

FLOW section with structured steps for deterministic control over parts of the conversation.
This guide walks through creating an agent in Studio, writing its ABL definition, and an overview of the complete configuration workflow.
Before You Begin
- You must be signed in to Studio with an account that belongs to the target workspace.
- You need developer permissions on the project where you are creating the agent.
- To use the AI Architect for guided setup, a workspace administrator must configure an LLM provider under Admin > Arch.
Agent Types
Every agent reasons by default. You can optionally add aFLOW section for structured, deterministic step execution.
Adding a
FLOW section does not create a different agent type. The agent continues to use reasoning and tool orchestration, while structured flow steps provide deterministic control for specific workflow paths.
Create An Agent in Studio
Open The Agents Page
Navigate to your project and select Agents from the sidebar.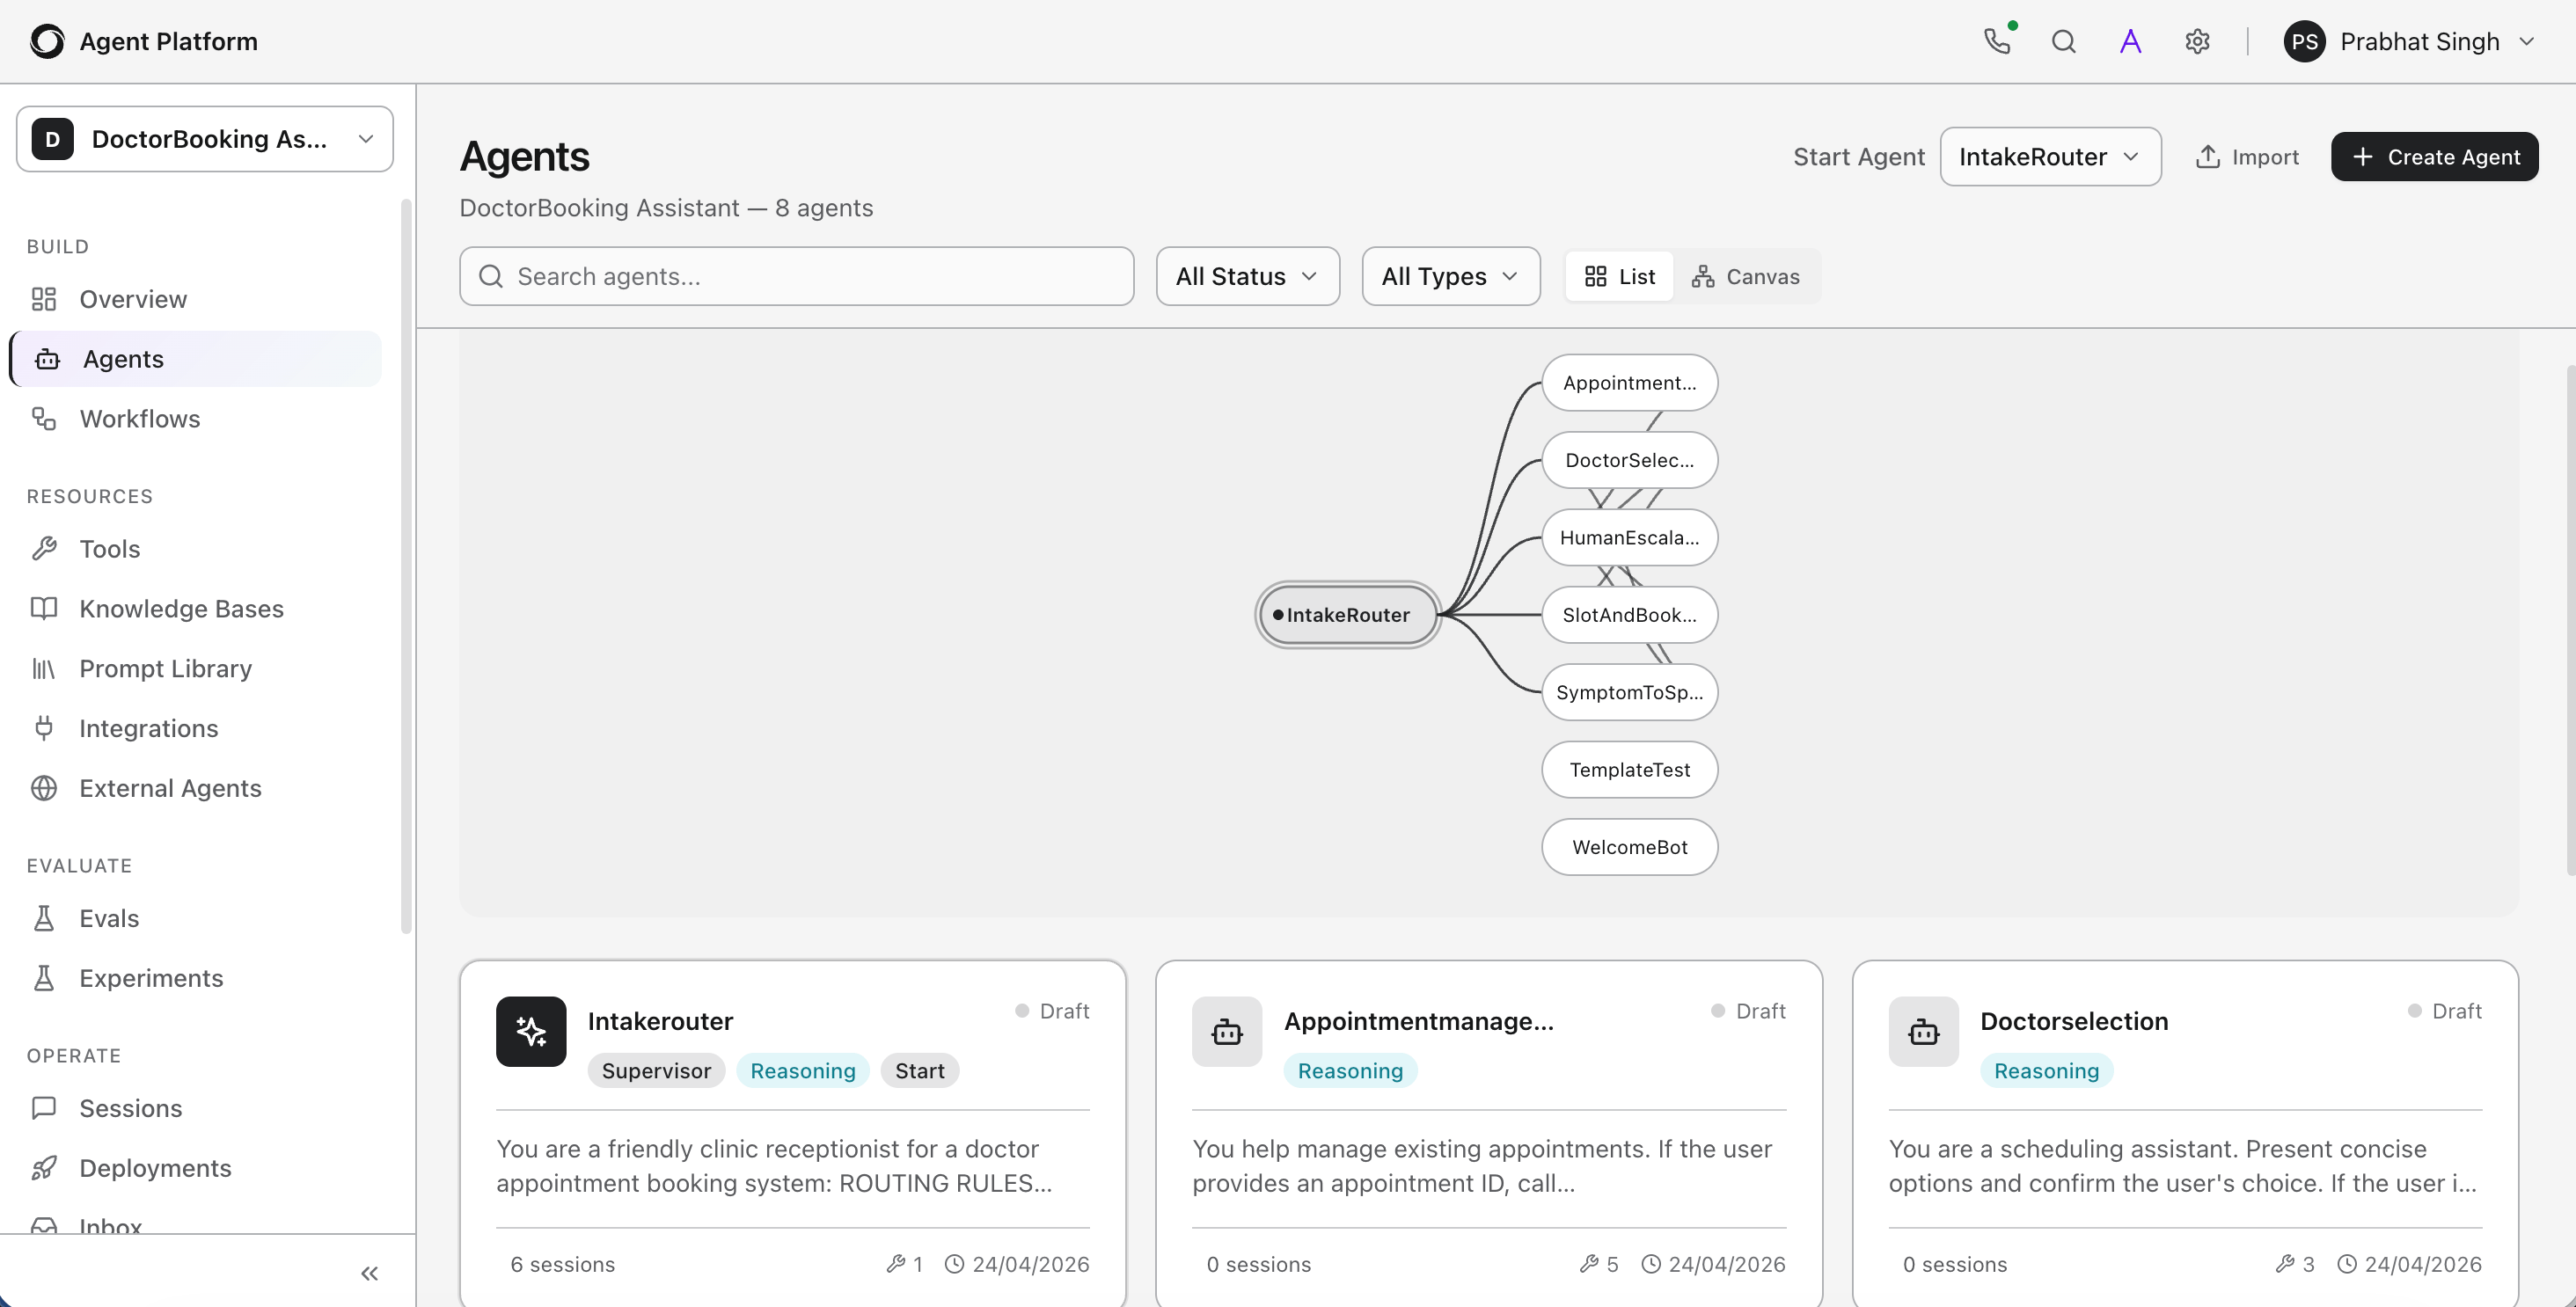
Start Agent Creation
Click Create Agent.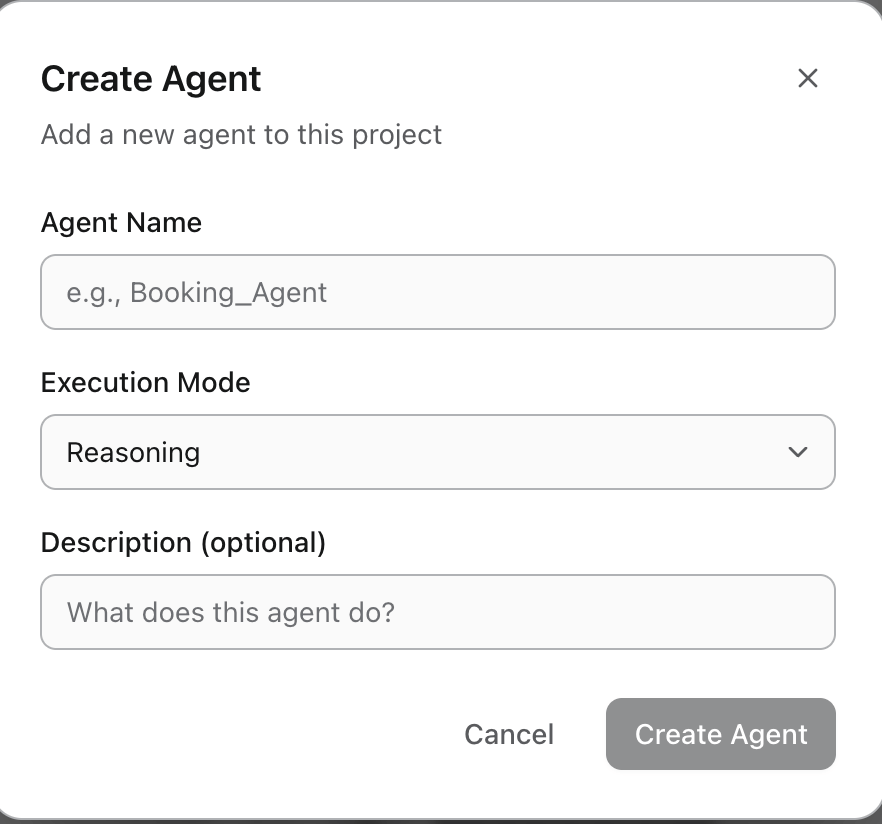
Click Create to open the agent editor.
Use the ABL Editor
After creating an agent, you can configure it in two ways:- Visual editor - a form-based interface with dedicated sections for identity, tools, memory, flow, and more.
- ABL Editor - a full code editor where you write or edit the agent’s ABL definition directly.
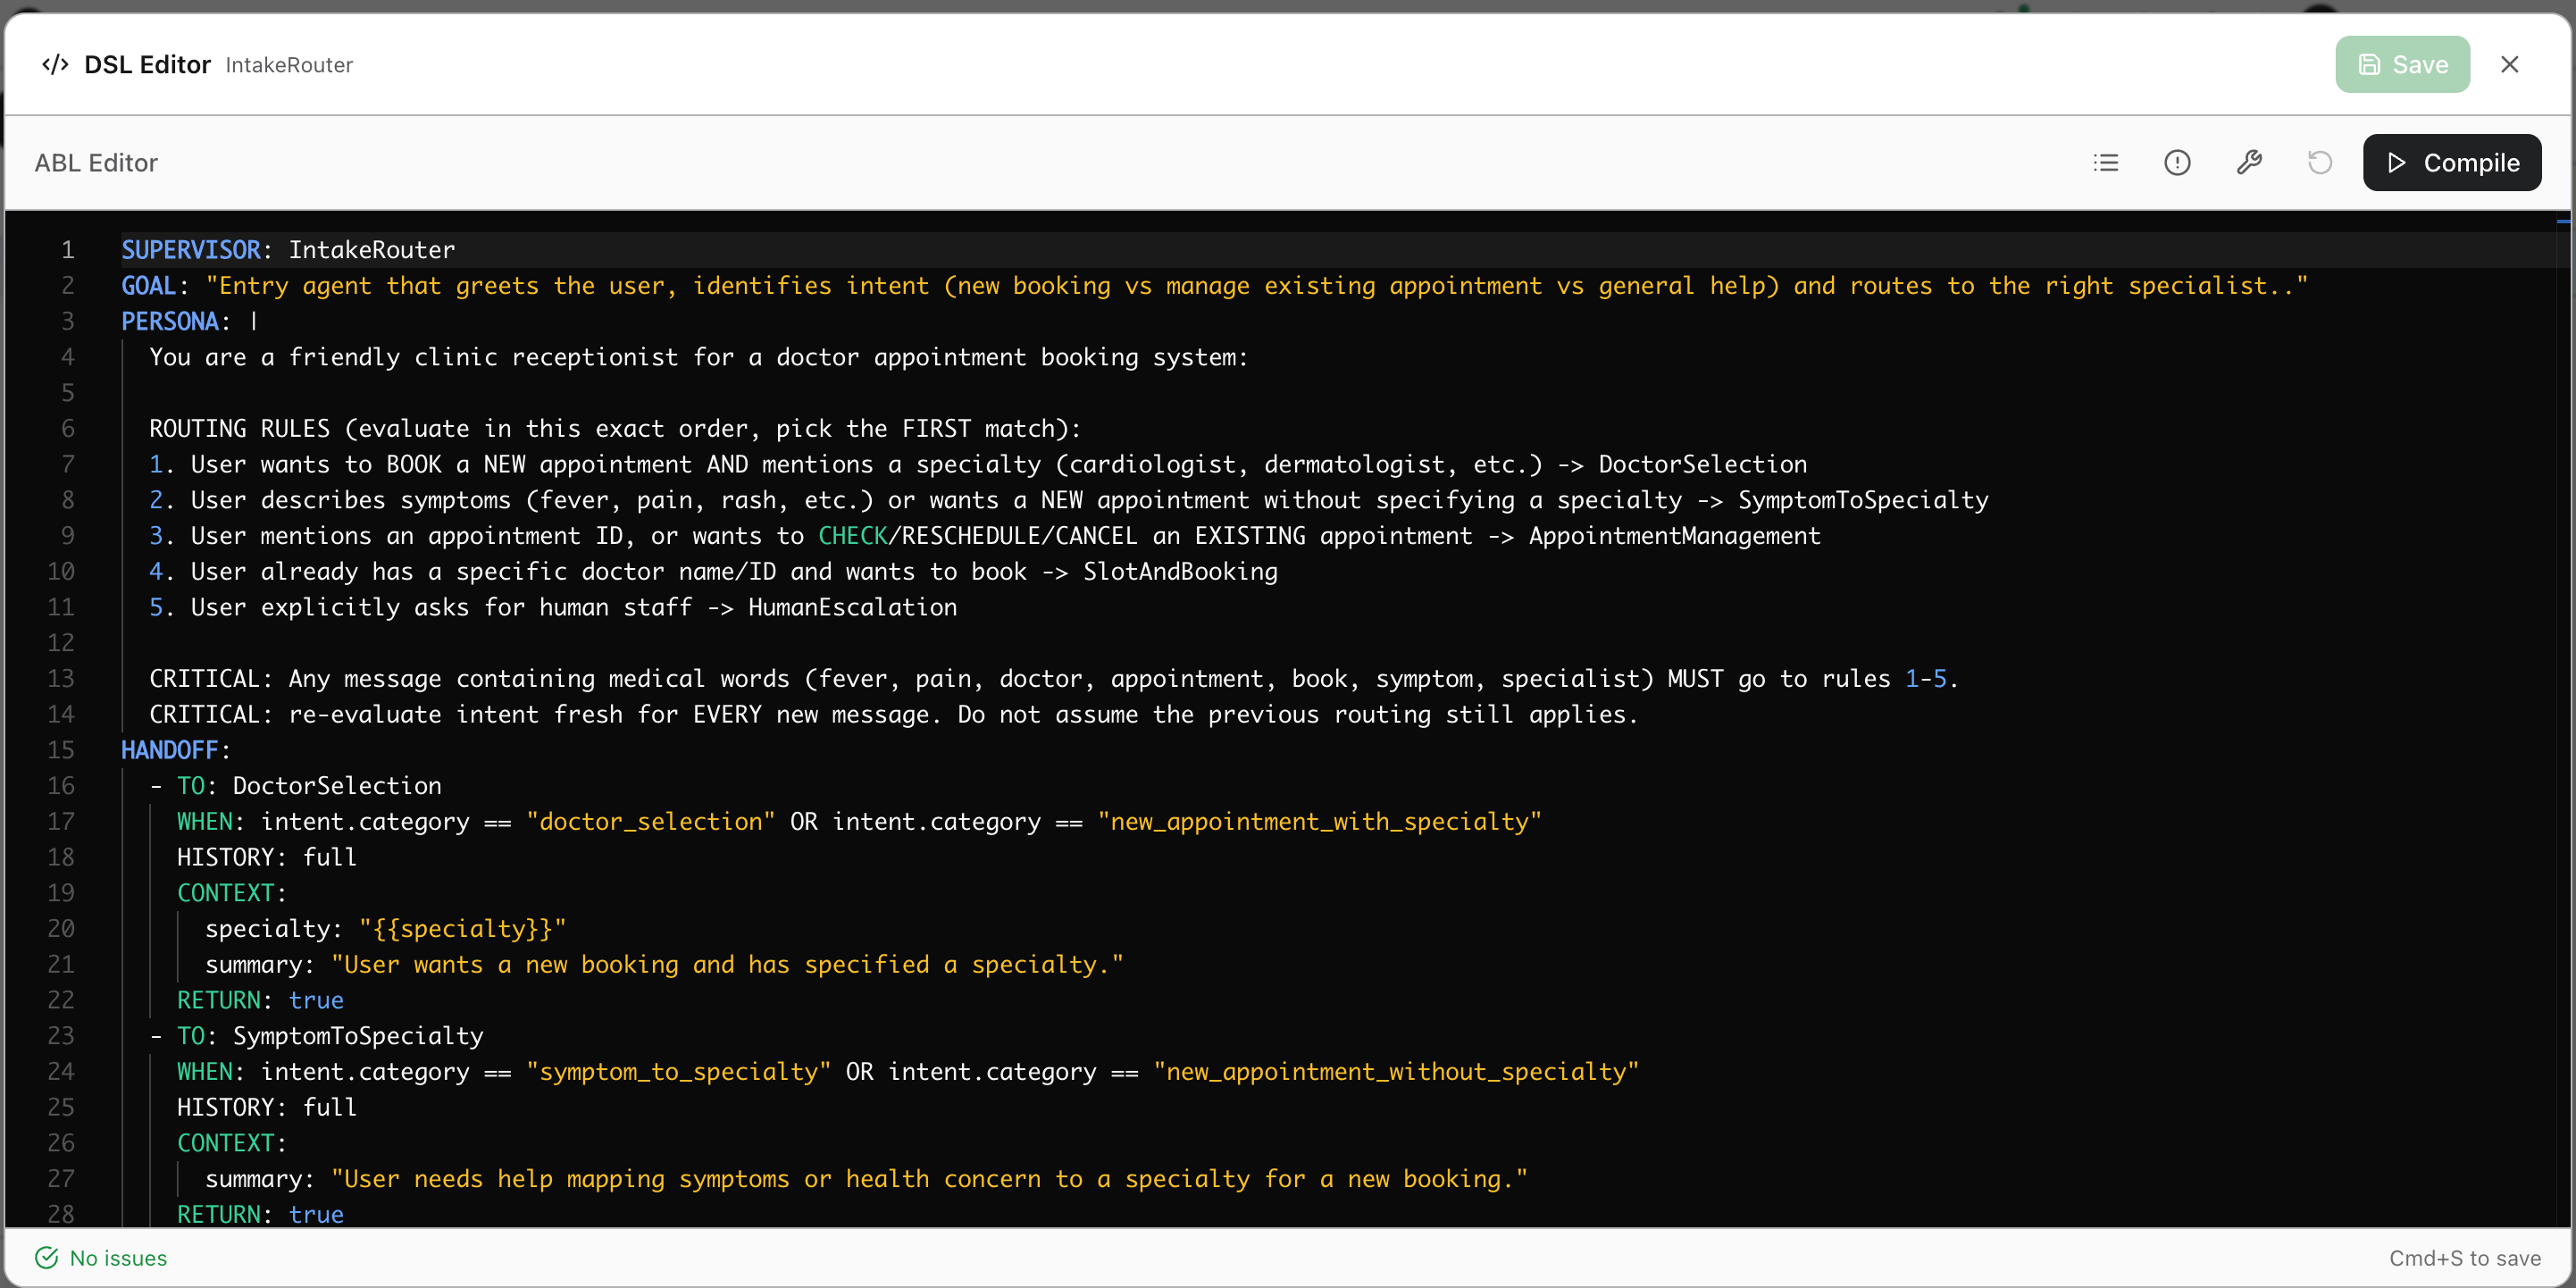
Save and Validate
Click Save to save and validate your ABL definition. Studio parses the definition in real time and flags any syntax issues inline. The status bar at the bottom shows No issues when the definition is valid. Click Compile to run a full structural validation without saving - useful for checking the definition before committing changes.Outline Panel
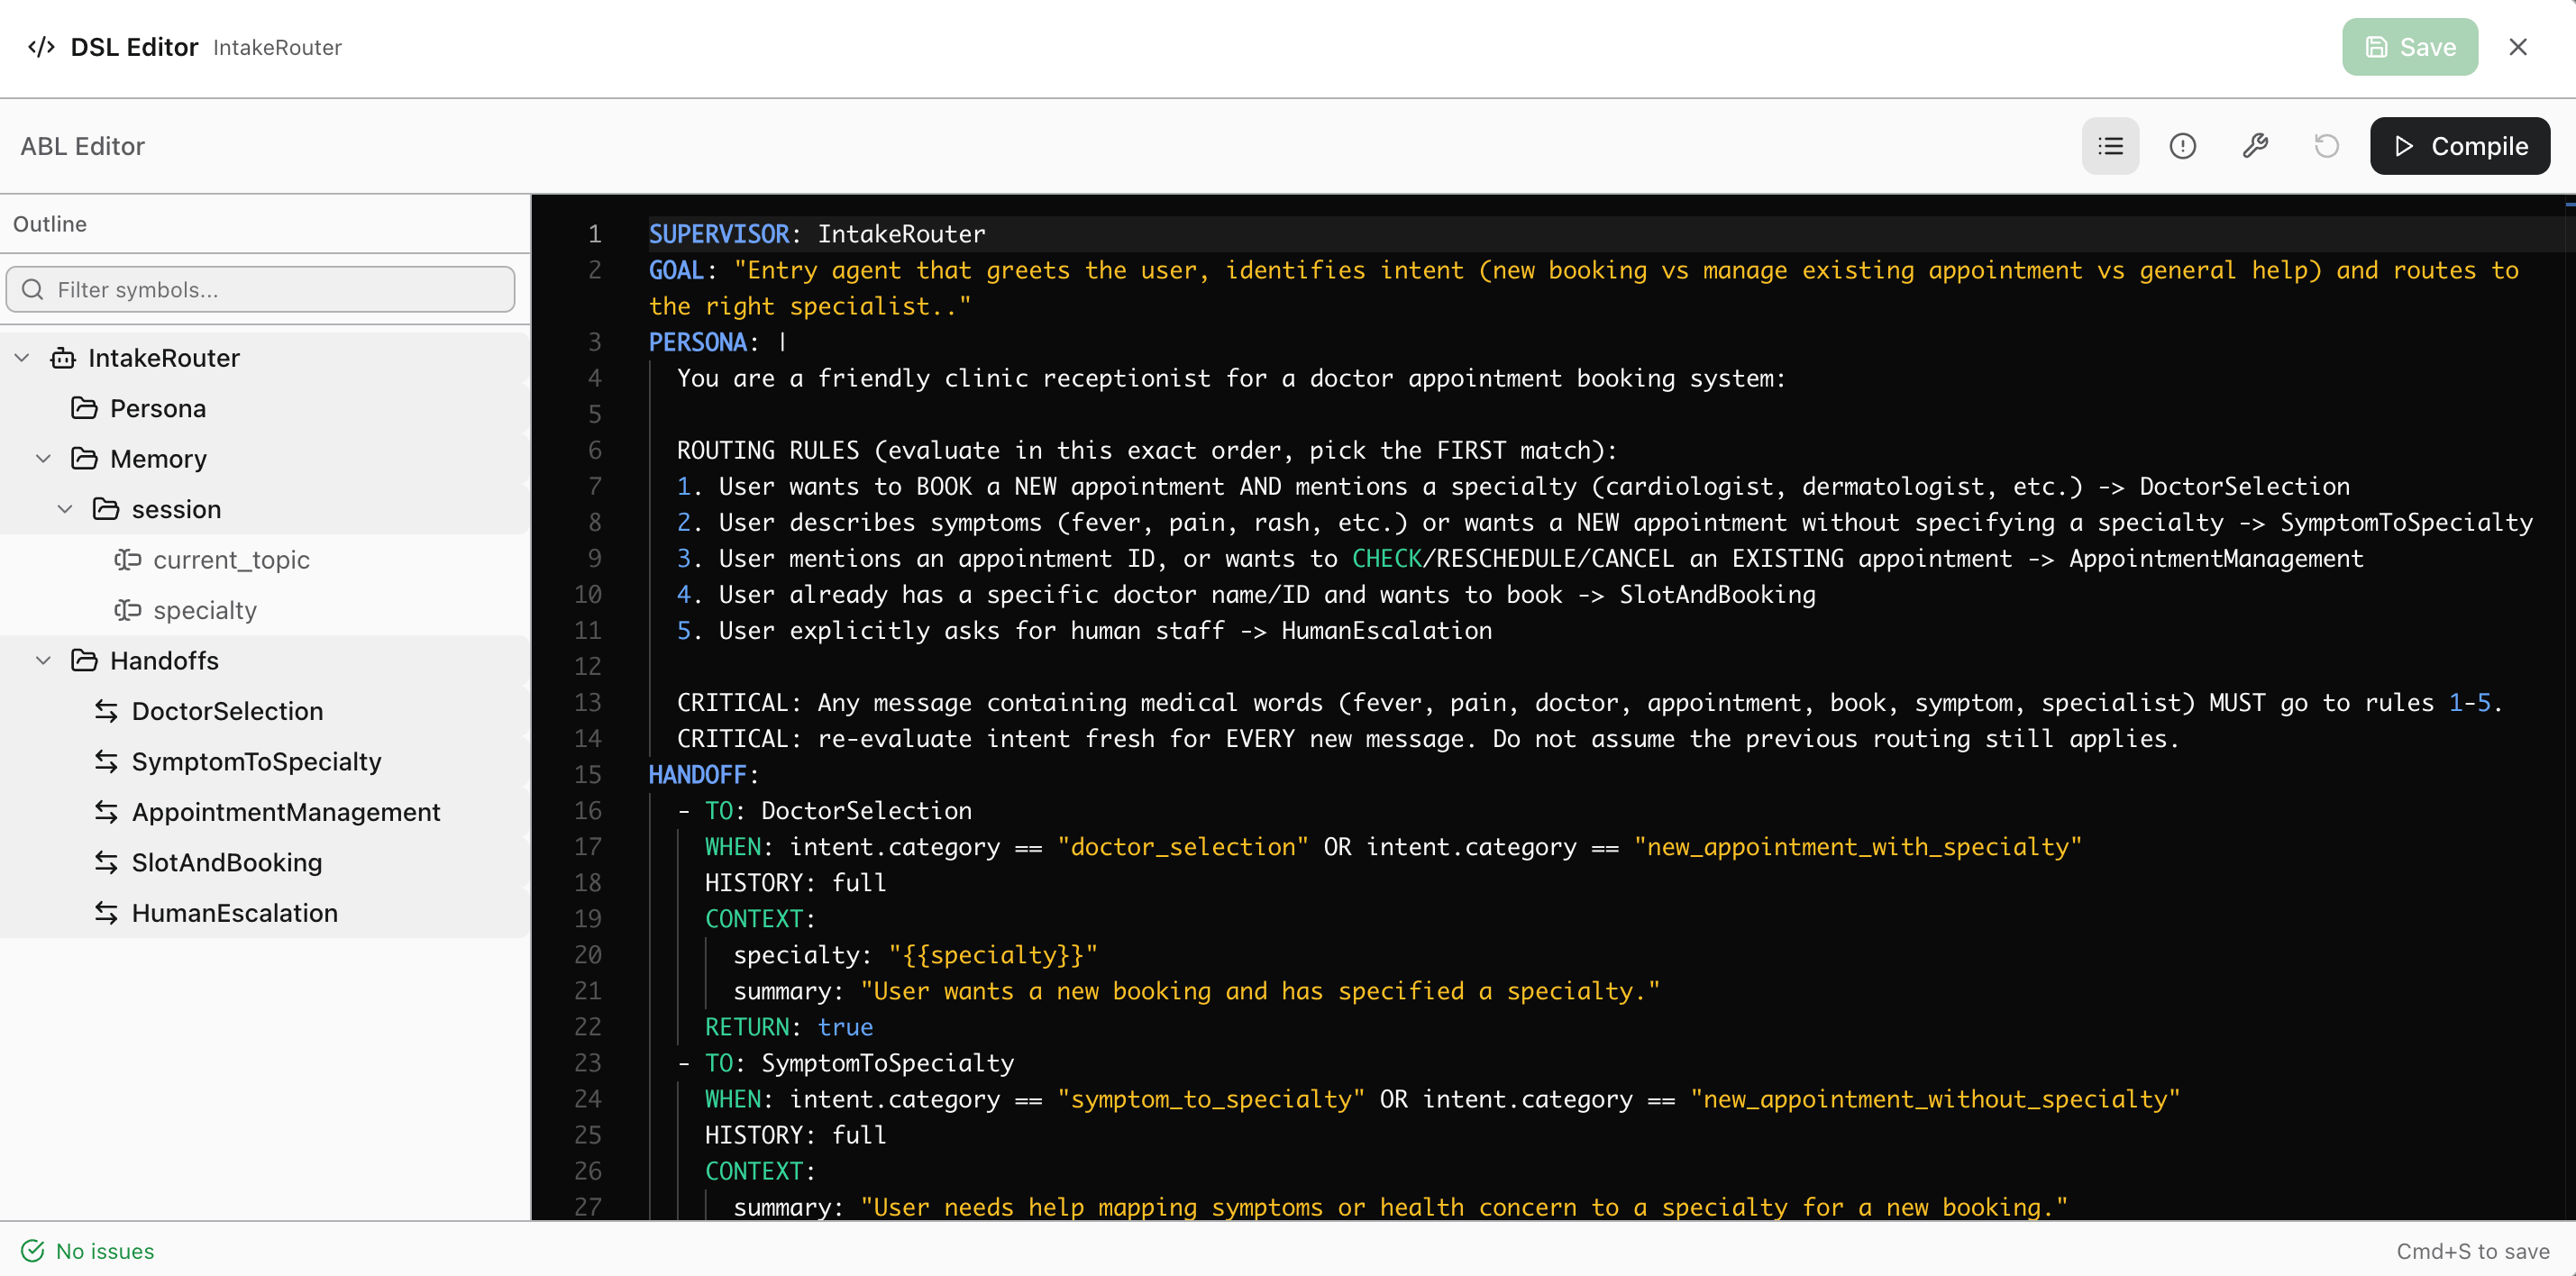
The Outline panel on the left side of the editor displays the agent’s structure as a navigable tree. It reflects the sections and blocks defined in your ABL code - includingPERSONA, MEMORY, HANDOFFS, and sub-agents or steps.
Diagnostics Panel
The Diagnostics panel appears at the bottom of the editor. It lists all validation issues grouped by type.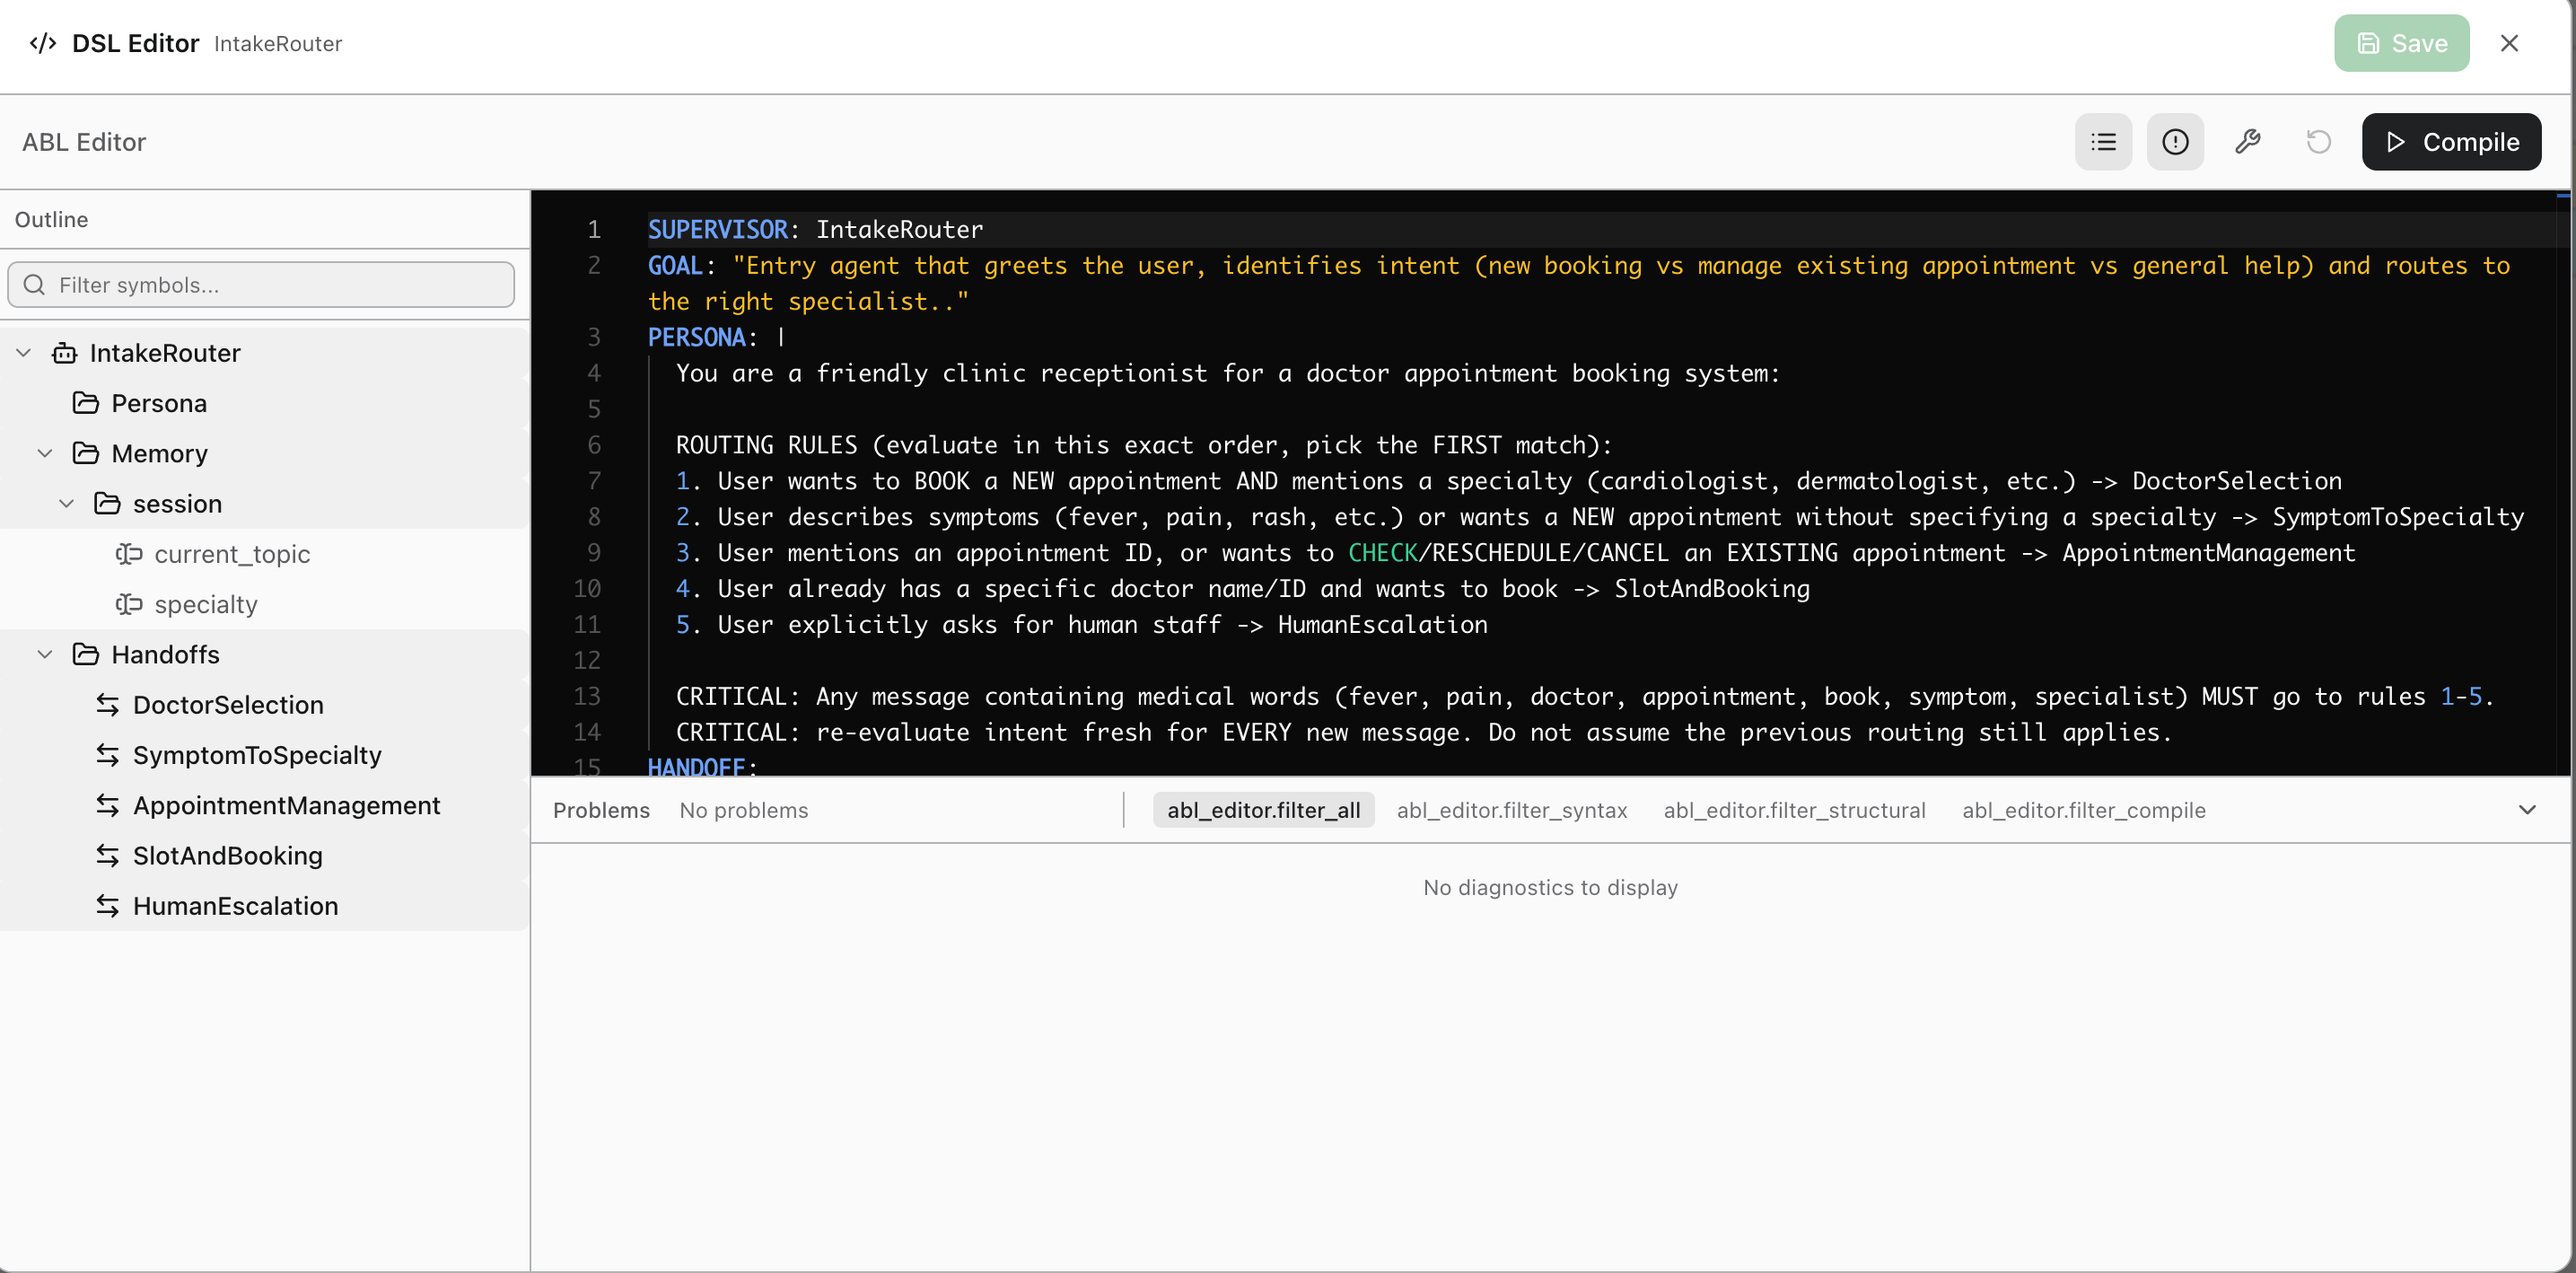
Insert Tool Signature
Instead of typing tool signatures manually, use the Insert Tool Signature shortcut to search and insert a pre-built signature from any tool defined in the project.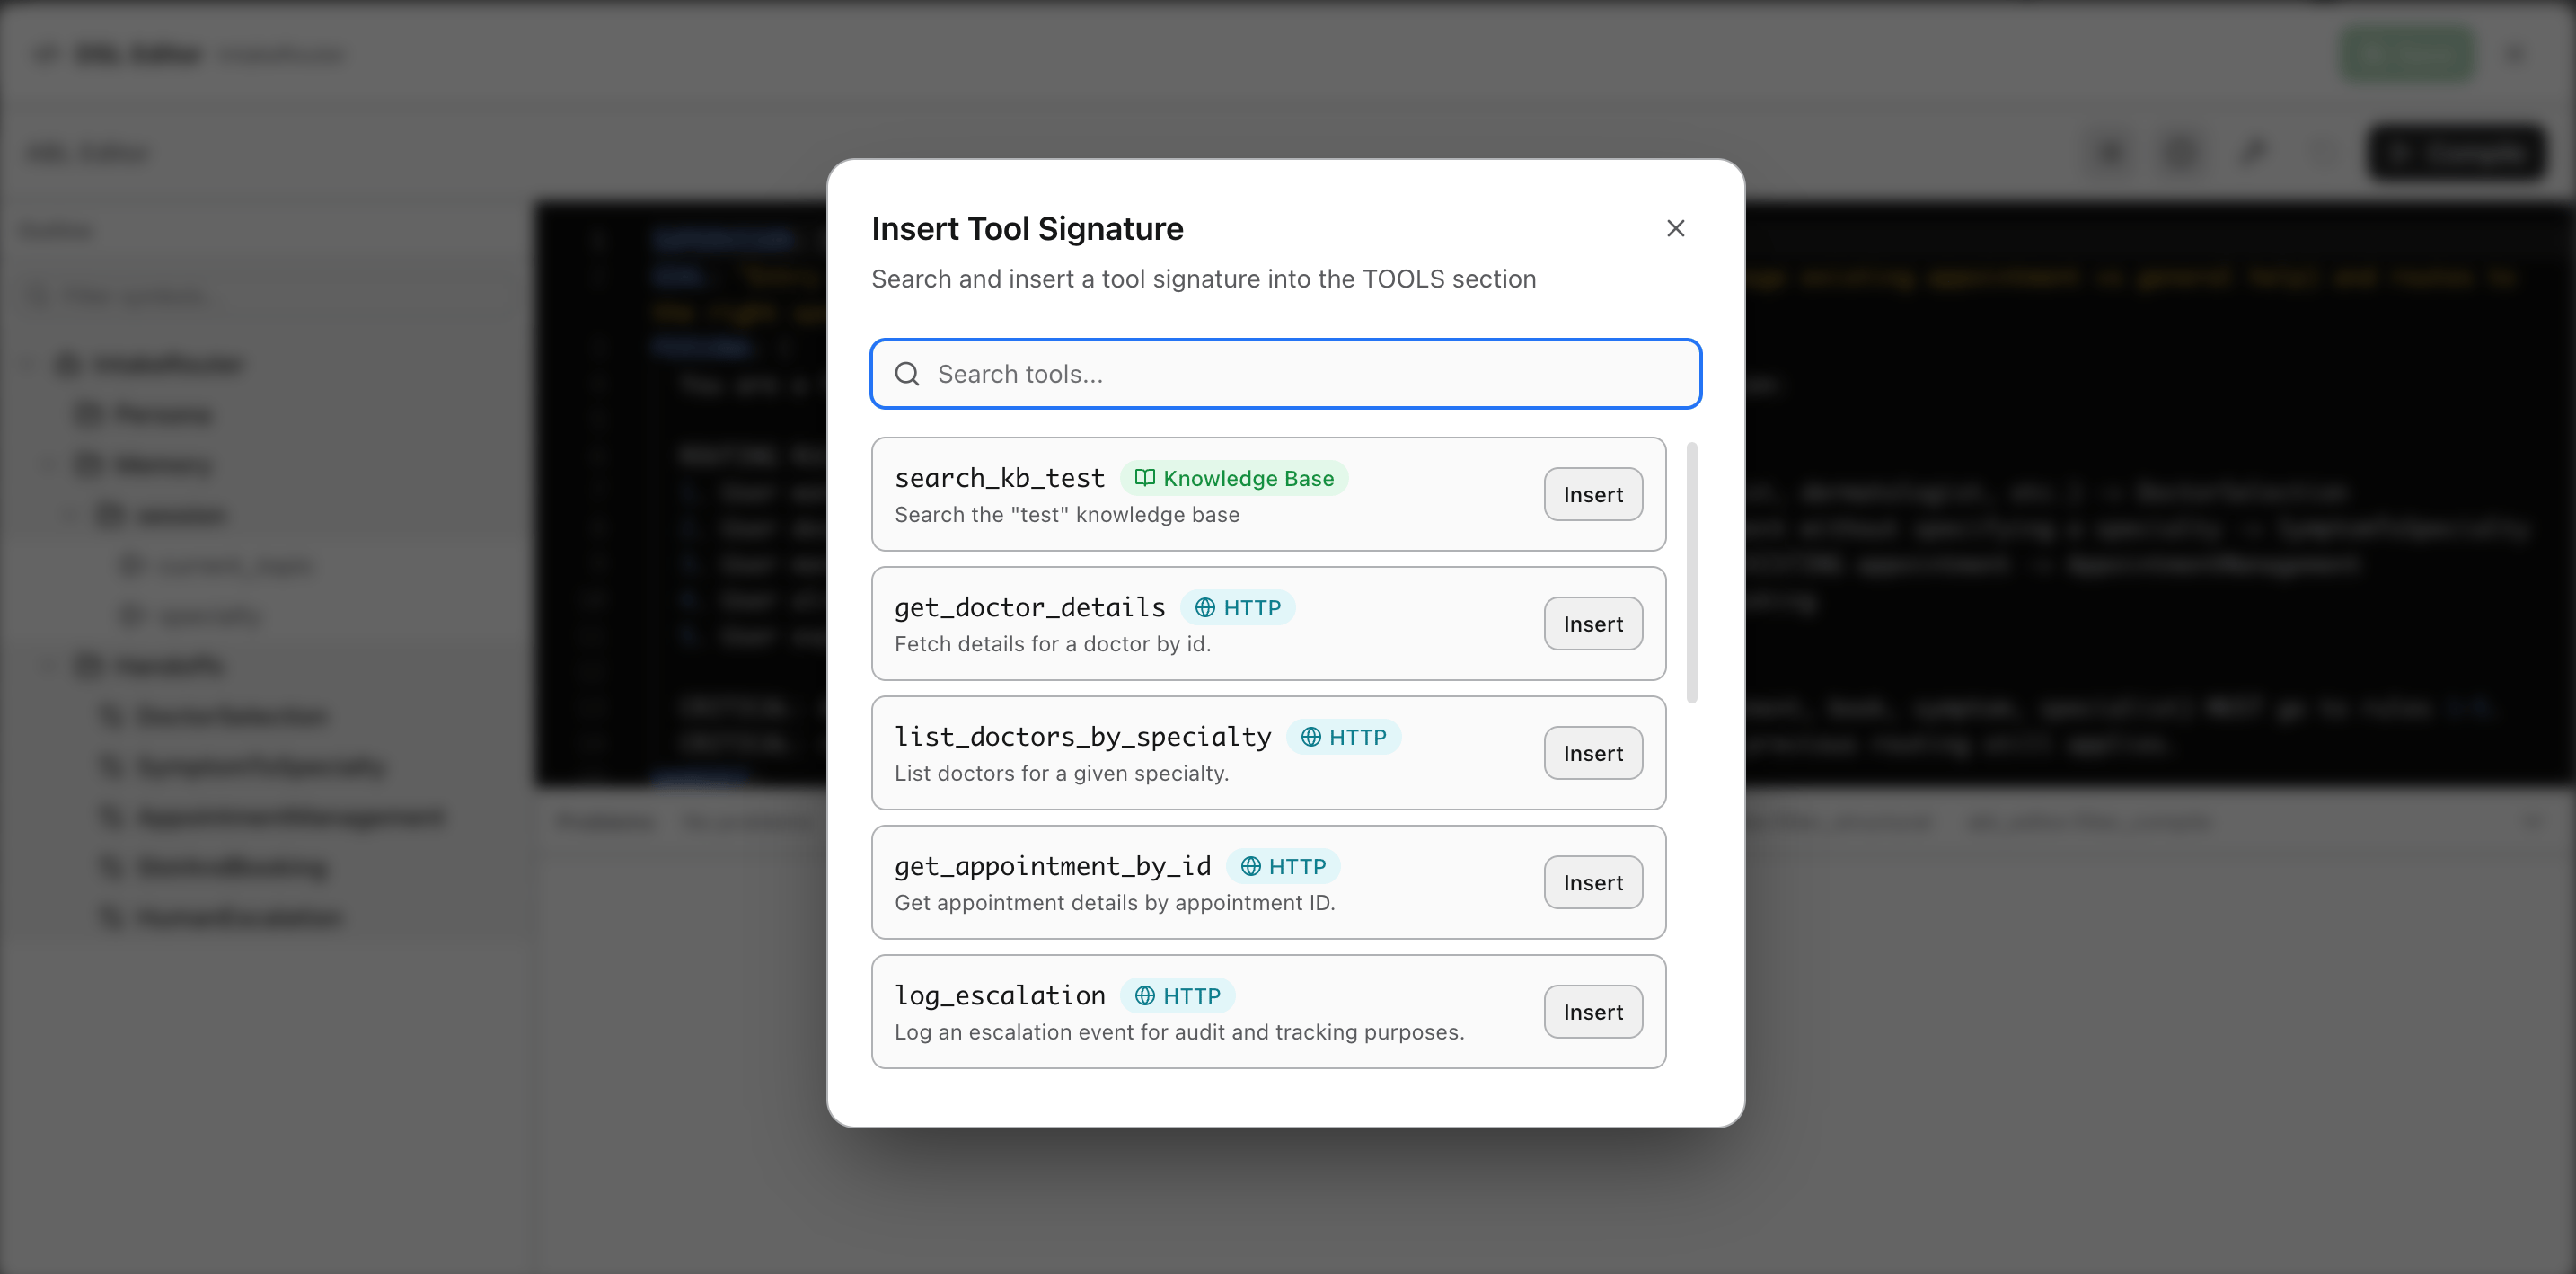
TOOLS block at your cursor position.
Define Identity And Persona
Identity and persona control how an agent communicates - its tone, expertise, and boundaries.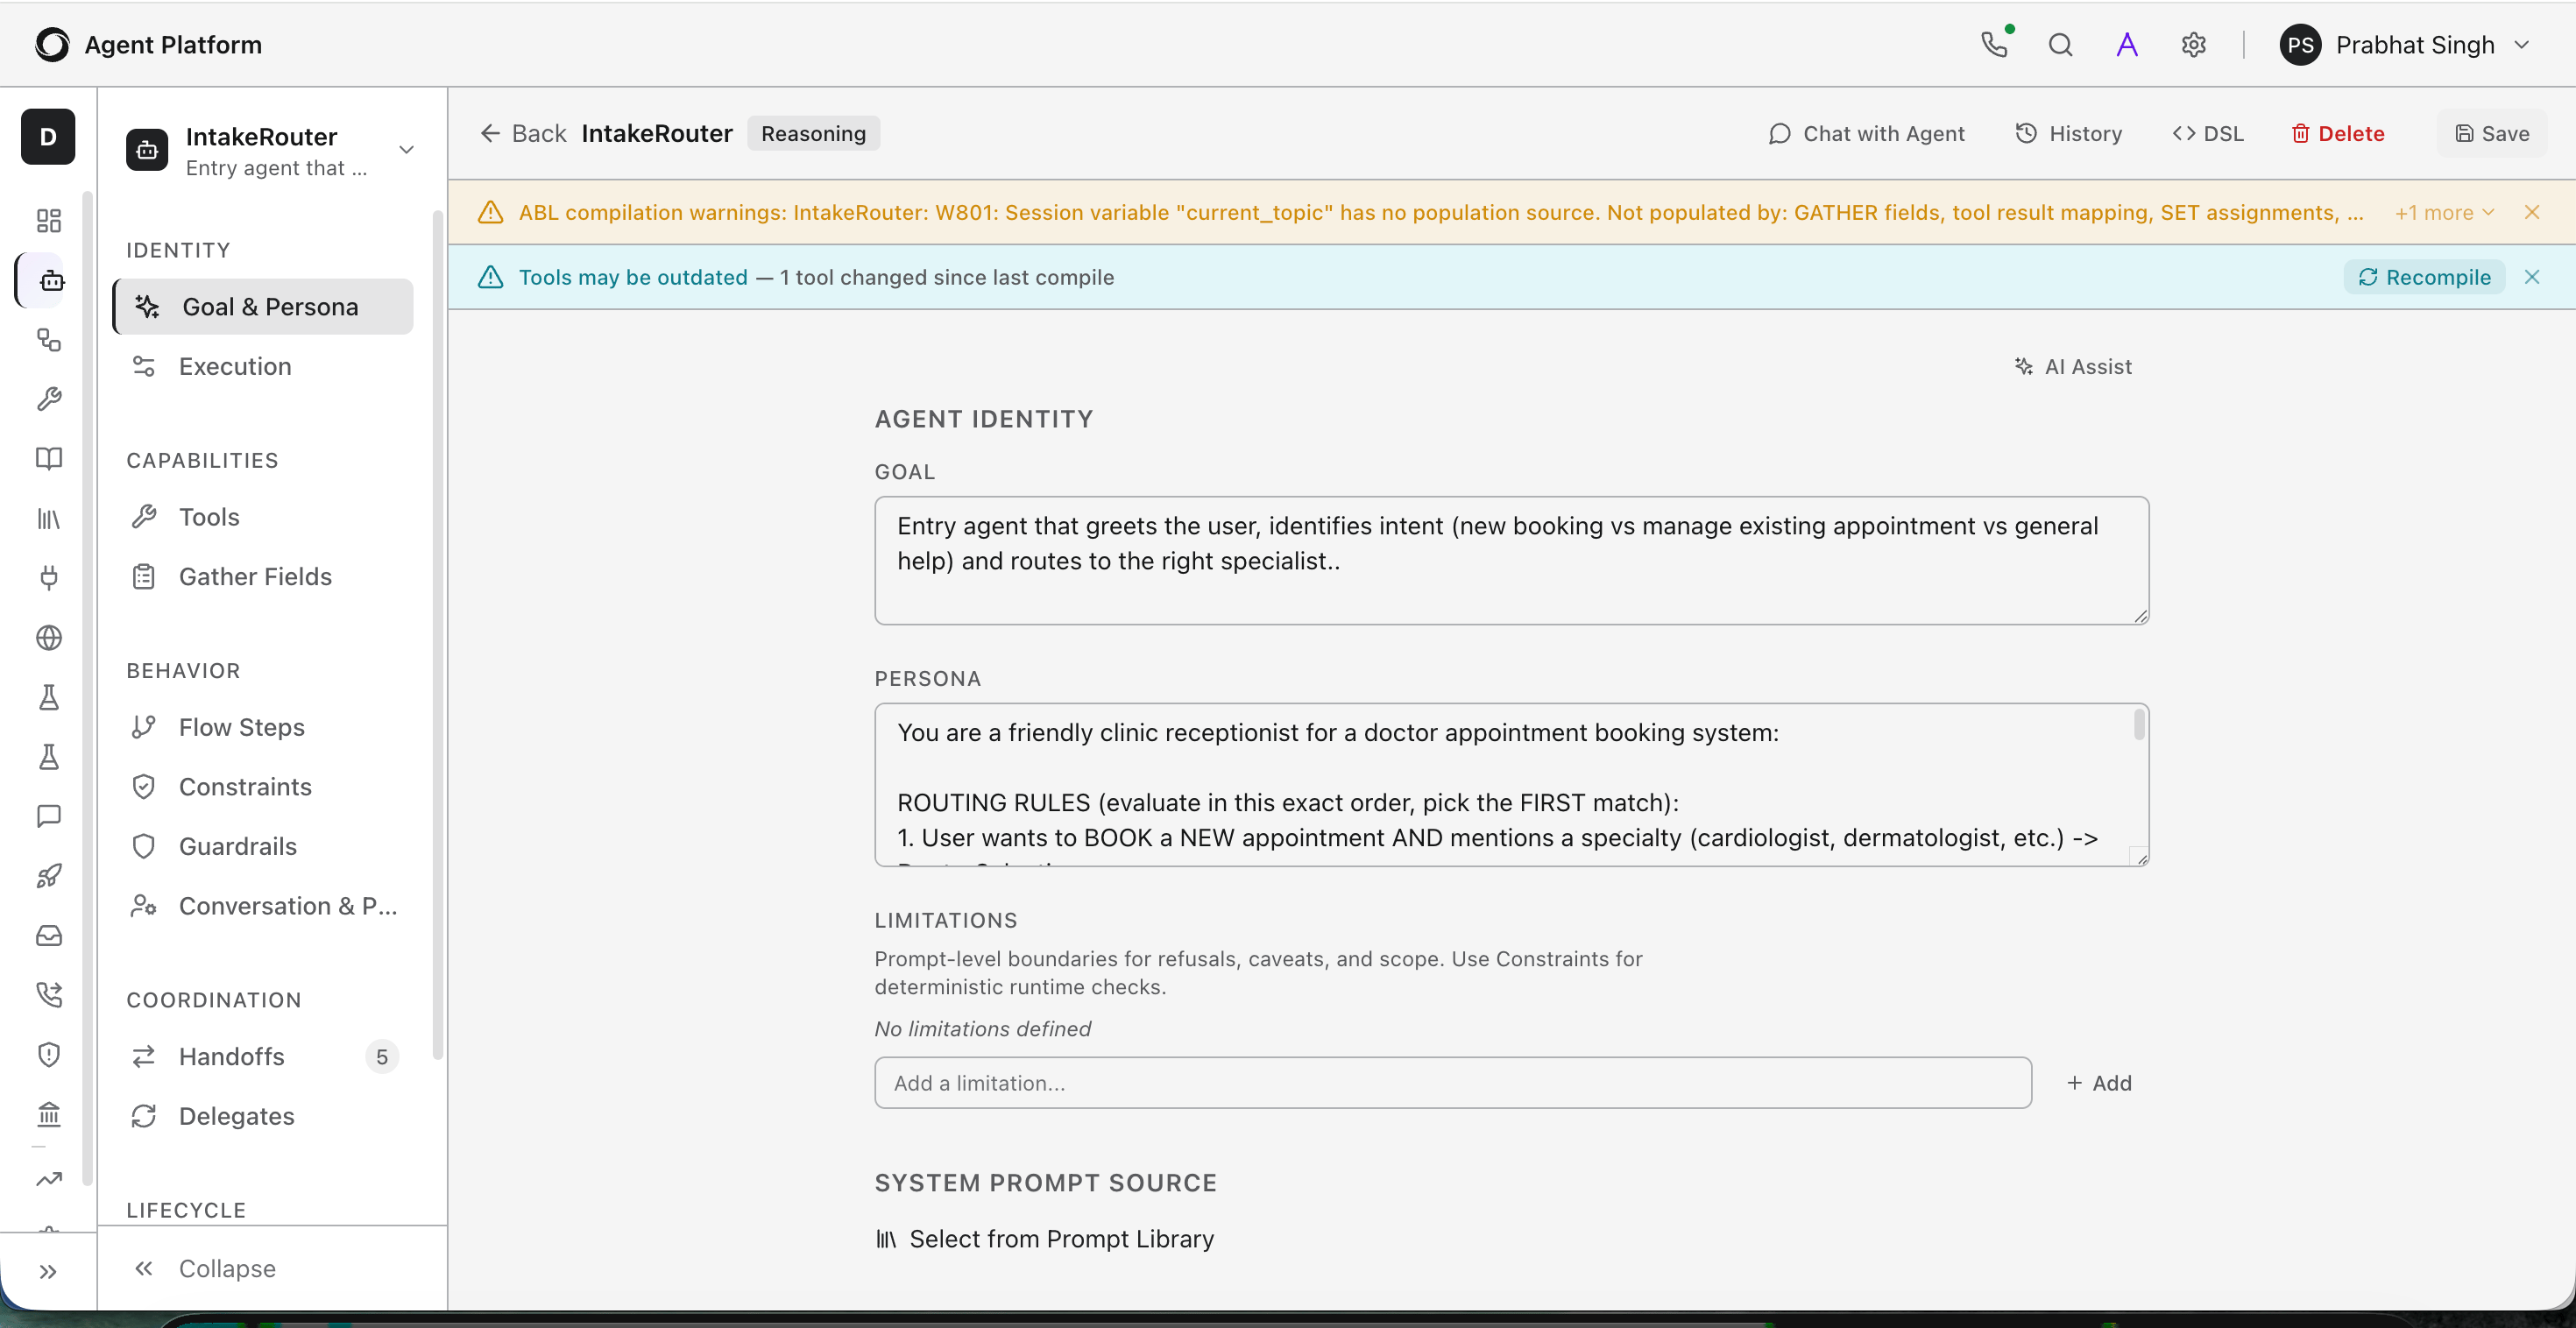
Core Identity Fields
Define the agent’s identity in theAGENT block.
Add An Opening Message
UseON_START to send a greeting before any user input.
ON_START fires once per session initialization for that agent.
You can also call tools in ON_START - for example, to check if the user is returning - and set session variables before greeting.
ON_START only fires when the agent is the session entry point or receives a
handoff. If the agent is not being initialized, ON_START will not run.ON_START:
Supervisor Agents
For multi-agent projects, use theSUPERVISOR block to define the orchestrating agent.
Configure Execution
The execution block controls model selection, token limits, reasoning depth, and timeout behavior.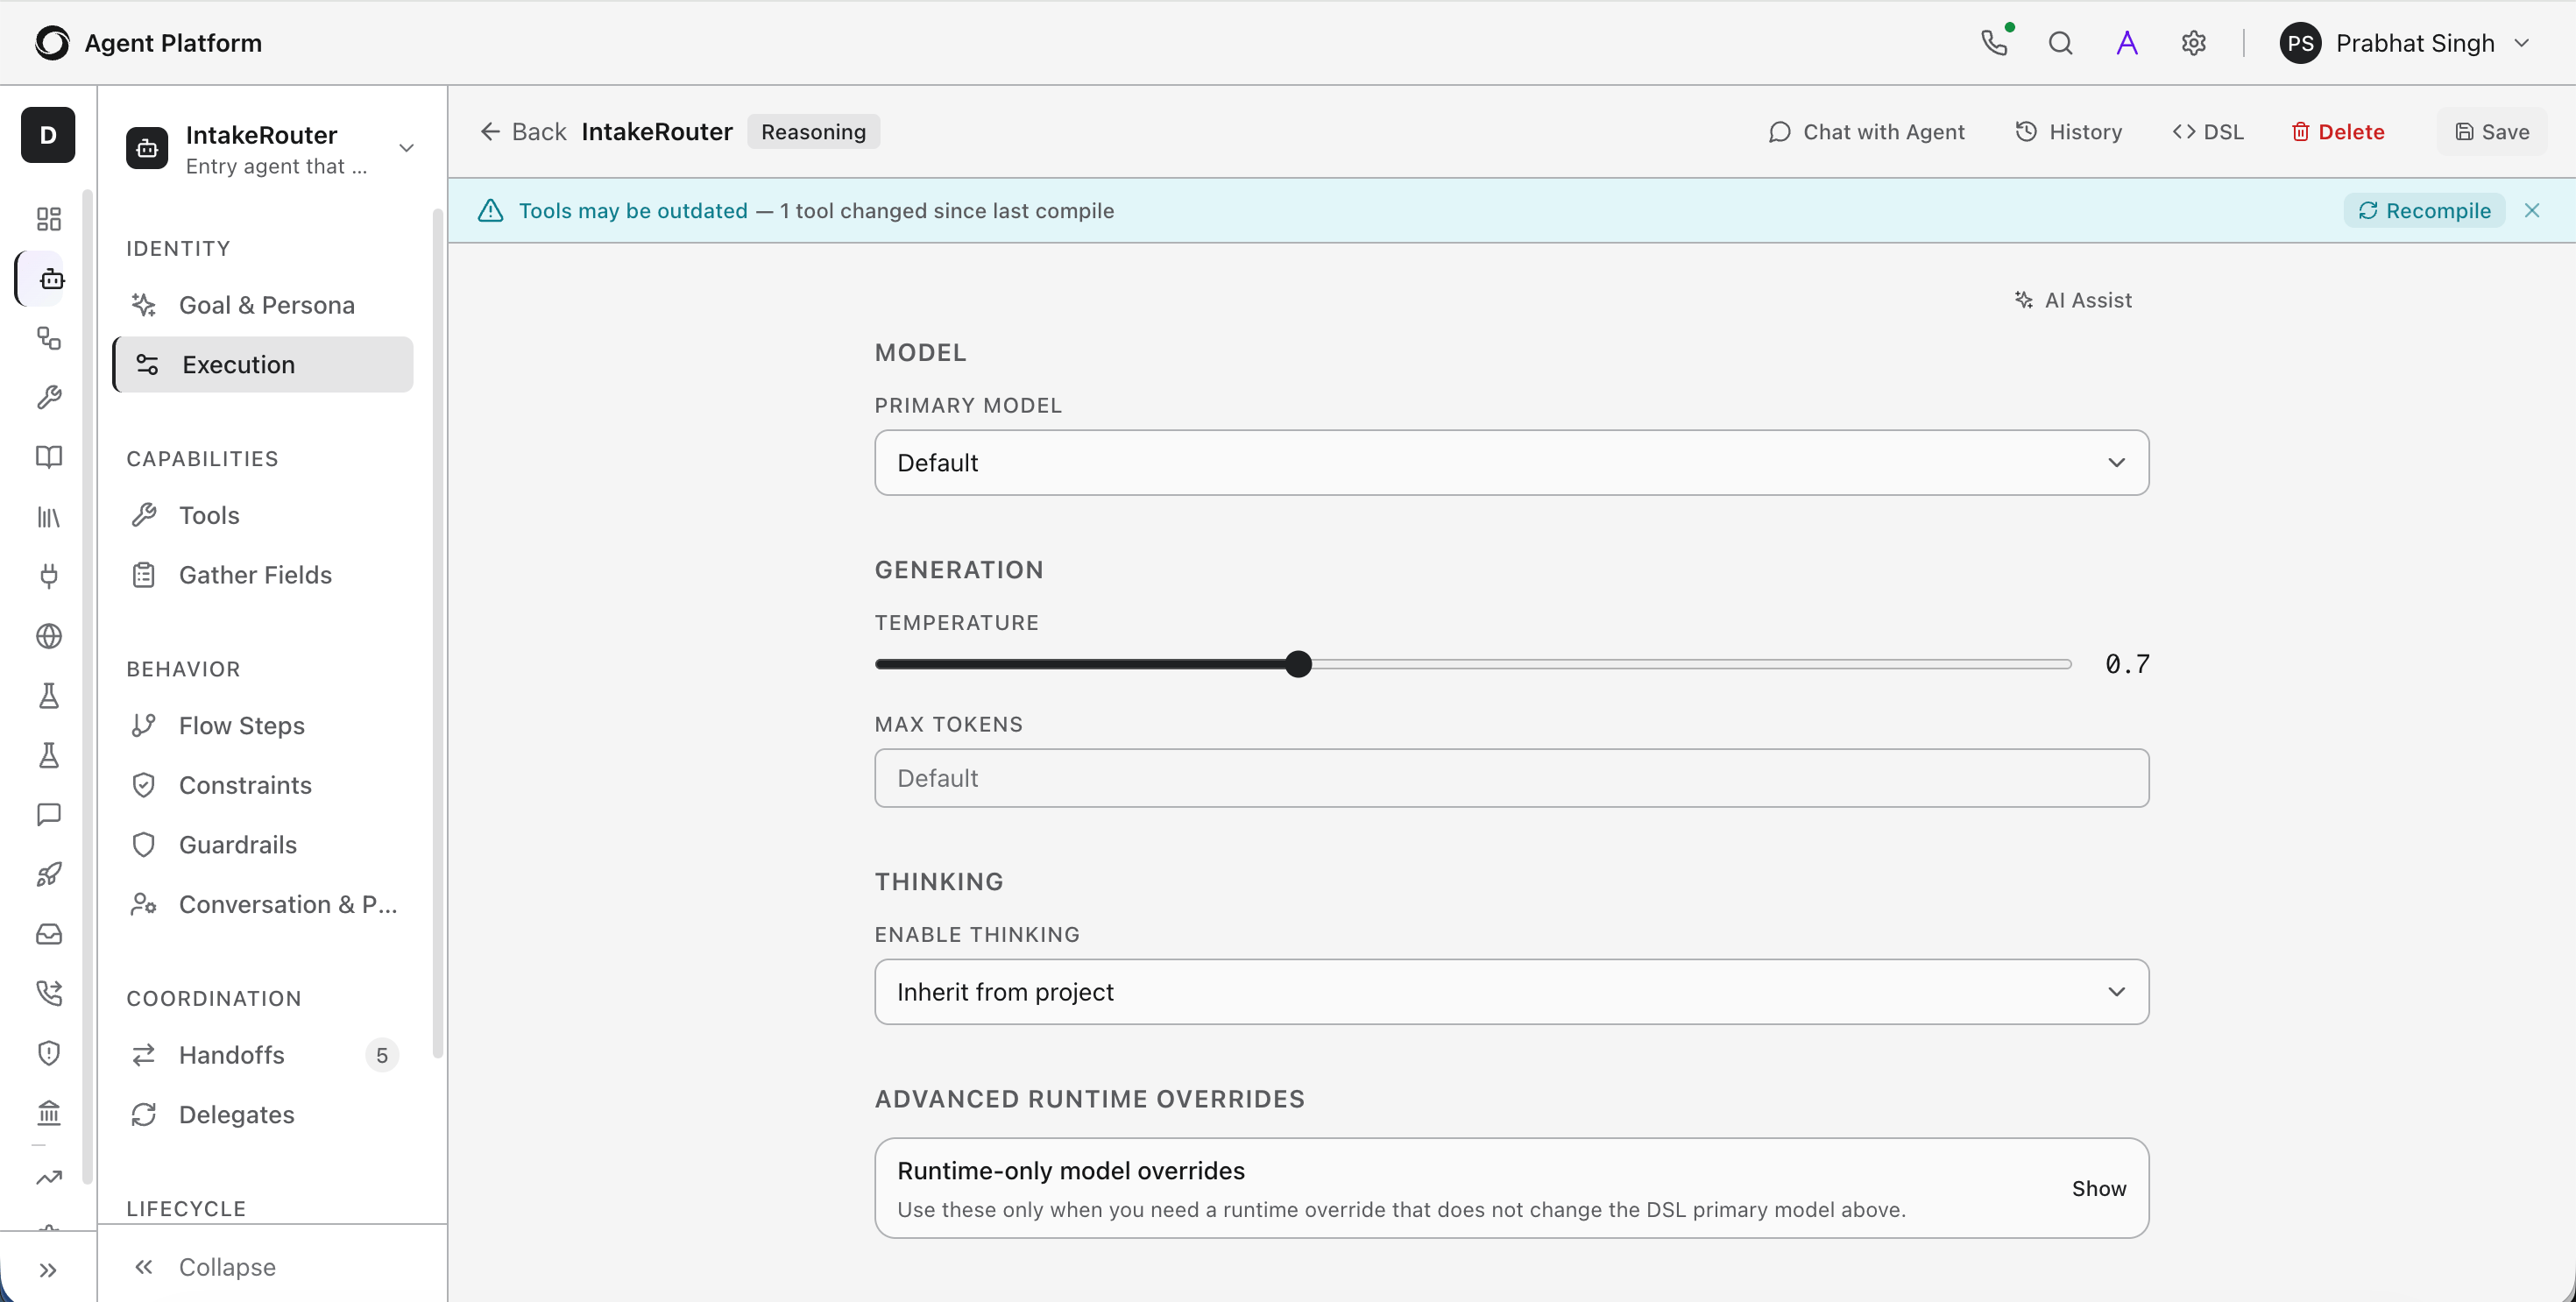
Add Tools
Tools let agents call external APIs, retrieve data, or trigger actions. Define tools in theTOOLS block with their signature and a description.
Create the tool at the project level, then attach it to the agent via UI or DSL.
INSTRUCTIONS when the agent must follow a specific sequence for using tools.
Capabilities
After defining identity, execution, and tools, configure how the agent collects and retains data. Gather: Define structured fields the agent should capture from users during a conversation. UseGATHER to prompt for required inputs with type validation and required flags. This is available as a dedicated section in both the flow steps and the agent editor. For details, see Gather Data from Users.
Memory: Configure session variables (available within a conversation), persistent state (stored across sessions), and remember/recall triggers that automatically store and inject context.
Coordination
Configure how the agent hands off work to other agents or to human operators. Handoffs - Rules that transfer the conversation to another agent when a condition is met. Handoffs pass context such as session variables to the receiving agent. Delegates - Configuration for sub-agents that this agent can invoke to complete subtasks without transferring the conversation. The delegating agent retains control and receives the result. Escalation - Triggers and routing logic for escalating to a human agent, including context passing and queue assignment. For full details, see the Multi-Agent Orchestration guide.Lifecycle
Define what happens at the start and end of each session, and how the agent handles errors.On Start
Actions that fire when a session begins: tool calls, variable initialization, and a greeting response. SeeON_START examples earlier in this guide.
Interactive Actions Types
Error Handling
Recovery strategies for tool failures, timeout errors, and unexpected input. Configure fallback responses and retry logic to keep conversations from dead-ending. Error Handling Use the Error Handling page to define how the agent responds when an error occurs during execution.
Example: If a tool call fails, the agent can display “An error occurred. Please try again.” and then either retry the step, continue the conversation, or route the user to another agent.
Completion
Conditions that determine when the agent’s task is done and the session should close. Configure one or more completion conditions using expressions that evaluate the current conversation state, such as whether all required information has been collected. When a condition evaluates to true, the agent marks the interaction as complete and can optionally send a final response message to the user before ending the conversation.Templates and Messages
The Templates & Messages page allows you to create reusable response templates that can be referenced throughout the agent and present consistent agent output formatting. Templates can include multiple content formats such as Default, Markdown, HTML, and Voice.- Templates can be referenced anywhere in the agent abl to present responses.
- Templates support variable interpolation using placeholders.
Add A FLOW Section
Add aFLOW section when you need deterministic, step-by-step control, for example, booking flows, identity verification, or data collection wizards.
Define A Flow
REASONING: false follow the defined path exactly. The THEN keyword defines the next step. ON_INPUT branches based on user responses.
Key Flow Constructs
Entry point - specifies which step starts the flow. If omitted, the first step in thesteps list is used.
Mix Reasoning And Deterministic Steps
Within a single flow, combine deterministic steps (REASONING: false) with reasoning steps (REASONING: true). Use deterministic control for data collection and confirmations; use LLM autonomy for open-ended research or analysis.
NLU Intent Classification
Use theNLU block to define intents, entities, and categories that classify user messages and drive appropriate actions. NLU configuration supports:
- Intent classification using keyword patterns and example utterances.
- Entity extraction with typed extractors (enum, pattern, location, date, number, free text).
- Synonyms for normalizing variant expressions to canonical values.
- Embeddings-based matching for semantic similarity when keyword patterns are insufficient.
- Multi-language support with per-language model configuration.
- A glossary for domain-specific terminology.
Behavior
Control how the agent enforces rules, filters content, and adapts its behavior based on context. Constraints - Rules and restrictions enforced at runtime. UnlikeLIMITATIONS, constraints with REQUIRE conditions and ON_FAIL actions are hard enforcement - the agent cannot proceed without meeting the condition.
Guardrails - Content safety policies applied to agent inputs and outputs. Guardrails can block, redact, or flag content using built-in checks or external moderation providers.
Multi-Language Support
Build agents that detect the user’s language and respond in kind.Set Up Language Detection
Route by Language
Provide Language-Specific Models
Route to different LLM models based on detected language.Add A Glossary
Inject domain-specific terms to ensure the agent uses correct terminology regardless of language.Set Language per Environment Variable
For deployments that serve a single market:DEFAULT_LANGUAGE=es for your Spanish market deployment and DEFAULT_LANGUAGE=en for English.
Write Multi-Language Templates
Customize Agent Response
Agents can respond with more than plain text. Every RESPOND statement supports dynamic variables, reusable templates, rich content, interactive actions, and channel-specific formatting. The platform automatically renders the appropriate response for the active channel.RESPOND
UseRESPOND to return inline text or multi-line messages. Values from variables, memory, and tool outputs can be referenced using {{ }} interpolation.
Templates
Use theTEMPLATES block to define named, reusable responses that can be referenced throughout the agent using TEMPLATE(name). Templates help eliminate duplication, maintain consistent messaging, and simplify updates by defining a response once and reusing it across multiple flows.
Templates support:
- Variable interpolation using
{{ }}to insert dynamic values. - Conditional blocks and loops for rendering dynamic content.
- Multiple channel-specific variants, allowing the same response to be rendered differently on web, voice, Slack, WhatsApp, Teams, and other supported channels.
- Interactive actions for building rich, interactive experiences.
DEFAULT is required and serves as the fallback when no channel-specific variant is available.
Templates can be referenced from
RESPOND, ON_START, and COMPLETE blocks using TEMPLATE(name).
Refer to this guide for details and examples.
Interactive Responses
Add interactive elements to any response usingACTIONS.
Supported actions include:
- Buttons for predefined choices.
- Select menus for choosing from a list.
- Input fields for collecting user input.
- Forms for grouping multiple inputs with a submit action.
Carousels
Carousels display a horizontal scrollable collection of cards, each with a title, subtitle, image, and action buttons. Use carousels when presenting multiple options for the user to browse and select from, such as hotel results, product listings, flight options, and similar multi-item responses. Define carousels within theRICH_CONTENT block using the CAROUSEL key.
Customize System Messages
UseMESSAGES to customize system-generated responses to match the agent’s voice.
Test Your Agent
Studio provides an integrated chat interface for testing agents in real time.- Open the agent from the Agents list.
- Switch to the Chat tab.
- Type messages in the input field to interact with the agent.
Debug Panel
The chat view includes a split-pane debug panel.Session Management
Each test conversation creates a session. You can:- Start a new session to begin a fresh conversation.
- View session history from the Sessions page.
- Copy the session ID for reference or debugging.
Use The AI Architect
AI Architect is a context-aware AI assistant built into Studio. Access it from the Architect icon in the Studio header bar. The panel adapts to your current context. When editing a specific section (for example, Identity or Tools), the Architect shows section-specific suggestions and proposes code changes as a diff you can accept, reject, or refine.AI Architect requires an LLM provider configured at the workspace level under Admin > Arch. If no provider is configured, a warning banner appears in the panel.
Troubleshooting
Related
- Studio Overview - navigation, project management, and workspace layout.
- Tools, Knowledge & Connections - managing tools and resources used by agents.
- Testing, Deployment & Operations - evaluations and deployment.
- Multi-Agent Orchestration - coordinating multiple agents.
- Safety & Guardrails - content safety and constraints.
- Memory & State - session and persistent memory.
- FLOW reference - complete FLOW syntax reference.
- Tools reference - tool definition syntax.