

- Navigation: Settings > Team
- Required role: Owner or Admin
Workspace Structure
The Agent Platform organizes resources across three levels. You don’t need all three - start with a workspace, add projects as your work grows, and only set up an organization if you need to manage multiple workspaces together.
What the workspace controls:
- Who has access and what they can do (team membership and roles).
- Which AI models and providers are available (LLM policies, token budgets, rate limits).
- Which features are unlocked (based on your plan tier).
- Project members are drawn from workspace members and carry project-specific roles.
- Environment variables and secrets can be scoped per project and per environment (development, staging, production).
Roles and Permissions
The platform uses hierarchical role-based access control (RBAC). Each role inherits all permissions from the roles below it.Workspace Roles
Project Roles
How workspace and project roles interact:
- Workspace Owners and Admins have workspace-wide authority and can administer all projects without explicit project membership.
- Non-admin workspace members need explicit project membership for project-scoped access.
- When a workspace member creates a project, they automatically become that project’s Admin and can add other workspace members from Settings > Members.
Managing Members
Only workspace Owners and Admins can manage team membership.View Current Members
Go to Settings > Team > Members. The list shows name and email, workspace role, status (active, suspended, locked, or deactivated), and date joined.Invite a Member
- Click Invite member.
- Enter the invitee’s email address.
- Select a role: Admin, Operator, Member, or Viewer.
- Click Send invite.
If a member reports not receiving the invitation email, check the pending list and resend - you don’t need to revoke first.
Change a Member’s Role
- Find the member in the Members list.
- Click the role dropdown next to their name.
- Select the new role and confirm.
- You can’t assign a role higher than your own. An Admin can’t promote a member to Owner.
- Only the workspace Owner can promote a member to Admin.
- Only the workspace Owner can transfer ownership.
- You can’t demote yourself - ask another Owner or Admin to change your role.
Remove a Member
- Find the member in the Members list.
- Click the three-dot menu next to their row.
- Select Remove member and confirm.
- They lose access to all workspace resources immediately.
- Their project memberships within this workspace are removed.
- Resources they created (agents, knowledge bases) remain in the workspace.
- Active sessions they initiated continue running, but they can’t start new ones.
Removing a member doesn’t delete their Agent Platform account. They can still access other workspaces they belong to.
Transfer Workspace Ownership
Only the current workspace Owner can transfer ownership.- Go to Settings > Team > Members.
- Click the three-dot menu next to the target member.
- Select Transfer ownership and confirm by typing the workspace name.
Custom Roles
Workspace Owners and Admins can define custom roles with granular permissions beyond the built-in set. Custom roles are tenant-scoped and managed from Settings > Team > Custom Roles.Create a Custom Role
- Enter a role name and optional description.
- Select the required permissions.
- Click Create.
- Built-in roles are managed on the Members page.
- Custom project roles are governed through the Custom Project Roles flow.
Security and Compliance
Go to Team > Security & Compliance to manage authentication and access controls. The page has three tabs: MFA, SSO, and Audit Logs. Required role: Owner or Admin.Multi-factor Authentication (MFA)
MFA adds a verification step using a time-based one-time password (TOTP). Enable MFA for your account: Go to Team > Security & Compliance, click Enable MFA, complete the authenticator app setup, enter the verification code, and click Verify & Enable. Recovery codes are generated during MFA setup and let you access your account if you lose your authenticator app:- Each code can only be used once.
- Store them securely.
- Regenerating codes invalidates all previously issued codes.
- New members must configure MFA before accessing the workspace.
- Existing members must complete MFA setup within the grace period.
- Members who don’t complete setup are locked out until MFA is configured.
Single Sign-on (SSO)
SSO lets users authenticate using an external identity provider (IdP). Plan requirement: Enterprise plan only. Generated SSO URLs The platform automatically generates these endpoints; there is no action to create or edit them manually. Use the URLs when configuring your identity provider’s SAML/OIDC application settings. Auto-generated SSO URLs are created automatically and aren’t user-configurable. Only organization owners or admins can view and use these URLs to configure SSO. Admins can select Refresh to reload the current URL values, but this doesn’t regenerate or change them.
Supported protocols:
- SAML 2.0 - Supports Okta, Azure AD, and OneLogin.
- OpenID Connect (OIDC) - Supports Auth0 and Keycloak.
- Password-based login is disabled for verified domain users.
- Users outside the verified domain are unaffected.
- Workspace Owners retain password-based login as a fallback.
Audit Logs
Audit logs give you a tenant-scoped, filterable record of all significant workspace actions. Use them to investigate incidents, verify compliance, and review team activity.- Navigation: Settings > Team > Audit Logs
- Required role: Owner or Admin
- Export: Available on Professional and Enterprise plans
Summary Metrics
Event Categories
Log Table Columns
Retention
- Follows the workspace retention policy.
- Professional and Enterprise plans: at least 90 days.
- Contact support for extended retention.
Key Management
The Key Management Service (KMS) lets you control the encryption keys used to protect sensitive workspace data. Instead of relying on platform-managed keys, you can provide your own key material from a supported cloud provider.- Navigation: Settings > Team > Key Management
- Required role: Owner
- Plan requirement: Enterprise plan only
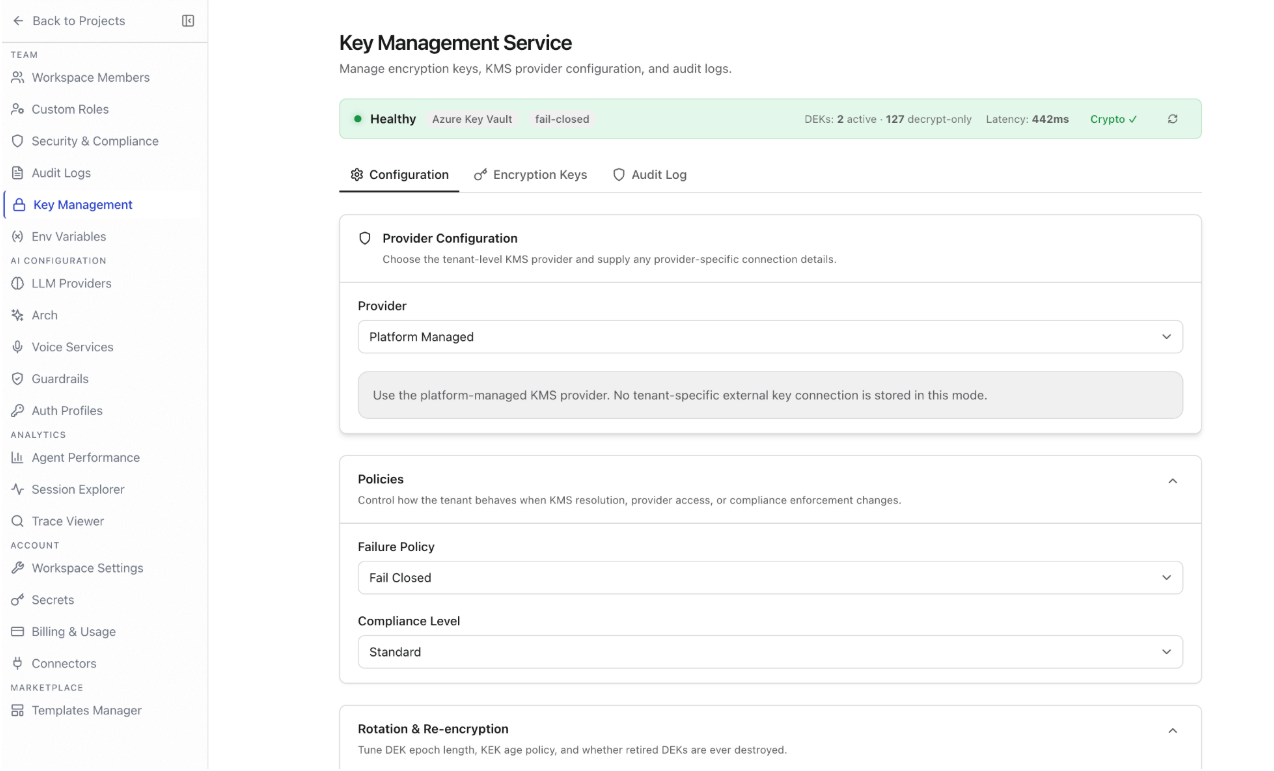
Encryption Architecture
The platform uses envelope encryption: a Key Encryption Key (KEK) from your provider wraps versioned Data Encryption Keys (DEKs).
The KMS page is organized into five tabs: Configuration, Scopes, Encryption Keys, Health, and Audit Log.
Configuration
The Configuration tab shows the active KMS setup and lets you manage provider and encryption policies. Supported KMS providers:
Failure policy:
Rotation and re-encryption settings:
Key rotation can happen automatically (if the provider supports scheduled rotation) or manually, by creating a new key version on demand from the Encryption Keys tab.
Re-encryption also includes Concurrency (parallel jobs), Batch Size (records per batch), and Max Retries (retry attempts for failed jobs). Click Save Configuration to apply.
Scopes
The Scopes tab lets you configure KMS overrides for specific environments and projects. Overrides follow this precedence:Platform default > Tenant default > Tenant environment > Project default > Project environment
The most specific override always takes precedence.
Use the Effective Scope Preview to inspect the resolved provider for a selected project or environment. It shows the full inheritance chain - each level marked as Active or overridden.
Use Save Override, Reset Form, or Clear Override to manage scoped overrides.
Encryption Keys
The Encryption Keys tab shows active and retired DEKs across scopes. DEK inventory summary:
Active DEKs can rotate; retired DEKs remain decrypt-capable as long as existing ciphertext still references them, which is why they appear as Decrypt-Only instead of being removed immediately.
Filter the inventory by status (Active, Decrypt-Only, or Destroyed), project, or environment. Use Rotate Keys to manually trigger DEK rotation for the current scope.
Don’t destroy a key version in your cloud provider until all data has been re-encrypted with the new version. Destroying active key versions may result in permanent data loss.
Health
The Health tab shows operational status and encryption metrics for the configured KMS provider. Click Refresh Health to reload. When provider connectivity fails:- Fail Closed - Encryption and decryption operations stop until recovery.
- Graceful Degradation - The platform continues operating using cached DEKs already in memory, without contacting the KEK provider.
KMS Audit Log
The Audit Log tab in Key Management shows tenant-scoped KMS activity: configuration changes, rotations, validations, and failures. Filter by operation type, result, or date range.KMS audit log retention follows the workspace data retention policy. Professional and Enterprise plans retain logs for at least 90 days.
Environment Variables
Environment variables are key-value pairs scoped to a project and environment. At runtime, agents resolve{{env.KEY}} placeholders in tool configs and parameters to the matching value.
- Navigation: Settings > Team > Env Variables
- Required role: Owner, Admin, or Operator
Variable Types
Environment Tabs
The page shows four tabs: Global, Dev, Staging, and Production. Each tab shows its variable count.Global variables are available in all environments. An environment-specific variable with the same key takes priority over the global variable.
Add a Variable
- Go to Settings > Team > Env Variables.
- Select the target project from the dropdown.
- Select the target environment tab.
- Click Add Variable.
- Enter a Key (use
UPPER_SNAKE_CASE), Value, and optional Description. - Check Mark as secret if the value is sensitive.
- Click Create.
Variables created on the Global tab are available in all environments unless overridden by an environment-specific variable with the same key.
Edit and Delete Variables
- Edit: Click Edit to update a variable’s value or description. Changes apply immediately.
- Delete: Click the delete icon and confirm.
Deleting a variable referenced in an agent definition causes runtime errors. Check all references before deleting.
Export Variables
- Select the environment tab.
- Click Export.
- Choose format: JSON (array) or .env (file format).
- Click Copy to Clipboard or Download.
Import Variables
- Select the environment tab.
- Click Import.
- Paste JSON in this format:
- Check Overwrite existing variables to replace matching keys.
- Click Import.