

Node Types
Start Node
The Start node is the mandatory entry point for every workflow. It is added automatically when you create a workflow. Every node in the flow must connect back to the Start node.Key Capabilities
- Input variables: Define the data the workflow accepts at runtime.
- Output variables: Specify variables to capture workflow results.
- Event triggers: Automatically run the workflow when a specific event occurs in a connected app (for example, a new Gmail message).
- Scheduled execution: Run the workflow at a fixed time or on a recurring schedule.
Add Event-Based Triggers
Prerequisites:- Set up an integration connection in Settings > Integrations.
- Create an authorization profile in Settings > Security & Control > Authorization Profiles.
- Click Add Trigger in the Start node panel.
- Select the integration app.
- Enable the trigger and select a connection.
- Choose the trigger event and configure its parameters.
- Save and test the workflow.
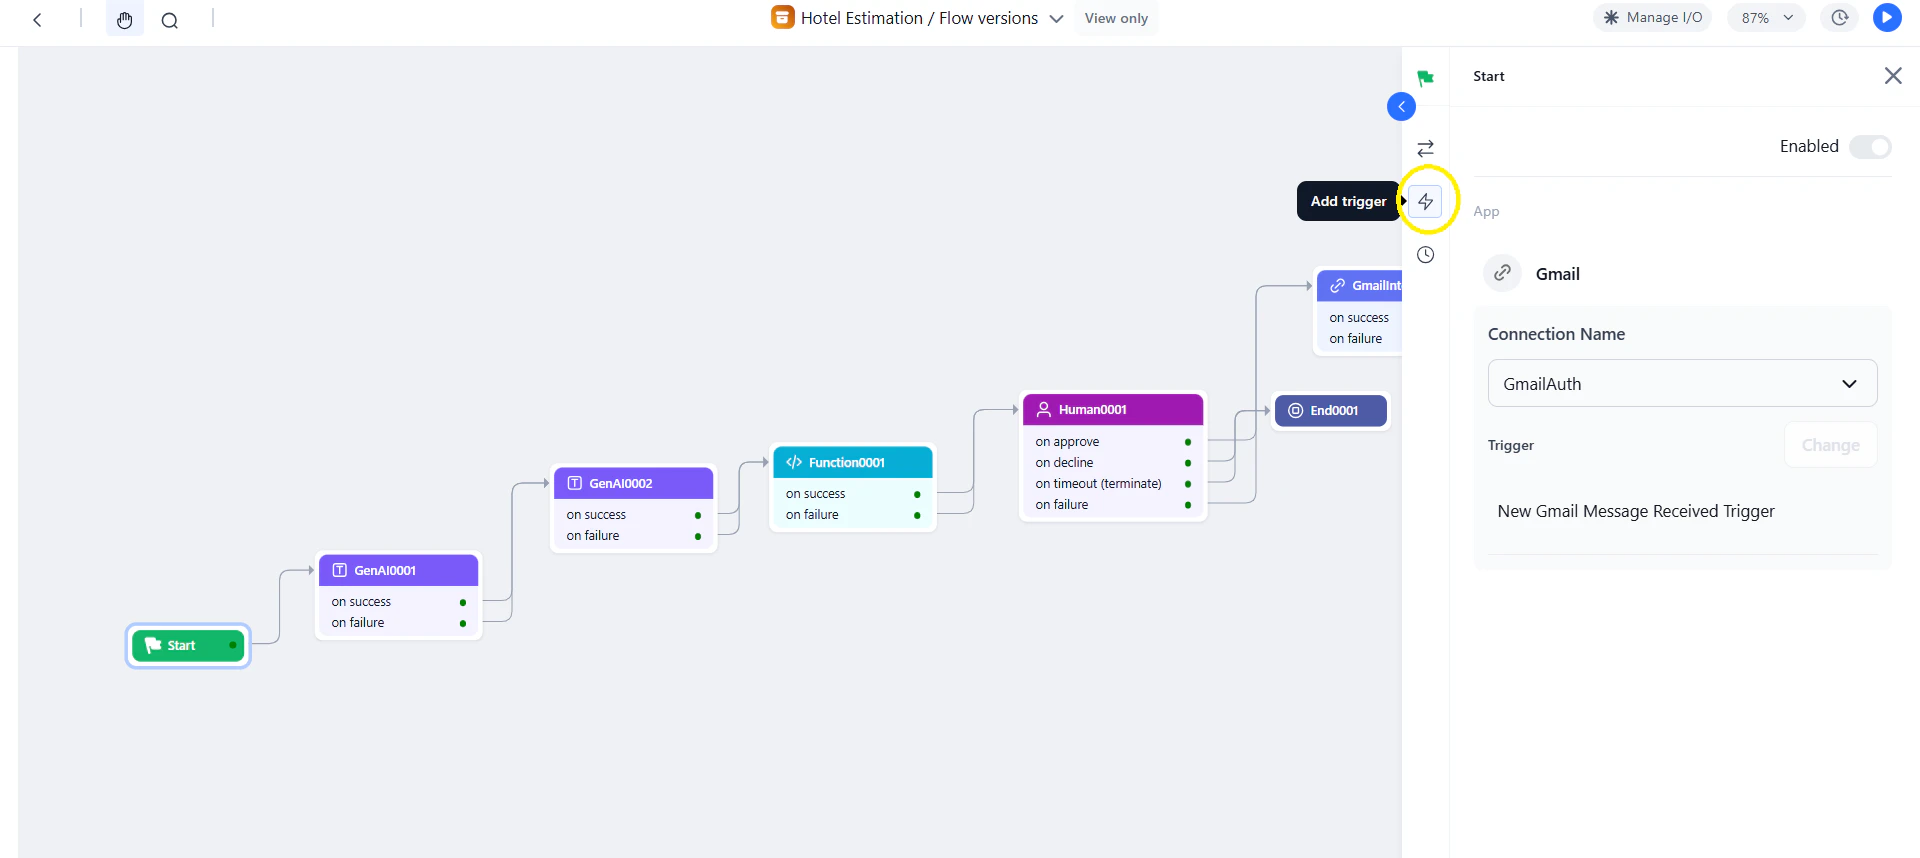
Trigger attachments are accessible via URL for 24 hours. Ensure the trigger is active before running the workflow.
Supported Third-Party Services for Triggers
Configure a Schedule
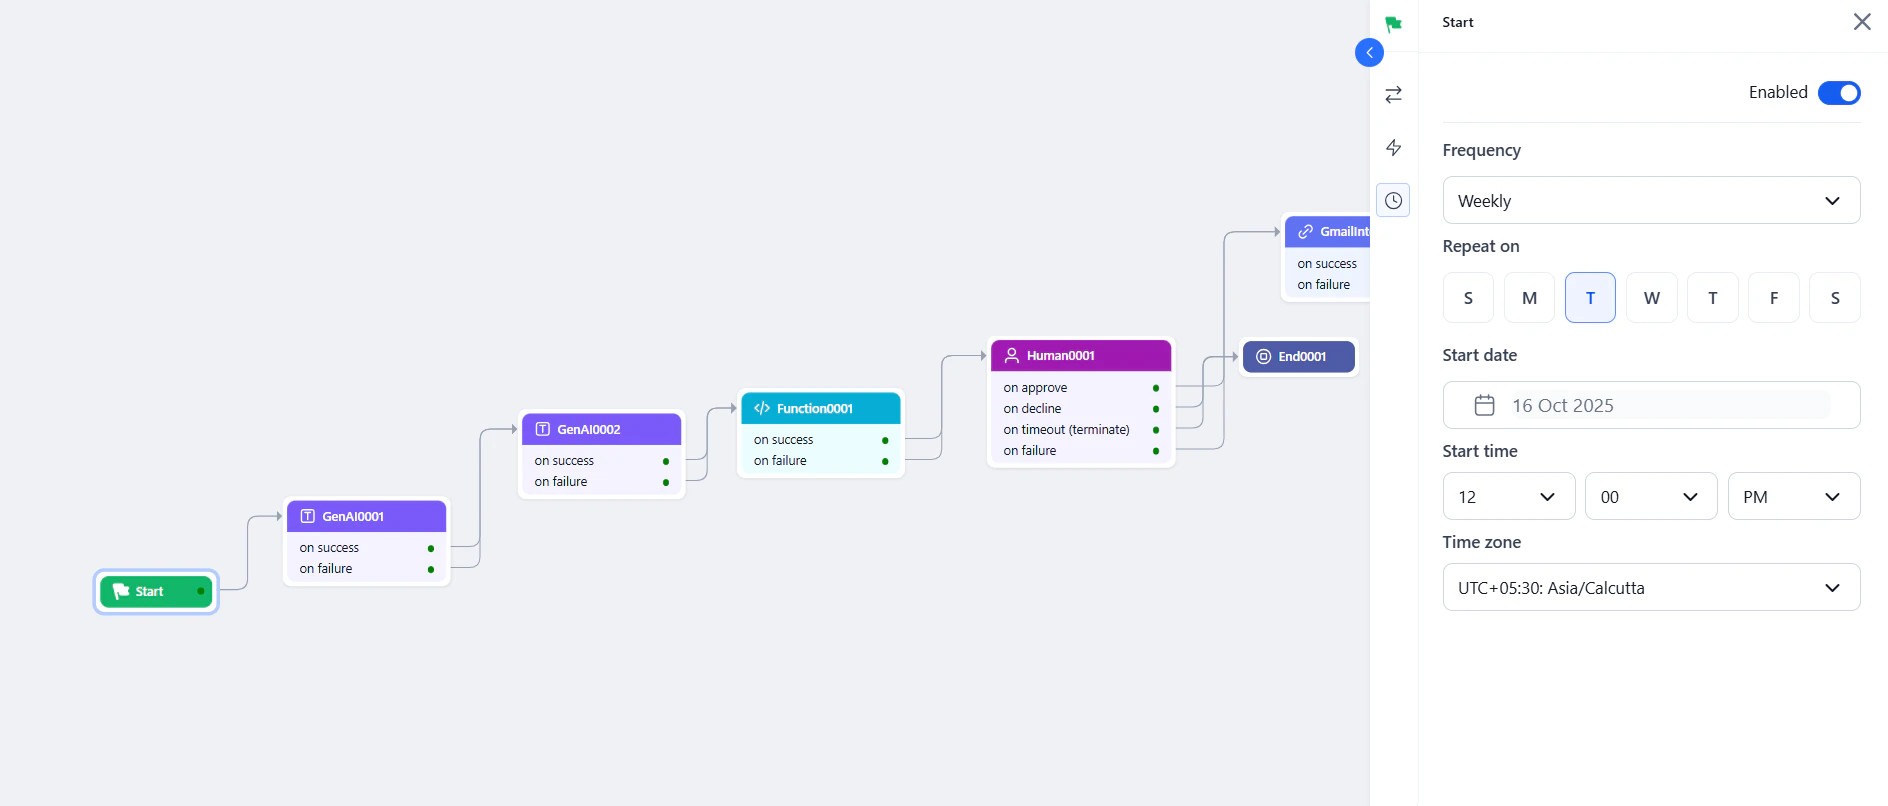
- Click the Schedule icon in the Start node panel and enable the scheduler.
- Set the frequency.
- Configure the start date, start time, and time zone.
Accessing Inputs in Downstream Nodes
Troubleshooting
End Node
The End node terminates the workflow and returns output to the caller, or displays an error message on failure.Configuration
- Click the + icon on any node or drag End from the Assets panel onto the canvas.
- Click the node to open its properties.
- Enter a Custom Name.
- In Name (key), select a key from the Manage Output section.
- In Value, enter the context variable to map. Example:
{{context.steps.summarization.output}}.
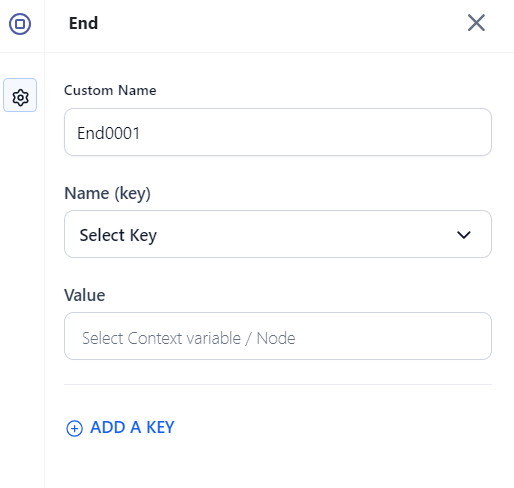
- At least one output variable is required for every End node.
- To return multiple outputs, click Add a Key and configure each additional key-value pair.
Delay Node
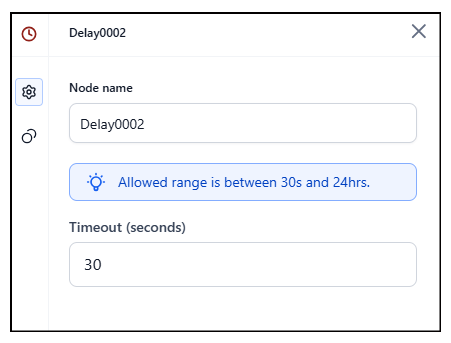
The Delay node pauses workflow execution for a defined duration before proceeding to the next node. Use it to throttle processing, wait for an upstream system, or introduce a controlled interval between steps.Configuration
API Node
Make HTTP requests to external services using REST or SOAP protocols.Key Capabilities
- Protocols: REST and SOAP.
- Methods: GET, POST, PUT, DELETE, PATCH.
- Auth: Pre-authorized tokens or per-user runtime authorization.
- Modes: Synchronous or asynchronous.
- Body formats: JSON, XML, Form URL Encoded, Custom.
- Testing: Preview API responses before finalizing the setup.
Common Use Cases
- Data enrichment — fetch user, order, or product details.
- Document retrieval from third-party storage.
- Webhook triggers based on workflow decisions.
- Approval checks — identity verification, fraud checks, compliance validation.
- Sending alerts or updating external dashboards.
Configuration
Auth options:
- Pre-authorize the integration — Use system-level credentials shared across all users.
- Allow users to authorize — Each user authenticates at runtime (for example, Google Drive access).
After configuring the request, click Test to preview the API response, then click Save.
On Success / On Failure: Configure downstream nodes for each path.
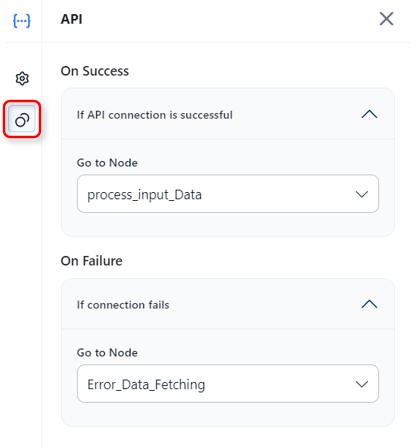
When using No timeout for asynchronous operations, enable it on both the API node and the parent workflow — otherwise timeout errors may still occur.
Accessing Output
Integration Node
Connect to pre-configured third-party services without writing code.Key Capabilities
- No-code integration: Embed prebuilt third-party actions without custom code.
- Secure connections: Uses tested and authenticated service connections.
- Auto-generated JSON: Prebuilt payloads from action parameters.
- Visual configuration: Configure directly on the canvas.
Common Use Cases
- CRM and marketing automation — trigger campaigns when a lead is captured.
- Workflow automation across apps — create a project task when a ticket is raised.
- Payment gateway processing.
- SaaS tool integrations (CRM, email, e-commerce).
Prerequisites
Add at least one service provider connection in Settings > Integrations before configuring this node. Test the connection in Settings to confirm it works.Configuration
- Click Integration > + New Integration in the Assets panel, or drag the node onto the canvas.
- Search or select the required service.
- Click the node to open its properties. Enter a Node Name (letters and numbers only).
- Select an active Connection Name.
- Click Add Action and select one action (only one action per node is supported).
- Fill in the action parameters and click Save.
- Set On Success and On Failure paths under Connections.
Managing Actions
Accessing Output
Function Node
Execute custom JavaScript or Python code for data transformation and business logic.Key Capabilities
- Write Code: Author inline scripts in the built-in editor.
- Custom Function: Invoke a function from a deployed script library.
- Languages: JavaScript (supports
async/await) and Python (synchronous). - Memory access: Read and write Agent Memory stores for stateful logic.
Common Use Cases
- Data transformation and format conversion.
- Custom validation and business rule logic.
- Mathematical calculations and statistical analysis.
- String manipulation and regex operations.
Option 1 — Write Code
- Select Write Code and click the Expand icon to open the script editor.
- Select JavaScript or Python.
- Use context variables for dynamic inputs.
- Click Run to test the script.
Context variable syntax:
Static vs. dynamic inputs:
- Static inputs: Type values directly in the script editor.
- Dynamic inputs: Use context variable syntax to reference inputs from the Start node or previous nodes.
Option 2 — Custom Function
Invoke a function from an imported and deployed script. Prerequisites: Deploy scripts in Settings > Manage Custom Scripts. Steps:- Select Custom Function and choose a deployed script from the Script name list. Only deployed scripts are listed.
- Choose a function from the Function name list (one function per node).
- Map input arguments — assign static or dynamic values to each argument. Select the correct data type (String, Number, JSON, Boolean). Type
{{to trigger context variable suggestions. - Click Test, enter values in the Input panel, then click Execute.
Input argument mapping is required for deployment. You can test the function, but deployment is blocked until all mapping errors are resolved.
- Output: Shows the
resultkey from the function and the function run ID. - Error: Shows
stderrlogs if the execution fails. - Logs: Shows
stdoutandstderrfor debugging.
- On import, the Function node’s configuration is fetched automatically.
- If the same script is already deployed in the target environment, the node links automatically.
- If the script isn’t deployed, validation errors appear listing unresolved scripts.
- On export, the node configuration is included in
callflow.json.
Extending the Context Object
Function nodes can write custom keys directly to the context object, making values available to any downstream node.{{context.userTier}}, {{context.enrichedOrder.isHighValue}}.
Do not override system-reserved keys in the context object.
Agent Memory Access
Use memory stores to retain and share data across steps or sessions. Data is stored as JSON — always check the memory store schema for field names and types.Accessing Output
Supported Script Libraries
The following libraries are pre-imported and available in the Function node’s script editor (Python only):
For the full list of available functions per library, see the official Python docs: numpy, pandas, collections, math, re, datetime, itertools.
Condition Node
Branch workflow execution based on logical conditions.Key Capabilities
- Condition types:
IF,ELSE IF, andELSE. - Operators:
==,!=,>,<,>=,<=,contains,startsWith,endsWith. - Logic combinators:
ANDorORfor multi-criteria conditions. - Dynamic references: Context variables and previous node outputs.
Common Use Cases
- Route based on classification, type, or priority.
- Fallback logic when no match is found.
- Validate data before proceeding.
- Multi-step filtering with combined conditions.
Configuration
- Add the Condition node to the canvas.
- Enter a descriptive Node Name.
- Set the IF condition:
- Enter a context variable (example:
{{context.ambiguous_sub_categories}}). - Choose an operator.
- Enter a value or another variable (example:
{{context.steps.NodeName.output}}). - Optionally combine criteria with AND / OR.
- Enter a context variable (example:
- Set routing:
- Go To: Node to execute if the IF condition is met.
- ELSE: Node to execute if no condition is met.
Complex conditions:
A Condition node can be called a maximum of 10 times in a workflow. Exceeding this limit results in an error.
Loop Node
Iterate over arrays to process multiple items, one at a time.Key Capabilities
- Array iteration: Execute child nodes once per item in an input array.
- Flexible child nodes: Add Function, API, AI, and Condition nodes inside the loop.
- Output aggregation: Collect per-iteration results into an output array.
- Three error handling strategies: Continue, Terminate, or Remove Failed.
- Debug support: Per-iteration inspection in the Debug panel.
Common Use Cases
- Batch processing — invoices, documents, records.
- API calls on multiple inputs — fetch data per customer ID.
- Bulk notifications — personalized messages to a list.
- Report generation per item in a dataset.
- Automated testing across multiple input variations.
Configuration
Adding nodes inside the loop:
- Click the + on the loop start node.
- Drag nodes into the loop block on the canvas.
- Reference the current iteration item using
{{currentItem}}.
Only nodes placed inside the loop block execute per iteration. Nodes connected outside run after the loop completes.
Error Handling Options
Accessing Output
Debug Logs
After running the workflow, open the Debug panel to inspect loop behavior. Click the icon next to the Loop node to open Loop Runs and view per-iteration statuses (Running, Completed, Failed). Failed iterations appear in red.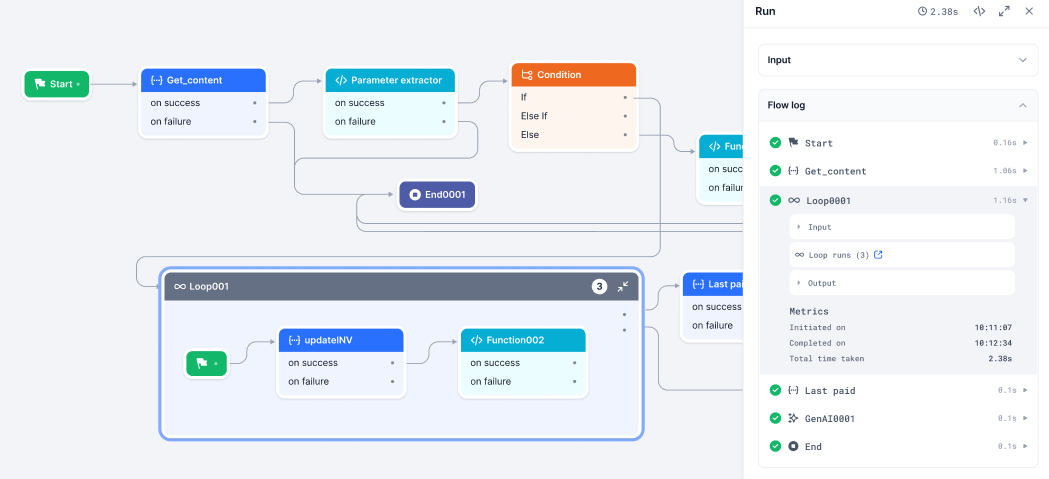
Troubleshooting
AI Nodes
AI nodes are multimodal components that use LLMs to process text, images, and audio within a workflow.Text to Text Node
Transform input text into desired text output using LLMs.Key Capabilities
- Prompt options: Write your own prompt, or choose from the Prompt Hub with version selection.
- Model selection: Choose from pre-configured LLM models.
- Hyperparameter tuning: Temperature, Top-p, Top-k, Max Tokens.
- Structured output: Optional JSON schema for parseable responses.
- Workflow calling: Enable the model to call up to 3 workflows during execution.
- Timeout: 30–180 seconds (default: 60s).
Common Use Cases
- Summarization — transcripts, logs, documents.
- Tone or style adjustment.
- Keyword-based content generation.
- Content rewriting and reformatting.
- Error explanation and log analysis.
Configuration
System vs. Human prompts:
- System Prompt: Sets the model’s role. Example: “You are a helpful assistant.”
- Human Prompt: The task or question. Example: “Summarize this error log.” Use
{{context.variable_name}}for dynamic values.
- If the prompt includes variables, map them in the Map Variables field.
- If the prompt has no variables, customize it manually — the Map Variables field does not appear.
- Importing a prompt also loads the preferred model and connection if specified at commit time.
When workflow calling is enabled, the model autonomously decides whether to use its internal knowledge or invoke a configured workflow.
Accessing Output
Text to Image Node
Generate images from descriptive text prompts using AI image models.Key Capabilities
- Positive Prompt: Define what the image should include — style, elements, setting.
- Negative Prompt: Specify what to exclude from the image.
- Aspect Ratio: Up to 2048 × 2048 pixels (GPU-dependent).
- Steps: Refinement iterations — 25–30 recommended for quality and performance.
- Batch Count: Up to 5 image variants per run, generated sequentially.
- Output: PNG format returned as URLs (no expiry).
Supported Models
Common Use Cases
- Marketing banners, ads, and promotional visuals.
- Content illustration for blogs or newsletters.
- Visual prototyping — UI mockups, storyboards.
- A/B testing with multiple image variants.
Configuration
The node uses an input scanner to detect banned words. Banned topics cause an error in the Debug window.
Accessing Output
Audio to Text Node
Convert spoken audio into written text using Automatic Speech Recognition (ASR).Prerequisites
Add an external LLM to your account before using this node.Key Capabilities
- Model: OpenAI Whisper-1.
- Multilingual: Transcribes multiple languages; translates non-English audio to English.
- Input: Audio file URL only — direct file uploads are not supported. Max file size: 25 MB.
- Timestamps: Optional; records when each dialog segment was spoken.
- Structured output: Optional JSON schema.
Supported Formats
M4a, Mp3, Webm, Mp4, Mpga, Wav, Mpeg.
Configuration
Key constraints:
- Files larger than 25 MB must be split at logical points — avoid mid-sentence breaks.
- Inverse translation (English to other languages) is not supported.
- Only URLs are supported as input — direct file uploads are not supported.
- Whisper automatically removes offensive and banned words during transcription.
Accessing Output
Image to Text Node
Extract text or generate insights from images using OCR and LLMs.Prerequisites
Add an external LLM to your account before using this node.Key Capabilities
- OCR: Extract embedded text from scanned documents, screenshots, and photos.
- Image understanding: Answer questions or generate descriptions from images using prompts.
- Multi-model: OpenAI and Anthropic models supported.
- Structured output: Optional JSON schema for parseable responses.
Supported Models
- OpenAI:
gpt-4o,gpt-4o-mini - Anthropic: Claude Sonnet Vision
Supported Image Formats
PNG, JPEG, JPG.
Configuration
Image input formats supported:
- Anthropic: binary, base64-encoded.
- OpenAI: binary, base64-encoded, and image URLs.
Accessing Output
DocSearch Node
Retrieve context-aware information from a connected Search AI app using Retrieval-Augmented Generation (RAG).Key Capabilities
- RAG-powered: Combines document retrieval with LLM-generated responses.
- Search AI integration: Connects to a configured Search AI app to query indexed content.
- Dynamic queries: Accepts static text or context variables as input.
- Meta filters: Optionally narrow search scope to specific documents or sources.
- User redirection: Optionally redirect users to the full Search AI app for a more comprehensive search experience.
Common Use Cases
- Retrieve relevant policies, manuals, or help articles based on user queries.
- Context-aware Q&A grounded in indexed documents.
- Internal knowledge base search — wikis, technical docs, training material.
Setup Prerequisites
Complete the following before configuring the node: 1. Set up a Search AI app:- Configure a Search AI application and enable the Answer Generation API scope. See Create and Manage JWT Apps.
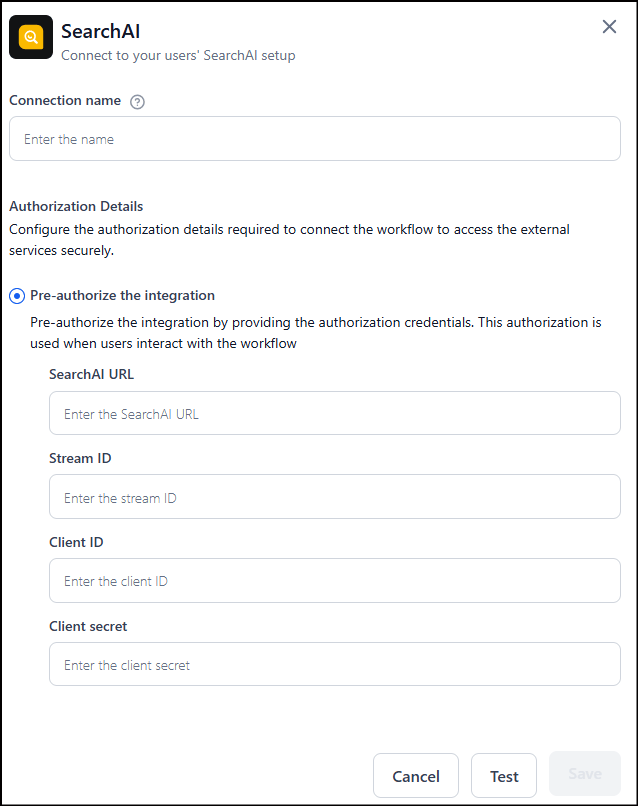
- Go to Settings > Integrations > Search AI > Add Connection.
- Enter the Search AI app credentials (use
https://platform.kore.aifor the Search AI URL). - Click Test to verify the connection, then click Save.
Configuration
Canvas-level errors appear when the node is misconfigured. Click the warning icon on the node to view and fix them.
Accessing Output
The output path is dynamic and depends on the Search AI API response:Human Node
Pause workflow execution to collect human input, approval, or review before proceeding.Key Capabilities
- Inbox-based routing: Sends approval requests to the reviewer’s Inbox (Personal or Group tab).
- Reviewer assignment: Route to all workspace members or specific users.
- Timeout handling: Set a timeout duration or wait indefinitely.
- Four outcome paths: On Approval, On Decline, On Timeout, On Failure.
Common Use Cases
- Approval workflows — expenses, leave requests, procurement.
- Quality assurance checkpoints before publishing AI-generated output.
- Compliance review for sensitive or regulated steps.
- Exception handling and escalation for edge cases.
How It Works
When the workflow reaches the Human node, it sends an approval request to the assigned reviewer’s Inbox. Execution pauses until the reviewer responds, times out, or a delivery failure occurs.- Sync mode: Workflow pauses and waits for a reviewer response within the endpoint timeout.
- Async mode: Workflow sends an immediate acknowledgement, continues execution, and resumes once the reviewer responds or the timeout is reached.
Configuration
1. Select Request Destination: In Send & wait for response, select Account Inbox, then choose:- Everyone — sends the request to all workspace members.
- Specific Users — enter the email addresses of specific members within the current workspace.
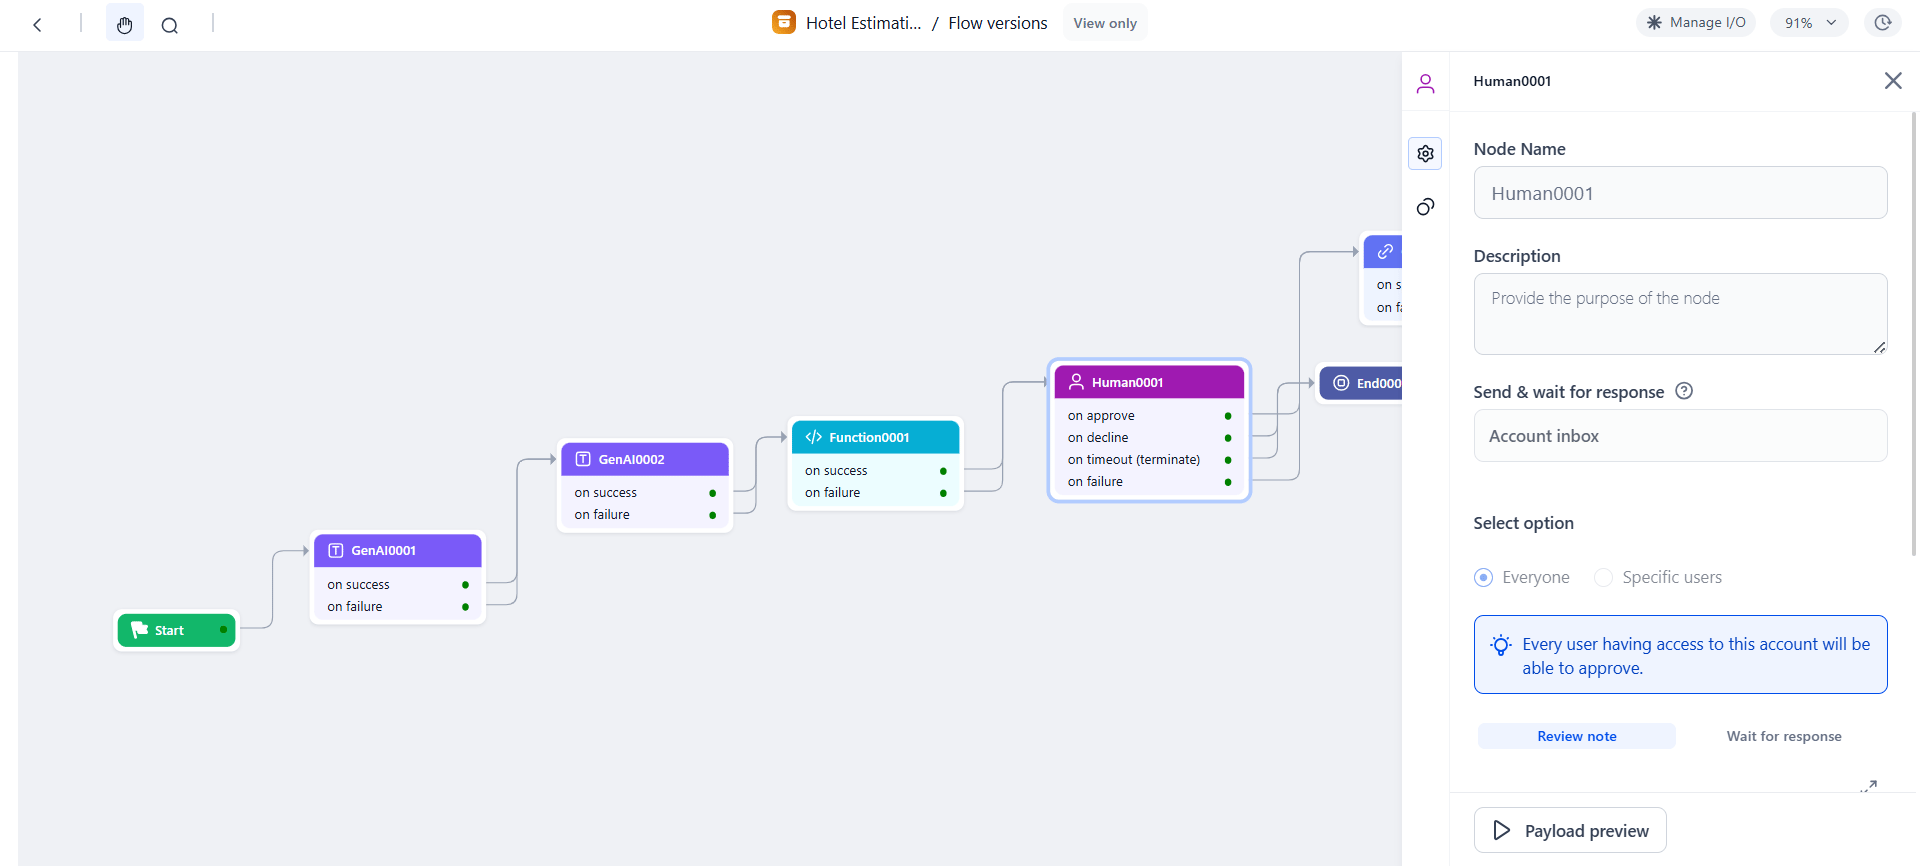
3. Configure Timeout Behavior:
- No timeout — waits indefinitely until the reviewer responds.
- Set timeout — default 120 seconds; configurable in seconds, minutes, hours, or days.
Testing the Flow with Inbox Approvals
- Click Run Flow in the workflow builder. The Debug Panel opens.
- When the workflow reaches the Human node, an approval request is sent to the reviewer’s Inbox:
- Personal tab — requests assigned to yourself.
- Group tab — requests assigned to a set of users or the whole workspace. Group members must assign the request to themselves before acting on it.
- In the Inbox, find the request under Pending for Approval. Review the details and click Approve or Decline.
- Verify results in Workflow Monitor — confirm the Human node shows the correct approval status and the flow followed the expected path.
Accessing Reviewer Responses
Agentic App Node
Integrate a deployed Agentic App into a workflow to handle decisions based on unstructured data or complex tasks.Key Capabilities
- Native integration: Connect workflows to any Agentic App within the same workspace.
- Contextual data exchange: Pass workflow inputs to the Agentic App and retrieve its response dynamically.
- Single-turn execution: Performs one turn of communication per execution. For multi-step interactions, add multiple Agentic App nodes.
Common Use Cases
- Incident triage: Pass incident details to the Agentic App to identify probable root causes and return remediation steps.
- Invoice processing: Send invoice details to determine the expense category, detect duplicates, or route for approval.
Prerequisites
- The Agentic App must be deployed.
- The Agentic App must belong to the same workspace as the workflow.
- The user configuring the node must have access to the Agentic App.
Configuration
Settings tab:
Connections tab:
- On Success: Node to execute after the Agentic App responds.
- On Failure: Node to execute if the Agentic App call fails.
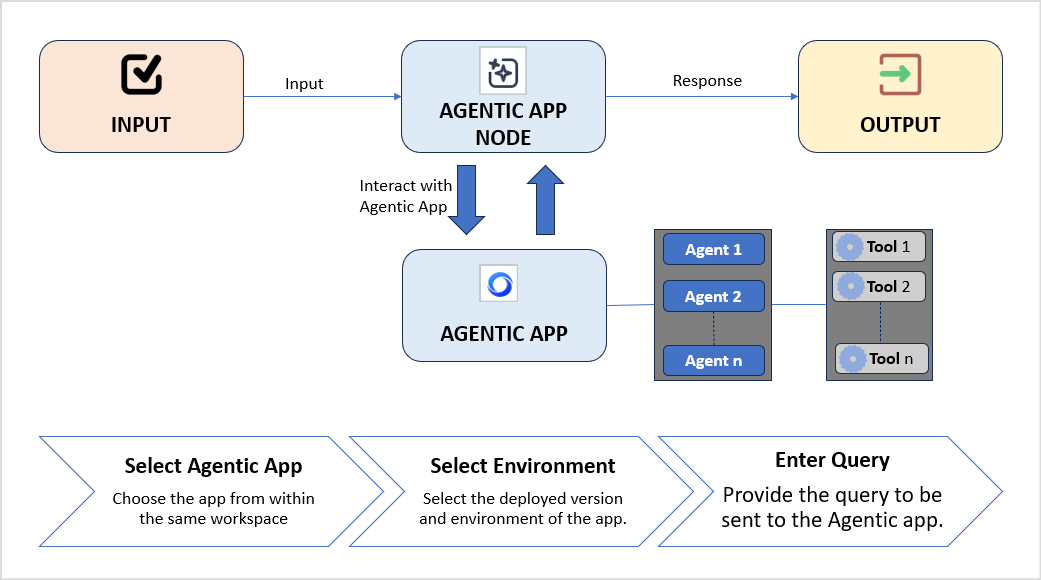
Accessing Output
The Agentic App response is asynchronous. The workflow receives the output only after the Agentic App has fully completed execution.
Browser Automation Node
Run a published browser automation as part of a workflow. The node performs human-like browser actions — navigating pages, clicking elements, typing text, extracting data, and uploading files — in a secure, isolated environment.Key Capabilities
- Run deployed automations: Select from the list of published browser automations in your workspace.
- Input and output mapping: Provide static values or map context variables. Outputs are stored automatically in the workflow context.
- Built-in reliability: Retries, timeouts, and visual validation for consistent execution.
- Secure credential handling: Uses secure browser sessions without exposing sensitive data.
Common Use Cases
- Form filling and data entry across web-based systems.
- Portal-based processes — claims submission, onboarding, invoice updates.
- Web data extraction — capturing tables and values from pages.
- File uploads and downloads across internal or external websites.
- Routine account actions — login, status checks (MFA not required).
Setup Overview
Browser automation has three stages:- Deploy the hardware in Settings > Browser Automation > Deployment. This pod is the execution environment for both Playground testing and workflow runtime.
- Create the automation in Settings > Browser Automation > Playground. Validate the flow step by step, then publish the automation to a pod.
- Integrate in a workflow using the Browser Automation Node.
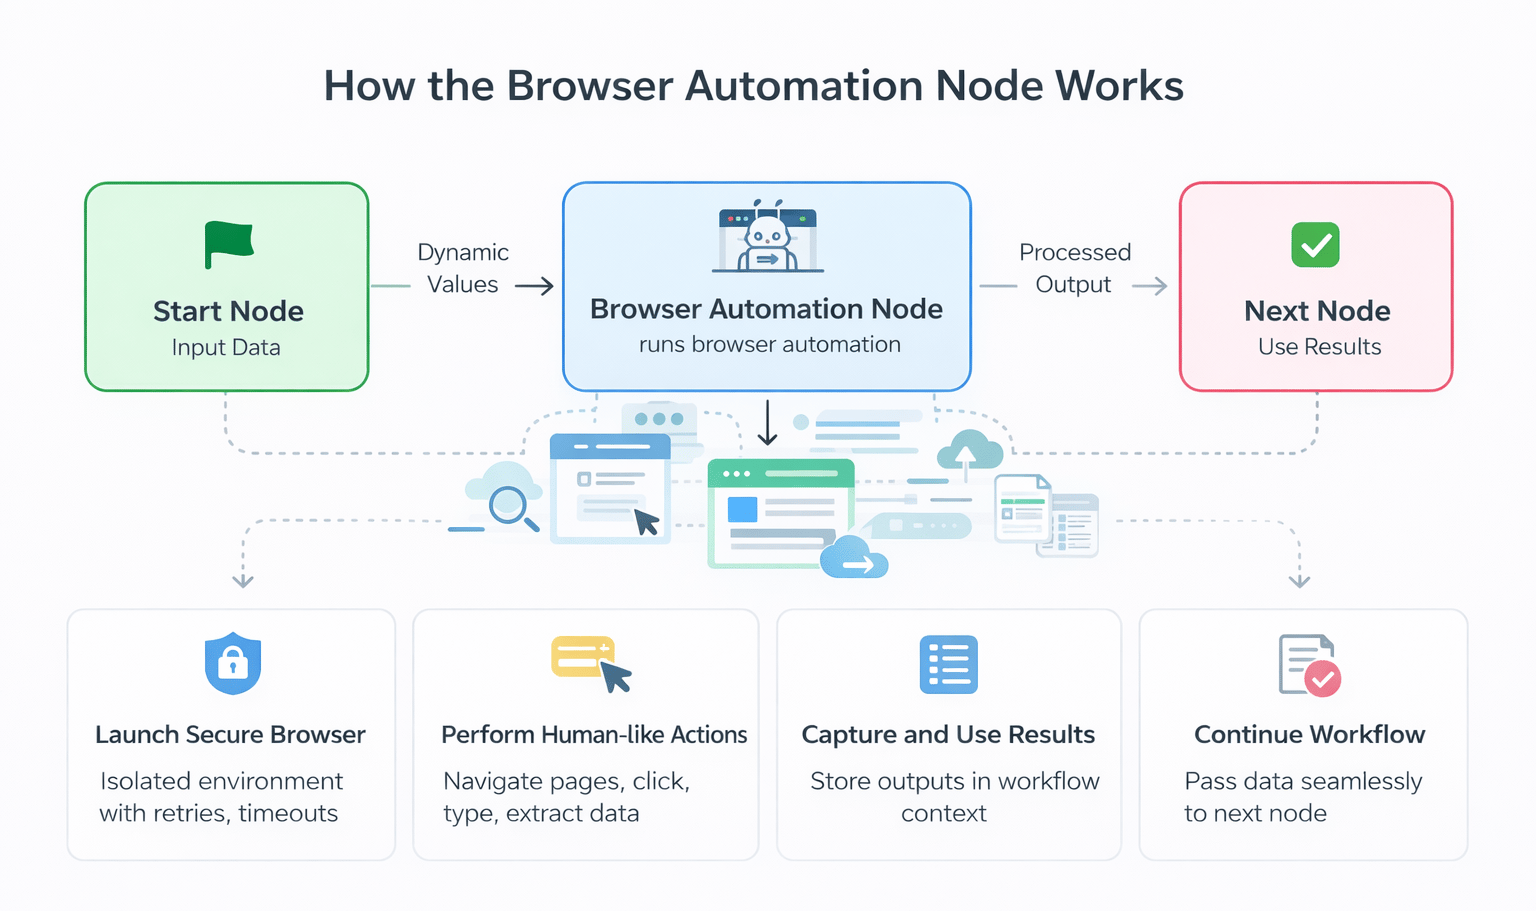
Configuration
1. Select an Automation:- In Automation name, choose from the list of published browser automations in your workspace.
- Only one automation per node. If none are deployed, you are prompted to create one first.
- After selecting an automation, the required input fields appear based on the automation’s design.
- Each field accepts a static value or a mapped context variable from the workflow.
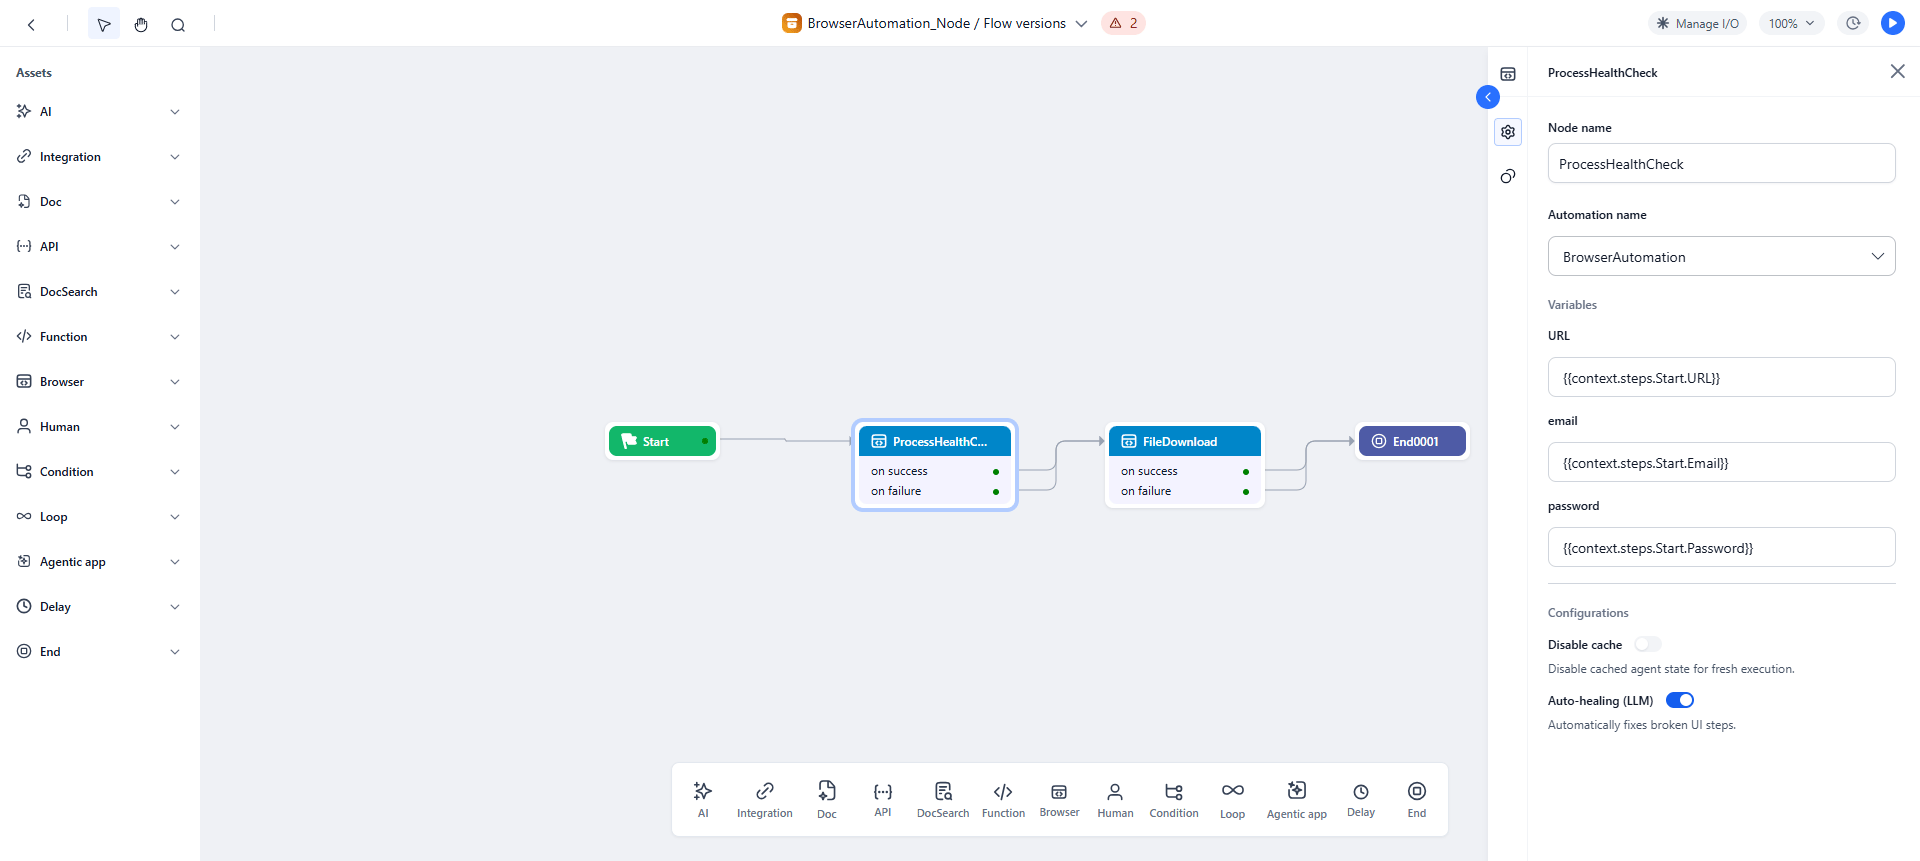
Accessing Output
Testing the Flow
- Test in Playground first: Go to Settings > Browser Automation > Playground, run the automation, and validate browser actions and outputs.
- Run the workflow: Verify inputs are passed correctly, the automation triggers, and outputs are captured in the context.
- Review Debug Logs: Check the Browser Automation Node section for step-by-step execution details, output values, and errors.
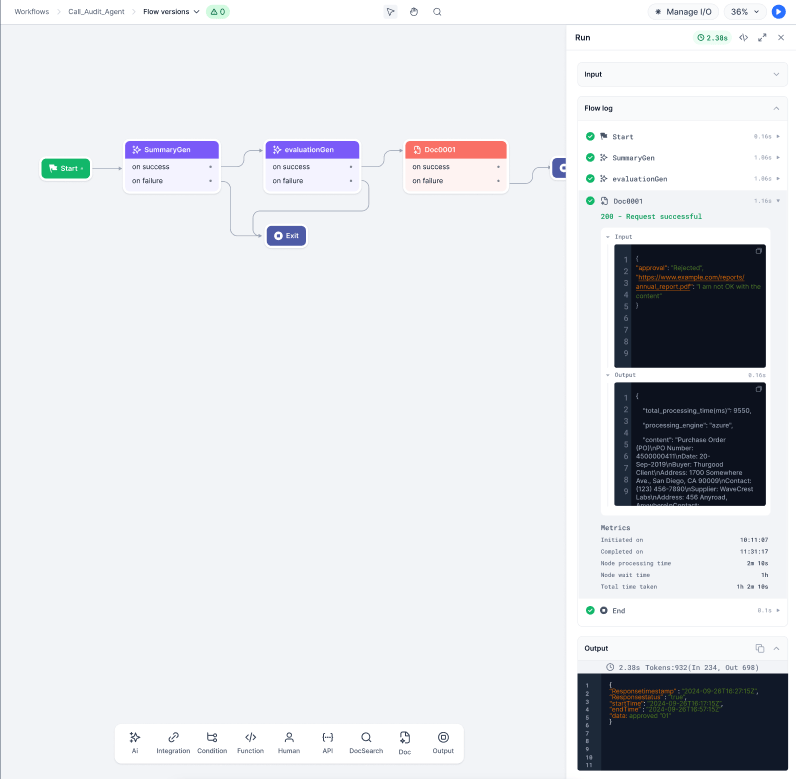
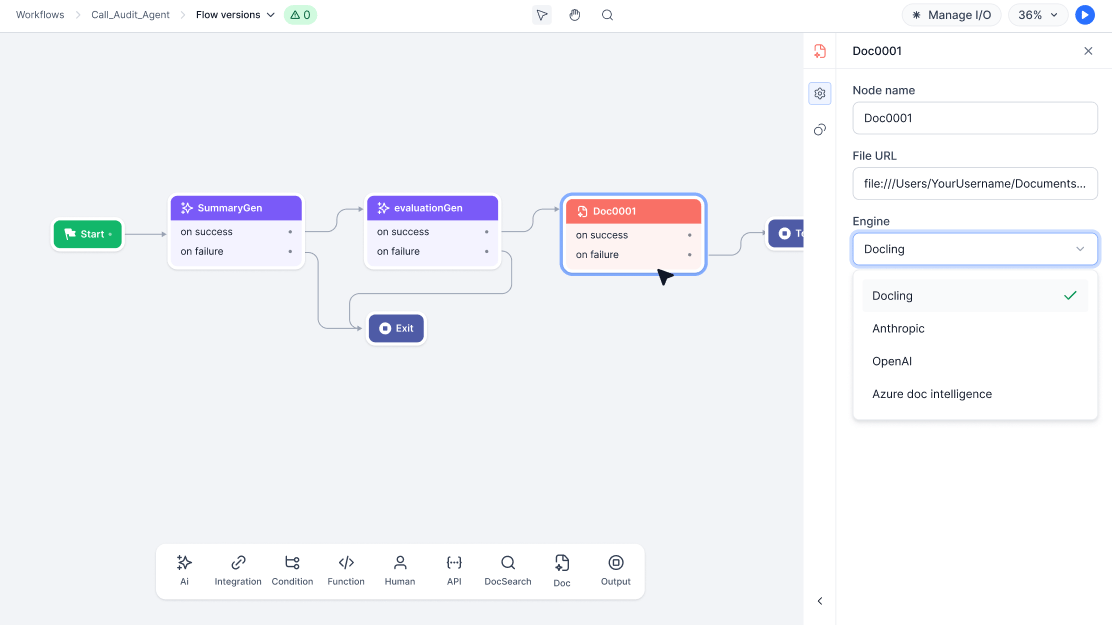
Doc Intelligence Node
Analyze documents and extract structured data within a workflow using AI engines.Key Capabilities
- Engine selection: Choose between Docling, OpenAI, Anthropic, or Azure.
- File input flexibility: Static URL or dynamic workflow context variable.
- Async processing: Processes documents in the background without blocking the workflow (engine support may vary).
- Structured data extraction: Generates machine-readable output for downstream nodes (engine support may vary).
Common Use Cases
- Invoice and receipt processing — extract amounts, dates, and vendor information.
- Identity document verification — extract data from IDs, passports, or business cards.
- Contract analysis — identify key clauses, dates, or parties.
- Compliance checks — ensure sensitive documents are analyzed and key fields are captured.
Configuration
Before you begin: Ensure at least one AI engine (Docling, OpenAI, Anthropic, or Azure) is configured in your workspace. Steps:- Give the node a descriptive name (example:
InvoiceProcessing,IDExtraction). - Enter the File URL — a static URL or a context variable from an upstream step.
- Select the Engine.
- Configure engine-specific options.
Supported Models:
Accessing Output
Related Topics
- Supported Libraries - List of supported libraries in the script editor of the Function node.