> ## Documentation Index
> Fetch the complete documentation index at: https://koreai-ai-for-work-dev.mintlify.site/llms.txt
> Use this file to discover all available pages before exploring further.
# Kore Voice Automation Integration with Zoom Contact Center
[Back to Integrations List](/ai-for-service/contact-center/integrations/overview)
Integrate Kore Voice Automation with Zoom Contact Center (ZCC) using SIP Integration to enable AI-powered voice assistance for incoming calls.
***
## How It Works
| Phase | Description |
| ----------------------- | ----------------------------------------------------------------------------------------------------------------------------------------------------------- |
| **Setup** | Kore configures the integration with ZCC using Zoom connectors. |
| **Channel Integration** | The AI Agent uses ZCC as a communication channel. Calls from ZCC route to Kore IVR for voice automation. Supports "Transfer from IVR" and "Agent Transfer." |
| **Routing** | Kore runs voice automation. If a human agent is needed, use the Agent Transfer Node to return the call to ZCC with optional SIP headers. |
| **Agent Interaction** | Agents receive and respond to customer calls via ZCC. |
***
## Prerequisites
* [Zoom App Marketplace Developer account](https://marketplace.zoom.us/)
* Developer access to the Platform
***
## Architecture
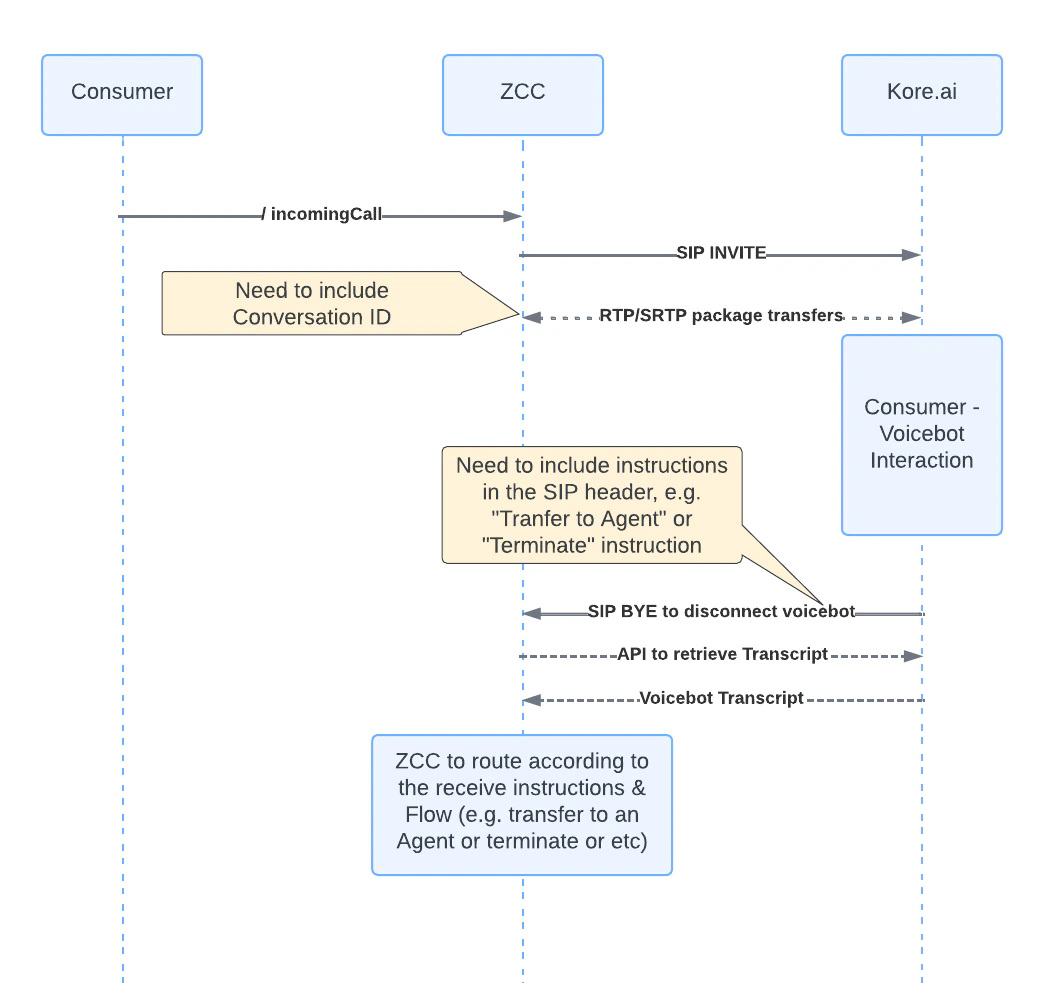 ***
## Setup Overview
1. Associate an app within an experience flow.
2. Configure "Transfer from IVR."
3. Configure "Agent Transfer."
4. Create a Bot Connector instance on Zoom App Marketplace.
5. Fetch conversation details and summary.
***
## Step 1: Associate an App with an Experience Flow
In the Experience Flow, add an **Automation** node and attach the app to trigger when ZCC transfers a call to Kore. See [Create Flows](/ai-for-service/flows/create-and-manage-flows#create-a-start-flow) and [Automation node](/ai-for-service/flows/node-types/automation).
If using the older "SmartAssist" version, follow the SmartAssist flow creation guide.
***
## Step 2: Configure Transfer from IVR
Transfer from IVR routes calls from ZCC to Kore.
1. Go to **Flows & Channels > Channels > Voice Gateway > SIP Numbers > Configure SIP Trunk**.
***
## Setup Overview
1. Associate an app within an experience flow.
2. Configure "Transfer from IVR."
3. Configure "Agent Transfer."
4. Create a Bot Connector instance on Zoom App Marketplace.
5. Fetch conversation details and summary.
***
## Step 1: Associate an App with an Experience Flow
In the Experience Flow, add an **Automation** node and attach the app to trigger when ZCC transfers a call to Kore. See [Create Flows](/ai-for-service/flows/create-and-manage-flows#create-a-start-flow) and [Automation node](/ai-for-service/flows/node-types/automation).
If using the older "SmartAssist" version, follow the SmartAssist flow creation guide.
***
## Step 2: Configure Transfer from IVR
Transfer from IVR routes calls from ZCC to Kore.
1. Go to **Flows & Channels > Channels > Voice Gateway > SIP Numbers > Configure SIP Trunk**.
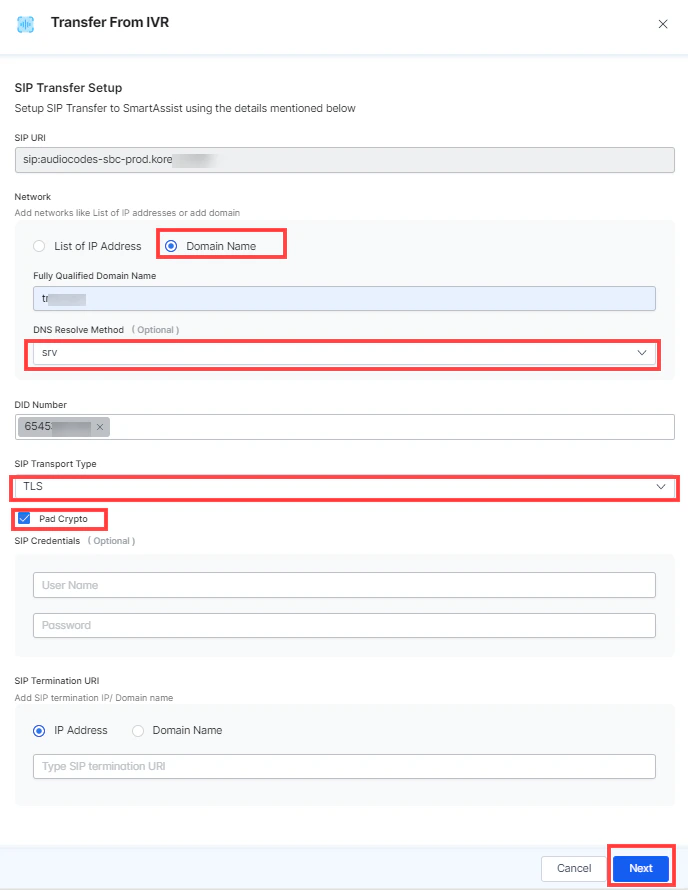 2. Select **Contact Center AI**. The **SIP URI** field auto populates and is used for the ZCC-to-Kore transfer.
3. Copy the **Domain** from Zoom Connector App > Configuration Details and paste it in **Fully Qualified Domain Name**.
4. Copy the **DID Number** from Zoom Connector App > Configuration Details and paste it in **DID Number**.
5. Configure:
* **DNS Resolve Method**: srv
* **SIP Transport Type**: TLS
* Enable **Pad Crypto**
6. Click **Next**, then enable **Inbound Calls** and **Outbound Calls**.
2. Select **Contact Center AI**. The **SIP URI** field auto populates and is used for the ZCC-to-Kore transfer.
3. Copy the **Domain** from Zoom Connector App > Configuration Details and paste it in **Fully Qualified Domain Name**.
4. Copy the **DID Number** from Zoom Connector App > Configuration Details and paste it in **DID Number**.
5. Configure:
* **DNS Resolve Method**: srv
* **SIP Transport Type**: TLS
* Enable **Pad Crypto**
6. Click **Next**, then enable **Inbound Calls** and **Outbound Calls**.
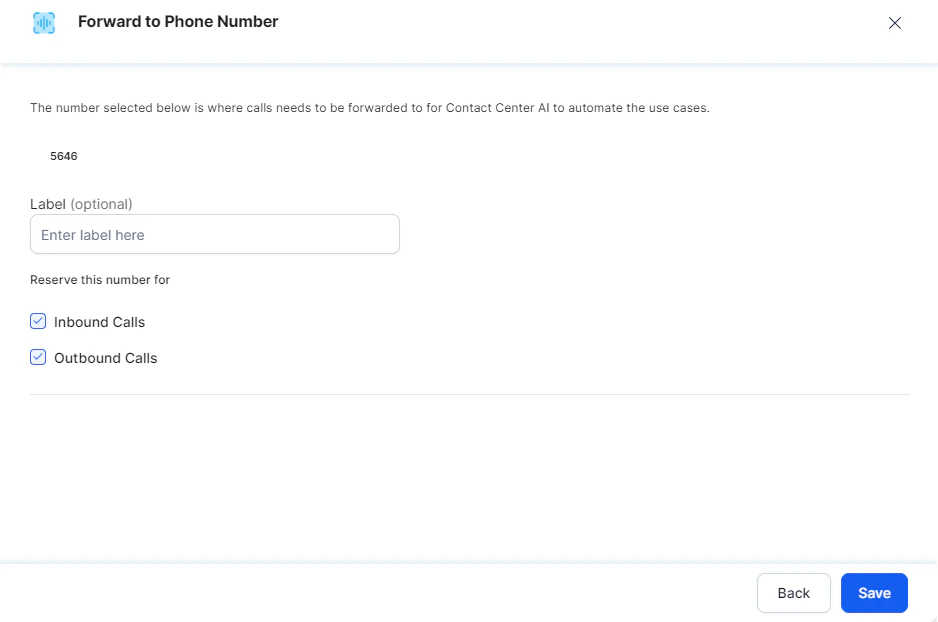 7. Click **Save**.
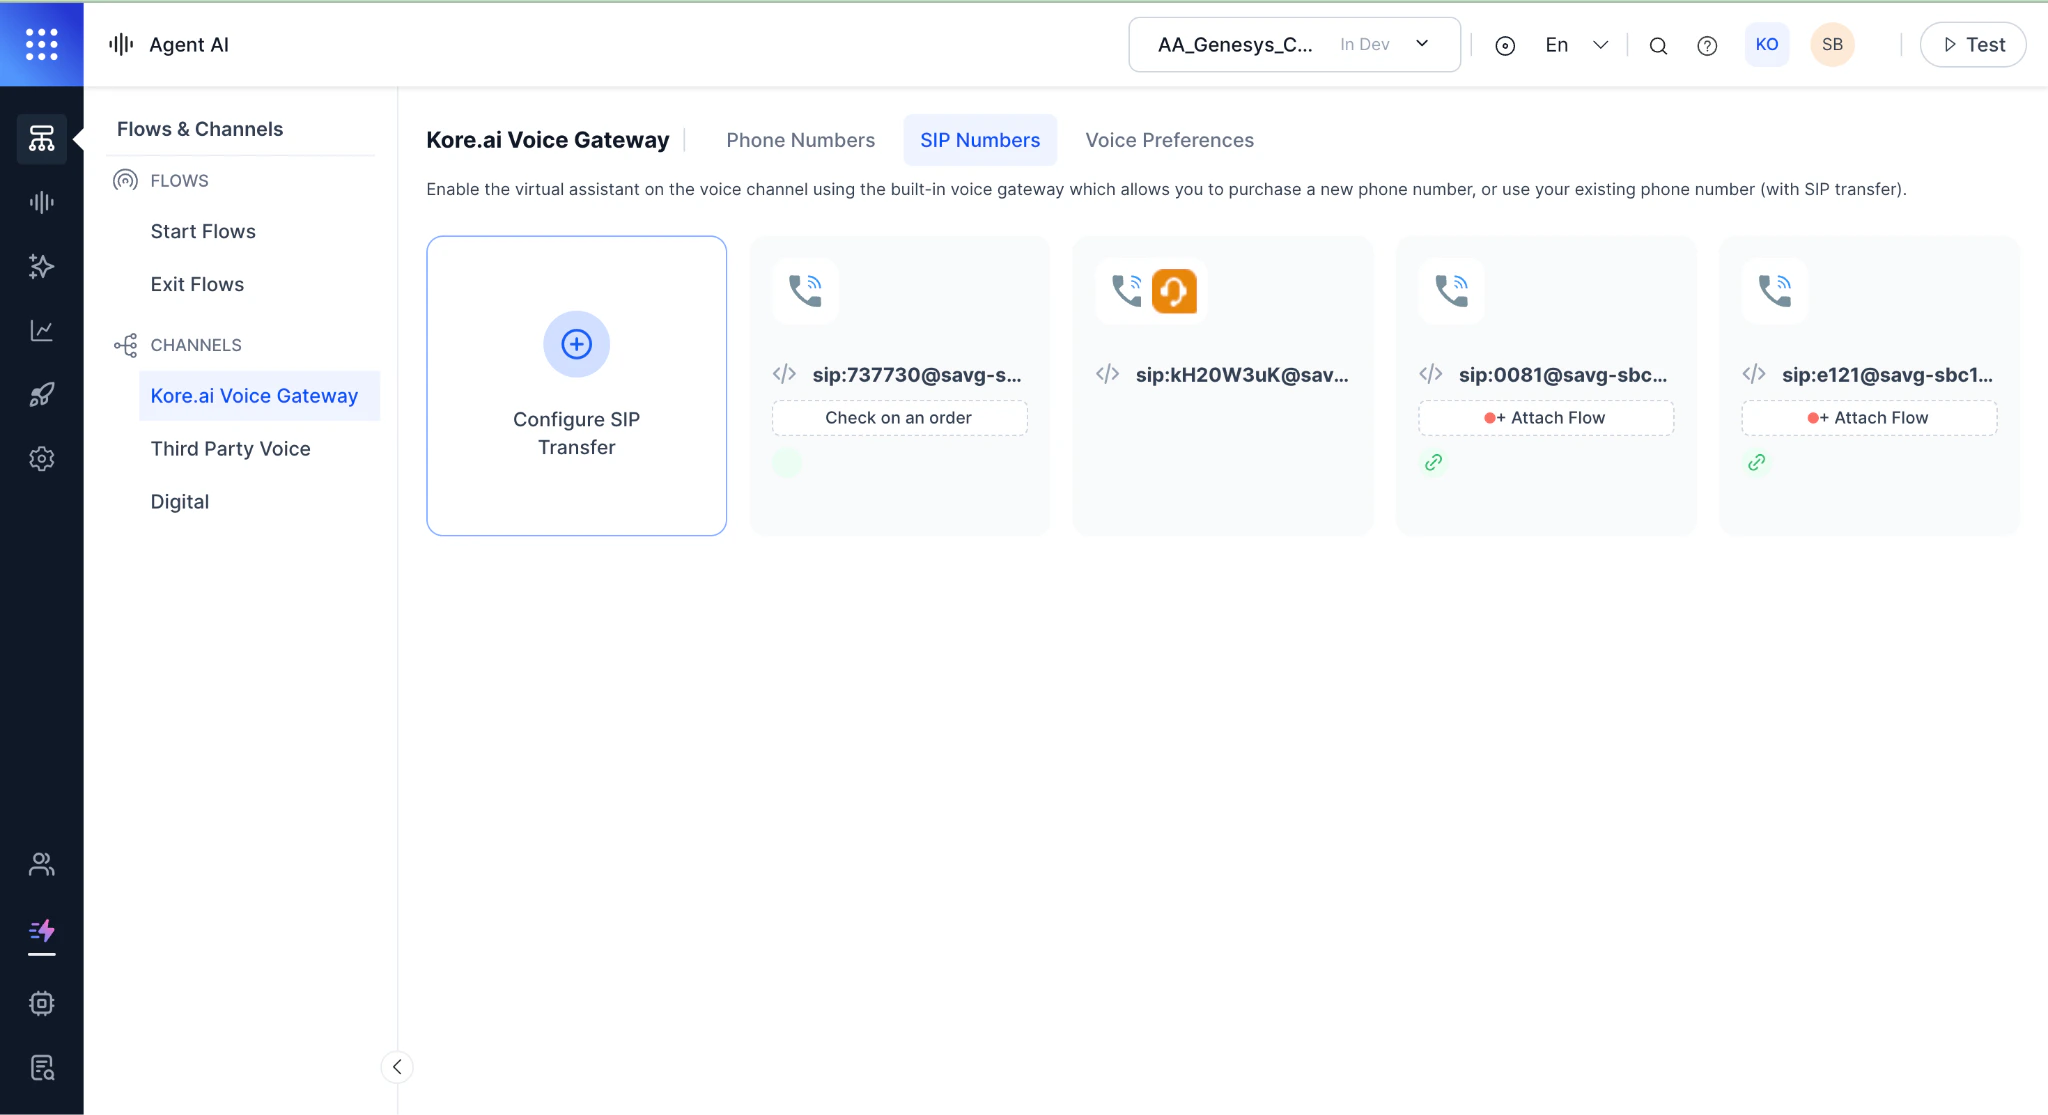
After saving, attach the flow from Step 1 to this SIP configuration.
8. Click **Attach Flow** and attach the flow from Step 1. See [Attach Flow](/ai-for-service/channels/voice-gateway/configure-voice-gateway#attach-flow).
7. Click **Save**.
After saving, attach the flow from Step 1 to this SIP configuration.
8. Click **Attach Flow** and attach the flow from Step 1. See [Attach Flow](/ai-for-service/channels/voice-gateway/configure-voice-gateway#attach-flow).
 ***
## Step 3: Configure Agent Transfer
After the customer interacts with the AI Agent, transfer to ZCC using one of these approaches:
### Option A: Agent Transfer Node in Experience Flow
1. Select **Agent Transfer** from **Action**.
***
## Step 3: Configure Agent Transfer
After the customer interacts with the AI Agent, transfer to ZCC using one of these approaches:
### Option A: Agent Transfer Node in Experience Flow
1. Select **Agent Transfer** from **Action**.
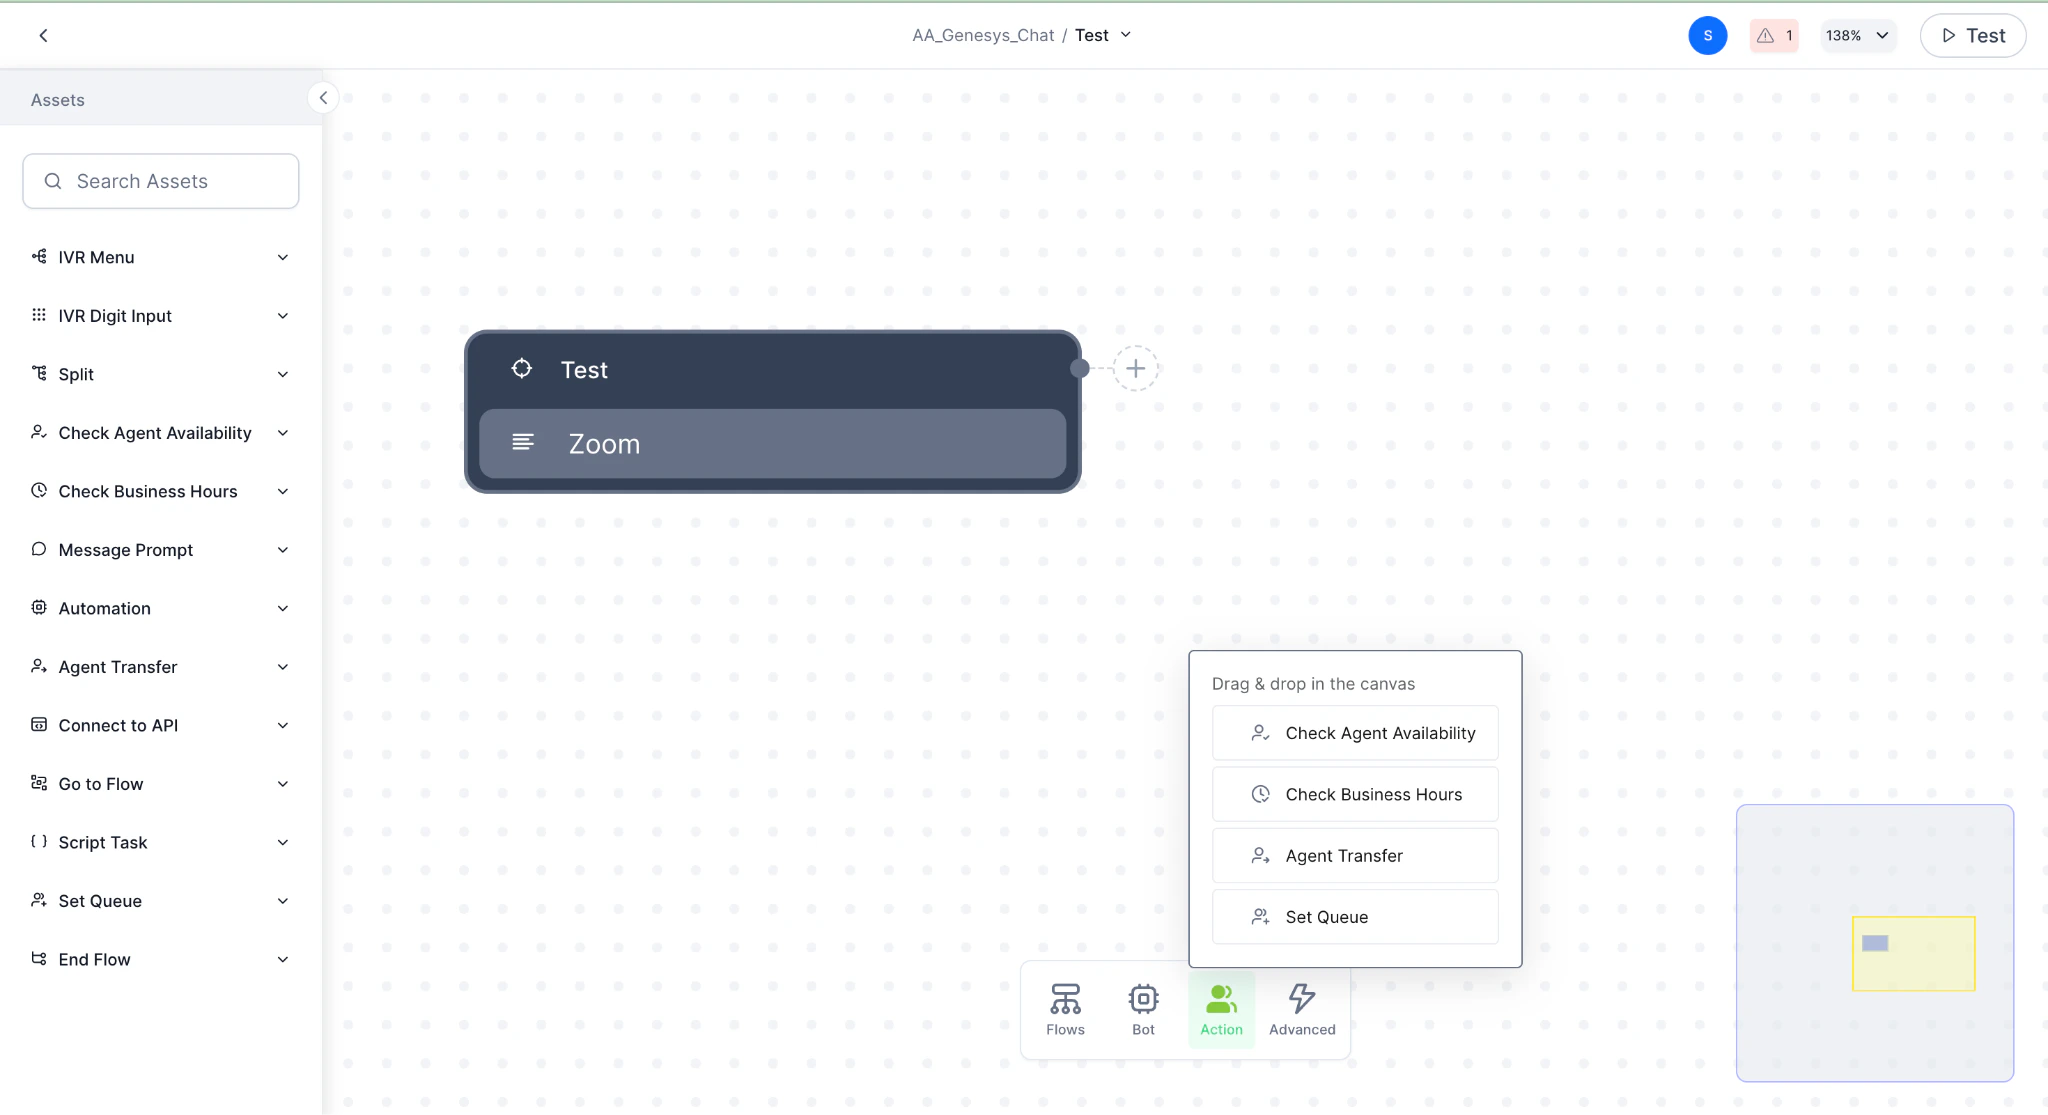 2. Add the Agent Transfer configuration.
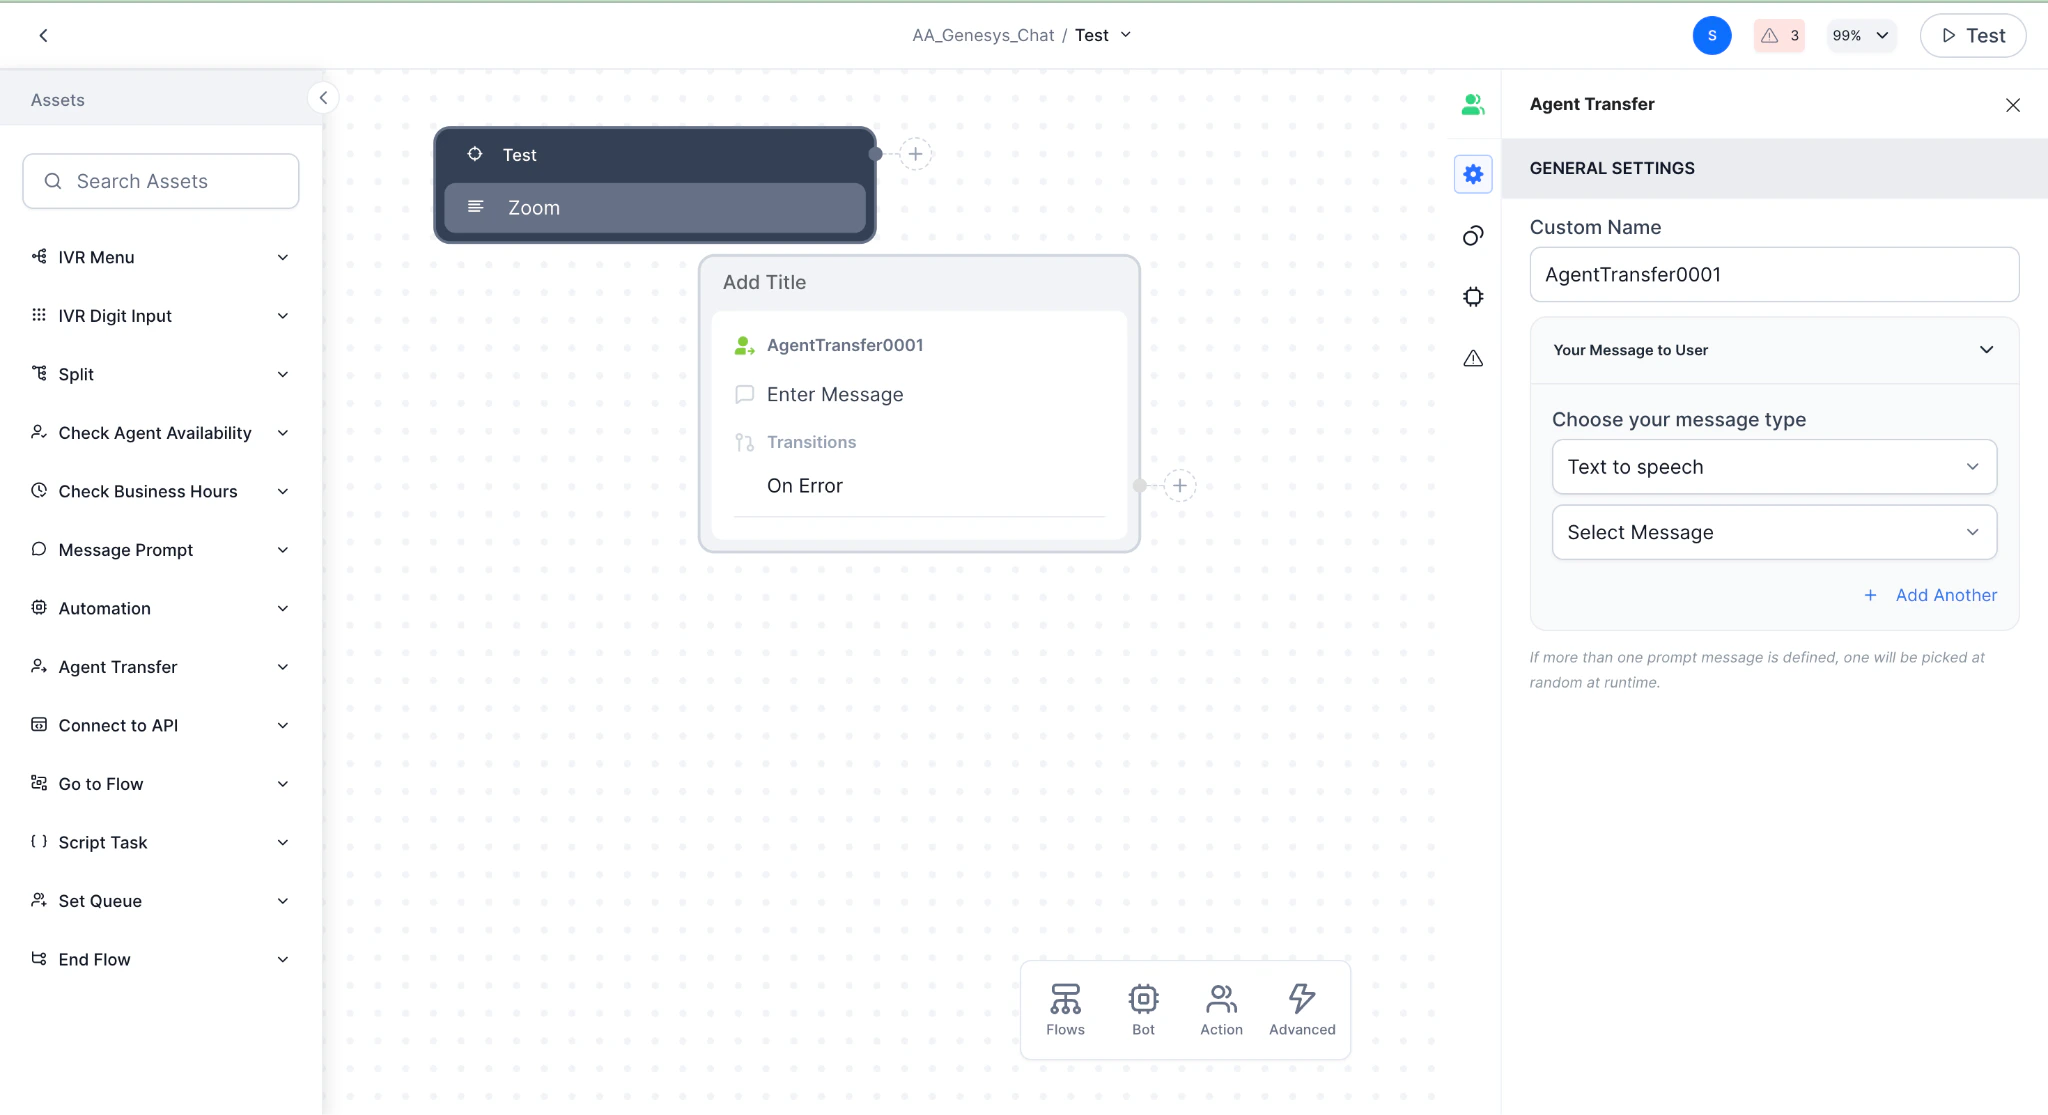 3. Go to **App Settings > Integration > Agent Transfer > Voice** and create a SIP transfer.
4. Select **SIP BYE** for ZCC agent transfer.
3. Go to **App Settings > Integration > Agent Transfer > Voice** and create a SIP transfer.
4. Select **SIP BYE** for ZCC agent transfer.
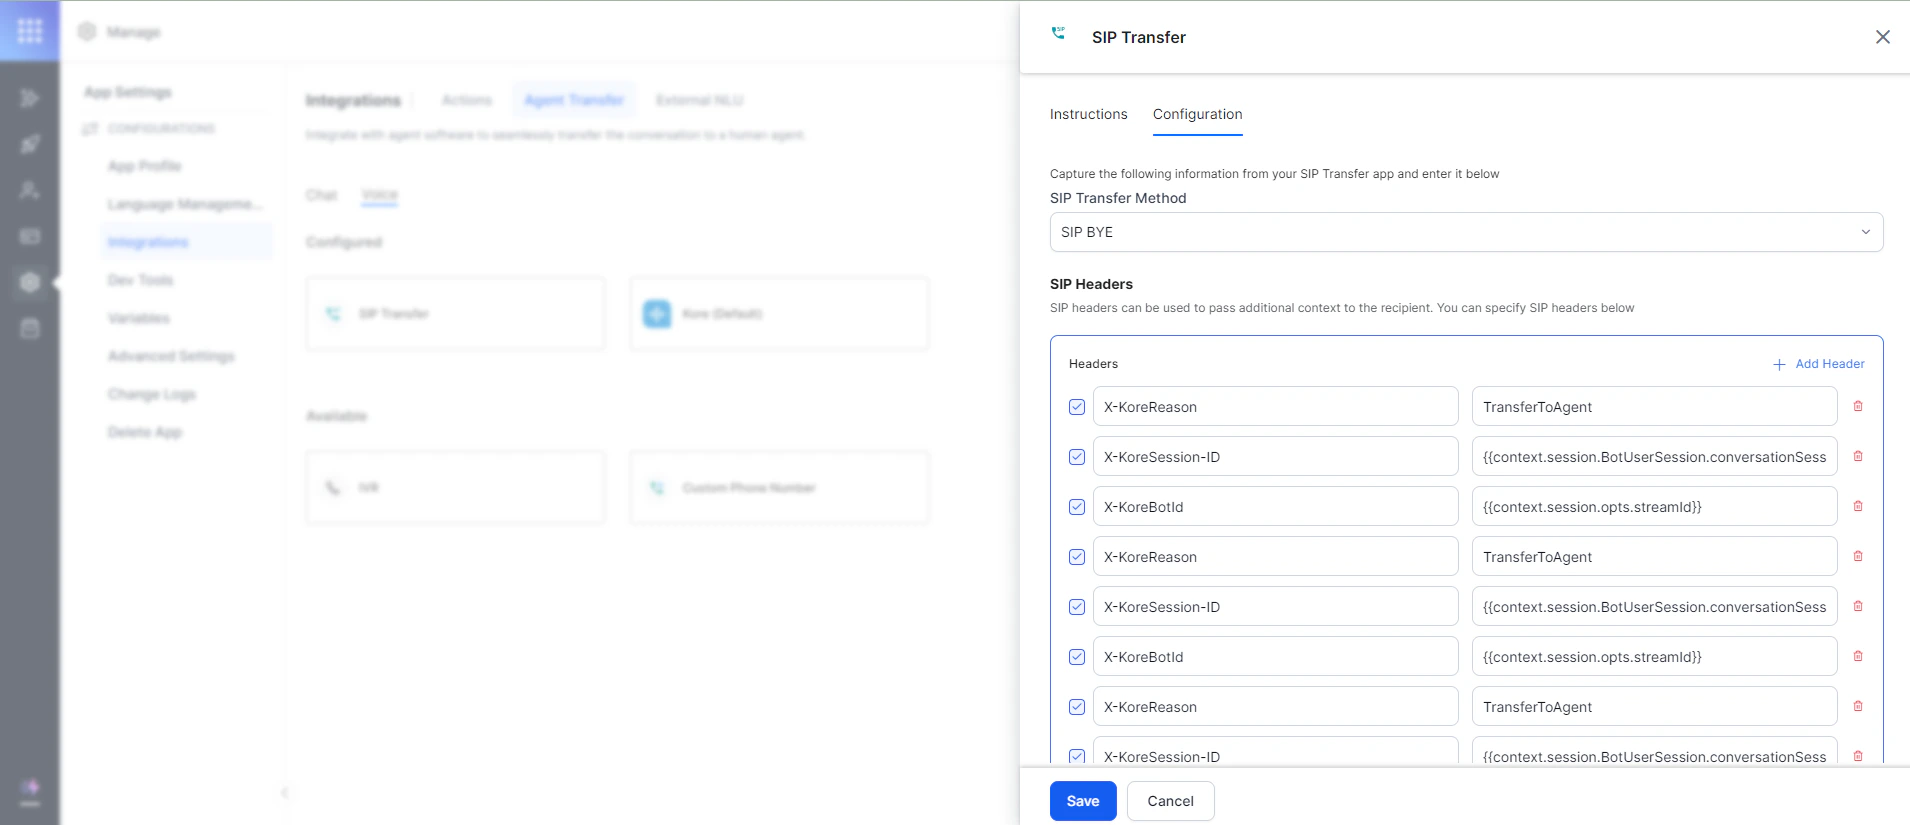 5. Configure SIP headers to pass to ZCC on agent transfer via SIP BYE.
### Option B: Agent Transfer from a Dialog Task
Add the following code to a Message Node:
Agent transfer can target a phone number or any SIP URI.
```js theme={null}
var message = "Transferring Call to xxxx number";
var ReferTo = "+91xxxxxxxxxx"; // or SIP URL
var headers = {
"X-Reason": "Call Received from Kore"
};
print(voiceUtils.refer(message, ExternalPhoneNumber, headers));
```
### Agent Transfer Scenarios
| Scenario | What Happens |
| ------------------------------------ | ------------------------------------------------------------------------------------------------------------------------------------------------- |
| Customer resolves query and hangs up | Zoom sends SIP BYE; Kore sends ACK; no SIP headers passed. |
| Voice bot ends the call | Kore sends `kore-session_id` and `kore-bot_id` in INVITE's 200 OK; sends `kore-reason(HangUp)` in SIP BYE; any custom gateway headers are passed. |
| Customer needs transfer to ZCC agent | Kore sends `kore-session_id` and `kore-bot_id` in INVITE's 200 OK; sends `kore-reason(TransferToAgent)` in SIP BYE. |
***
## Step 4: Create a Zoom Connector (Transfer from IVR)
1. Sign in to [Zoom App Marketplace](https://marketplace.zoom.us/apps) as Admin.
2. Go to **App Types > Connectors**, or search for "kore.ai."
5. Configure SIP headers to pass to ZCC on agent transfer via SIP BYE.
### Option B: Agent Transfer from a Dialog Task
Add the following code to a Message Node:
Agent transfer can target a phone number or any SIP URI.
```js theme={null}
var message = "Transferring Call to xxxx number";
var ReferTo = "+91xxxxxxxxxx"; // or SIP URL
var headers = {
"X-Reason": "Call Received from Kore"
};
print(voiceUtils.refer(message, ExternalPhoneNumber, headers));
```
### Agent Transfer Scenarios
| Scenario | What Happens |
| ------------------------------------ | ------------------------------------------------------------------------------------------------------------------------------------------------- |
| Customer resolves query and hangs up | Zoom sends SIP BYE; Kore sends ACK; no SIP headers passed. |
| Voice bot ends the call | Kore sends `kore-session_id` and `kore-bot_id` in INVITE's 200 OK; sends `kore-reason(HangUp)` in SIP BYE; any custom gateway headers are passed. |
| Customer needs transfer to ZCC agent | Kore sends `kore-session_id` and `kore-bot_id` in INVITE's 200 OK; sends `kore-reason(TransferToAgent)` in SIP BYE. |
***
## Step 4: Create a Zoom Connector (Transfer from IVR)
1. Sign in to [Zoom App Marketplace](https://marketplace.zoom.us/apps) as Admin.
2. Go to **App Types > Connectors**, or search for "kore.ai."
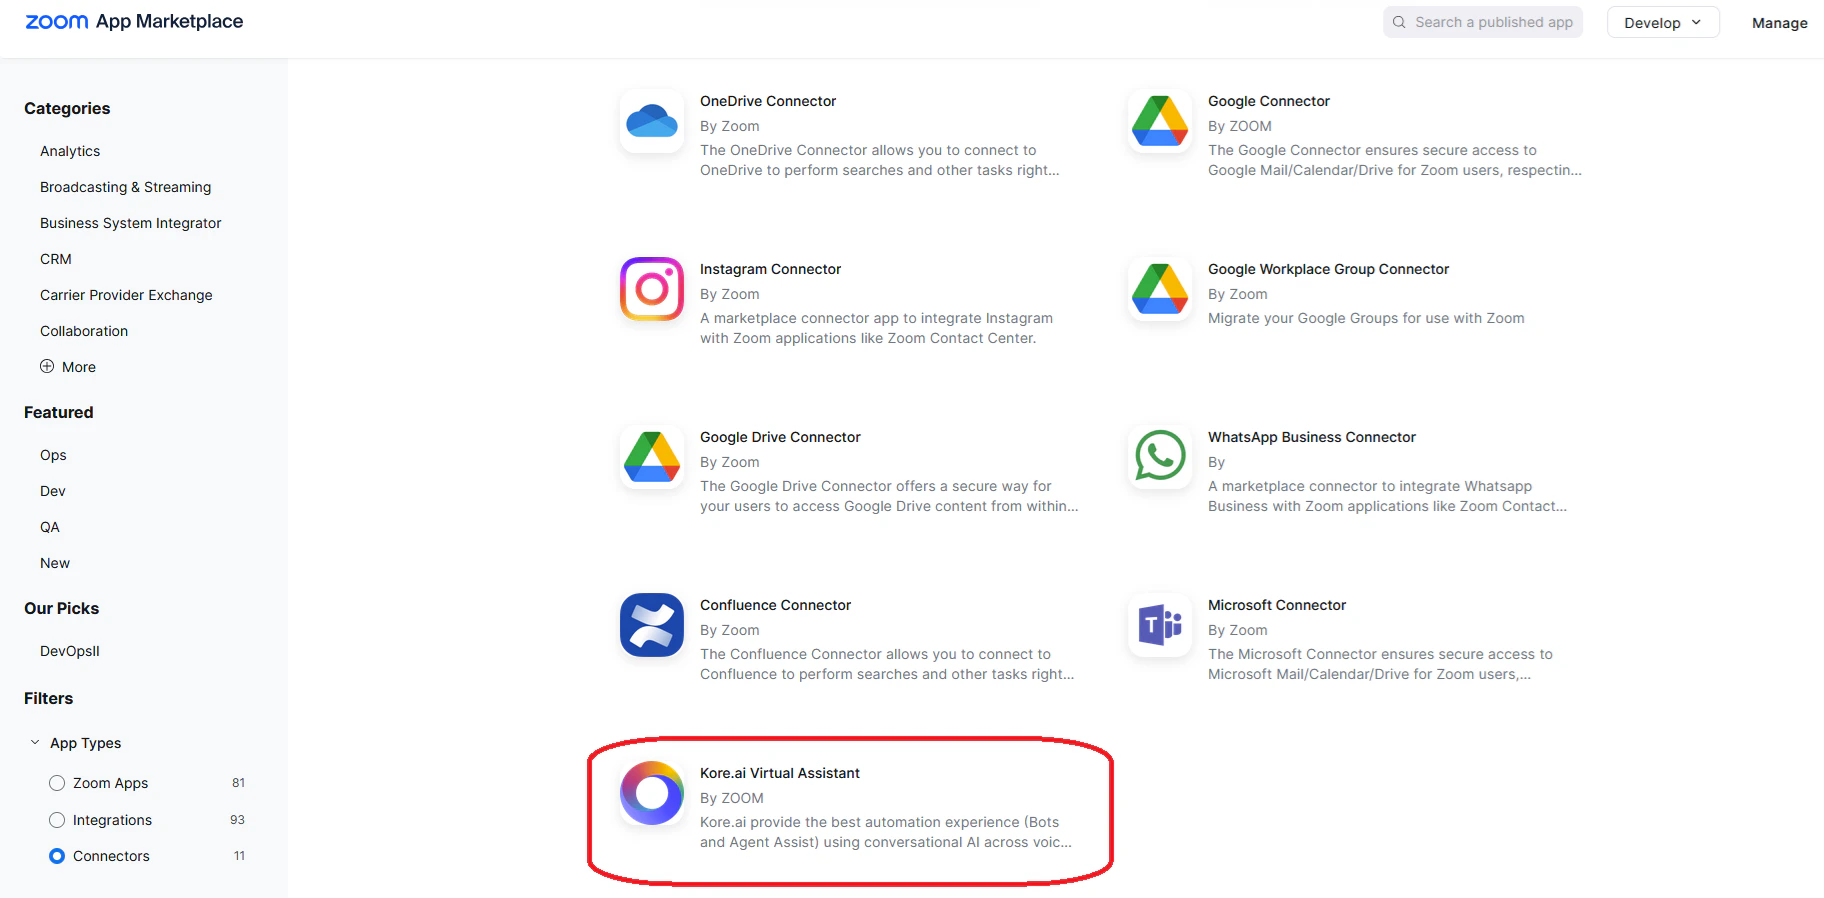
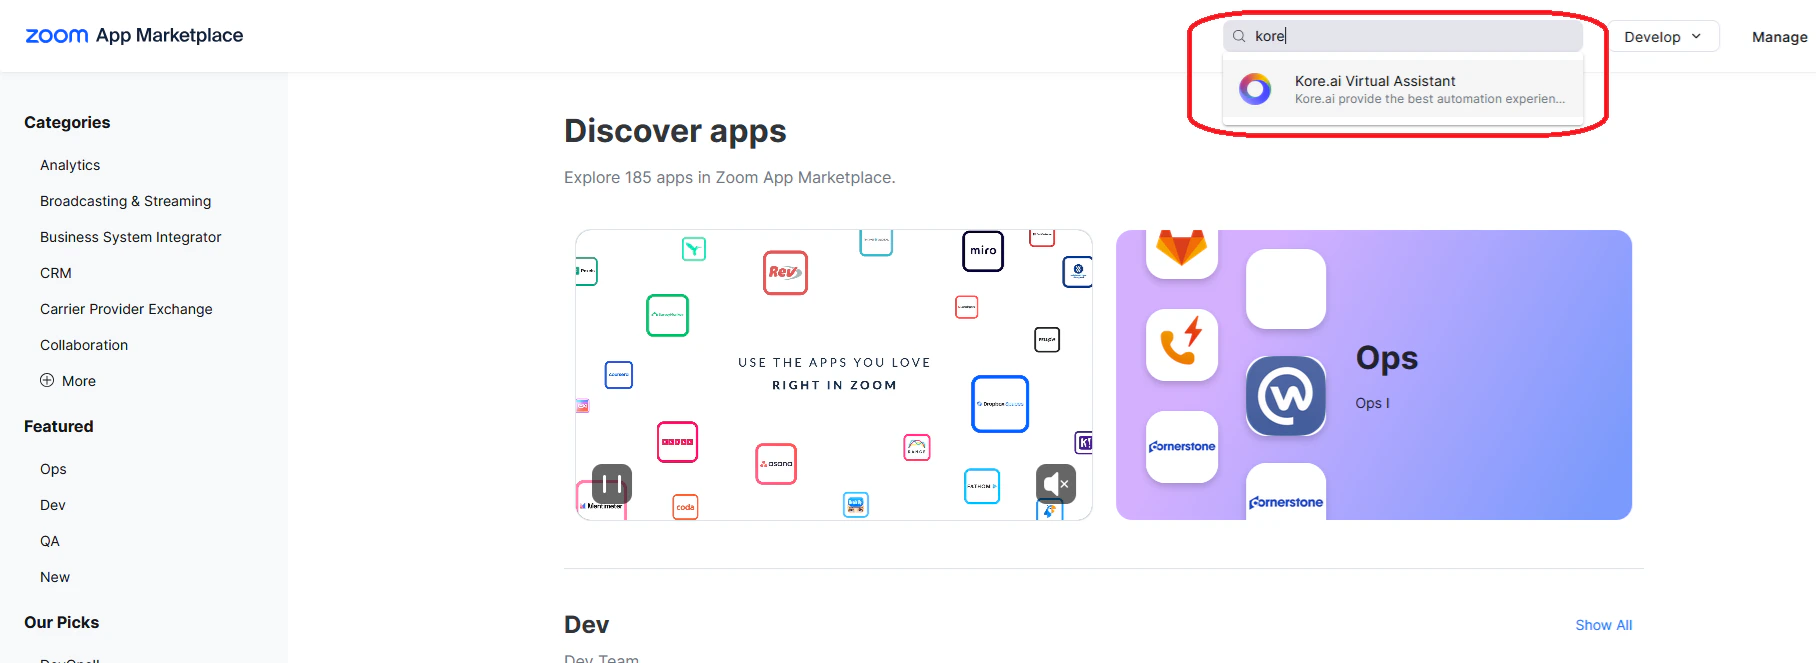 3. Select the **Kore.ai** connector.
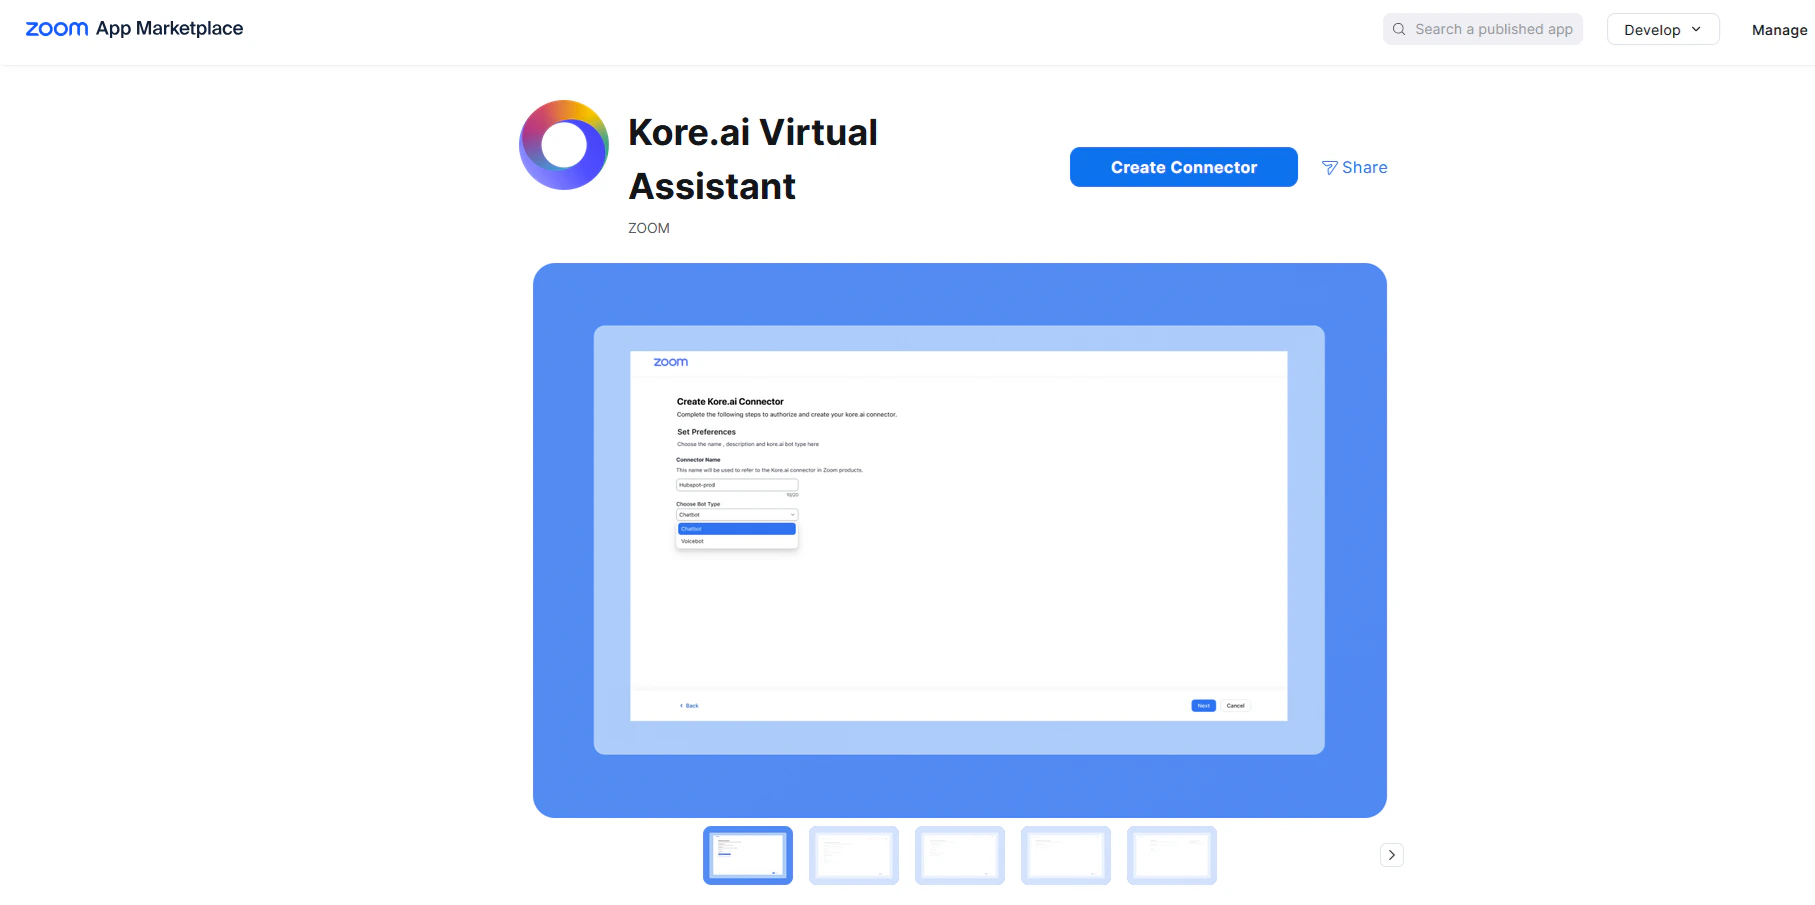 4. Click **Create Kore.ai Assistant Connector**.
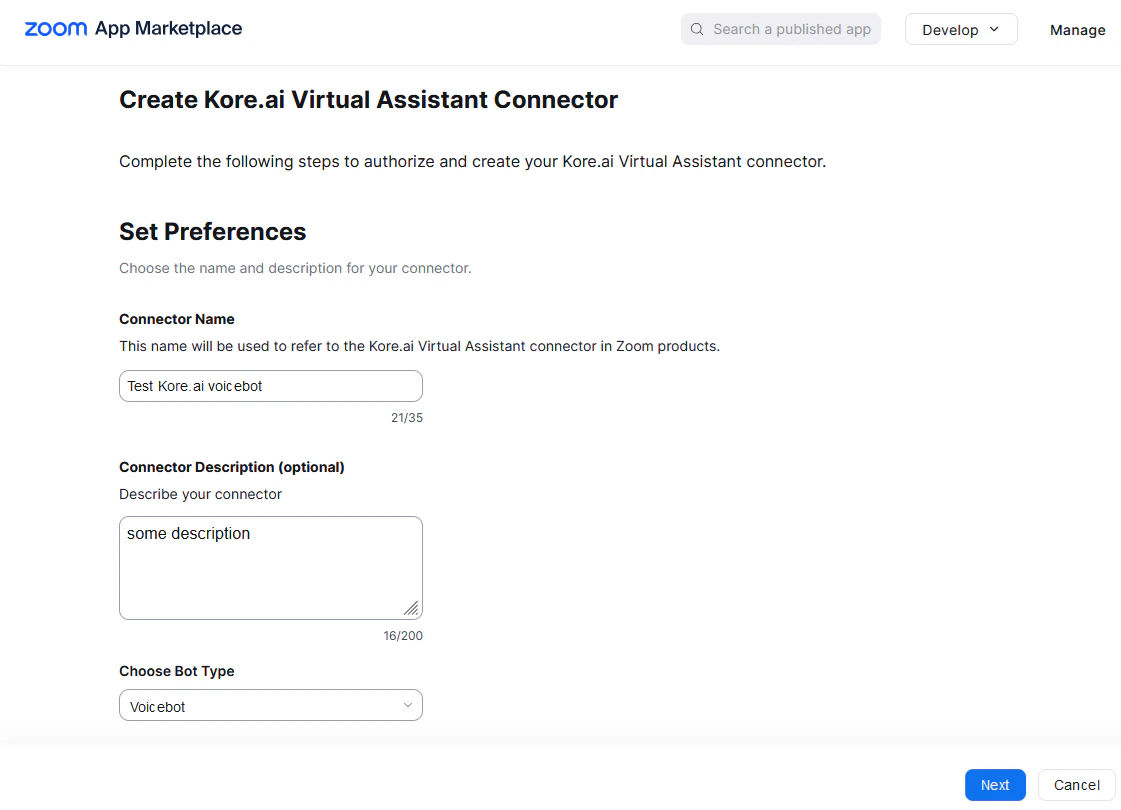 5. Enter a **Connector Name**, select **Voicebot** from **Choose Bot Type**, and click **Next**.
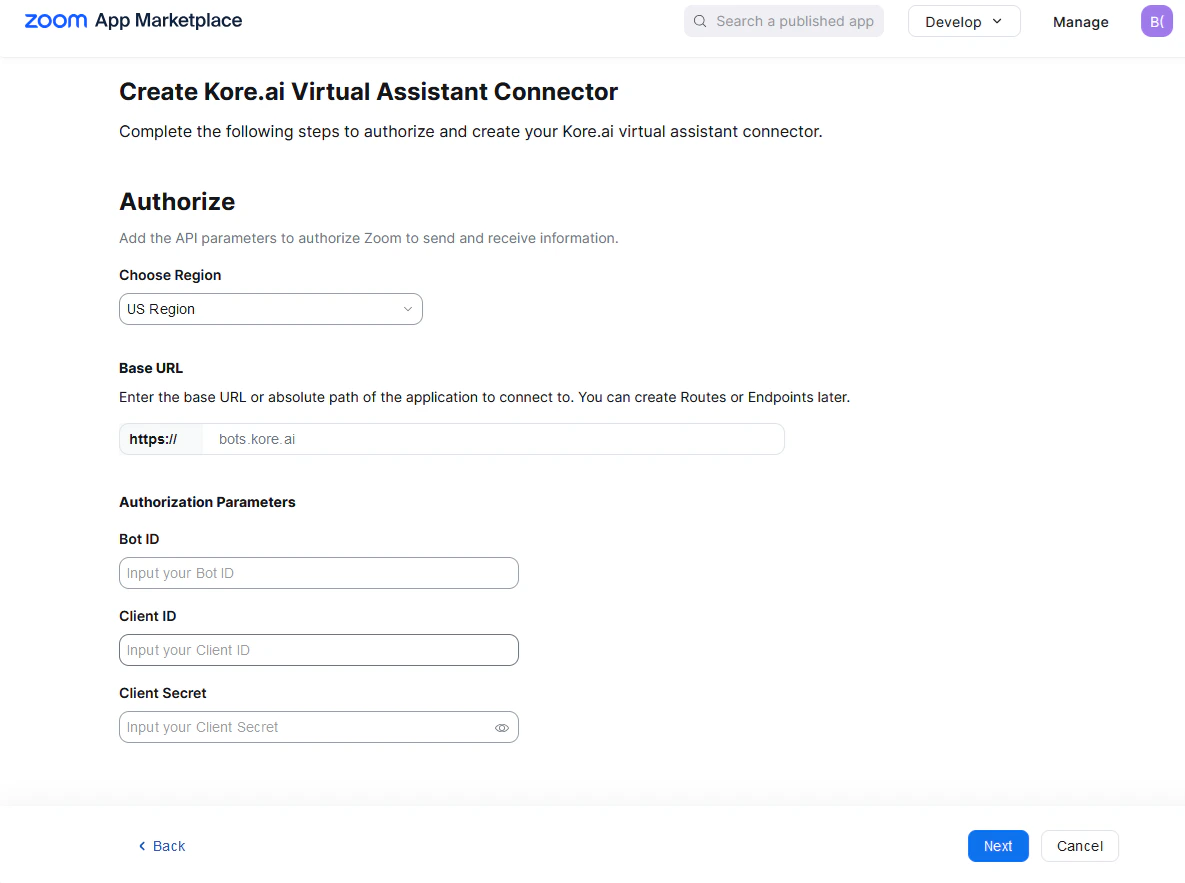
6. Select your region to auto-populate the Base URL.
7. Copy **Bot ID**, **Client ID**, and **Client Secret** from AI for Service:
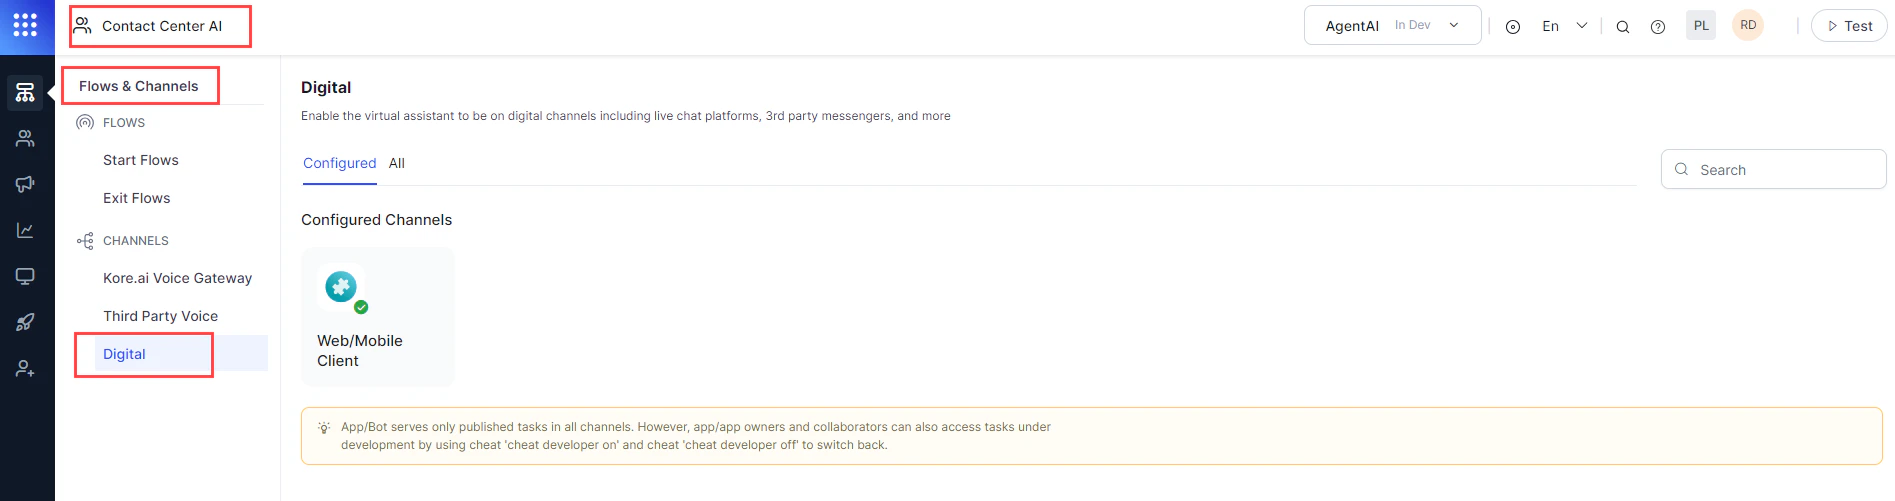
* Go to **Flows & Channels > Digital > Configured Channels > Web/Mobile Client > JWT App Details**.
5. Enter a **Connector Name**, select **Voicebot** from **Choose Bot Type**, and click **Next**.
6. Select your region to auto-populate the Base URL.
7. Copy **Bot ID**, **Client ID**, and **Client Secret** from AI for Service:
* Go to **Flows & Channels > Digital > Configured Channels > Web/Mobile Client > JWT App Details**.
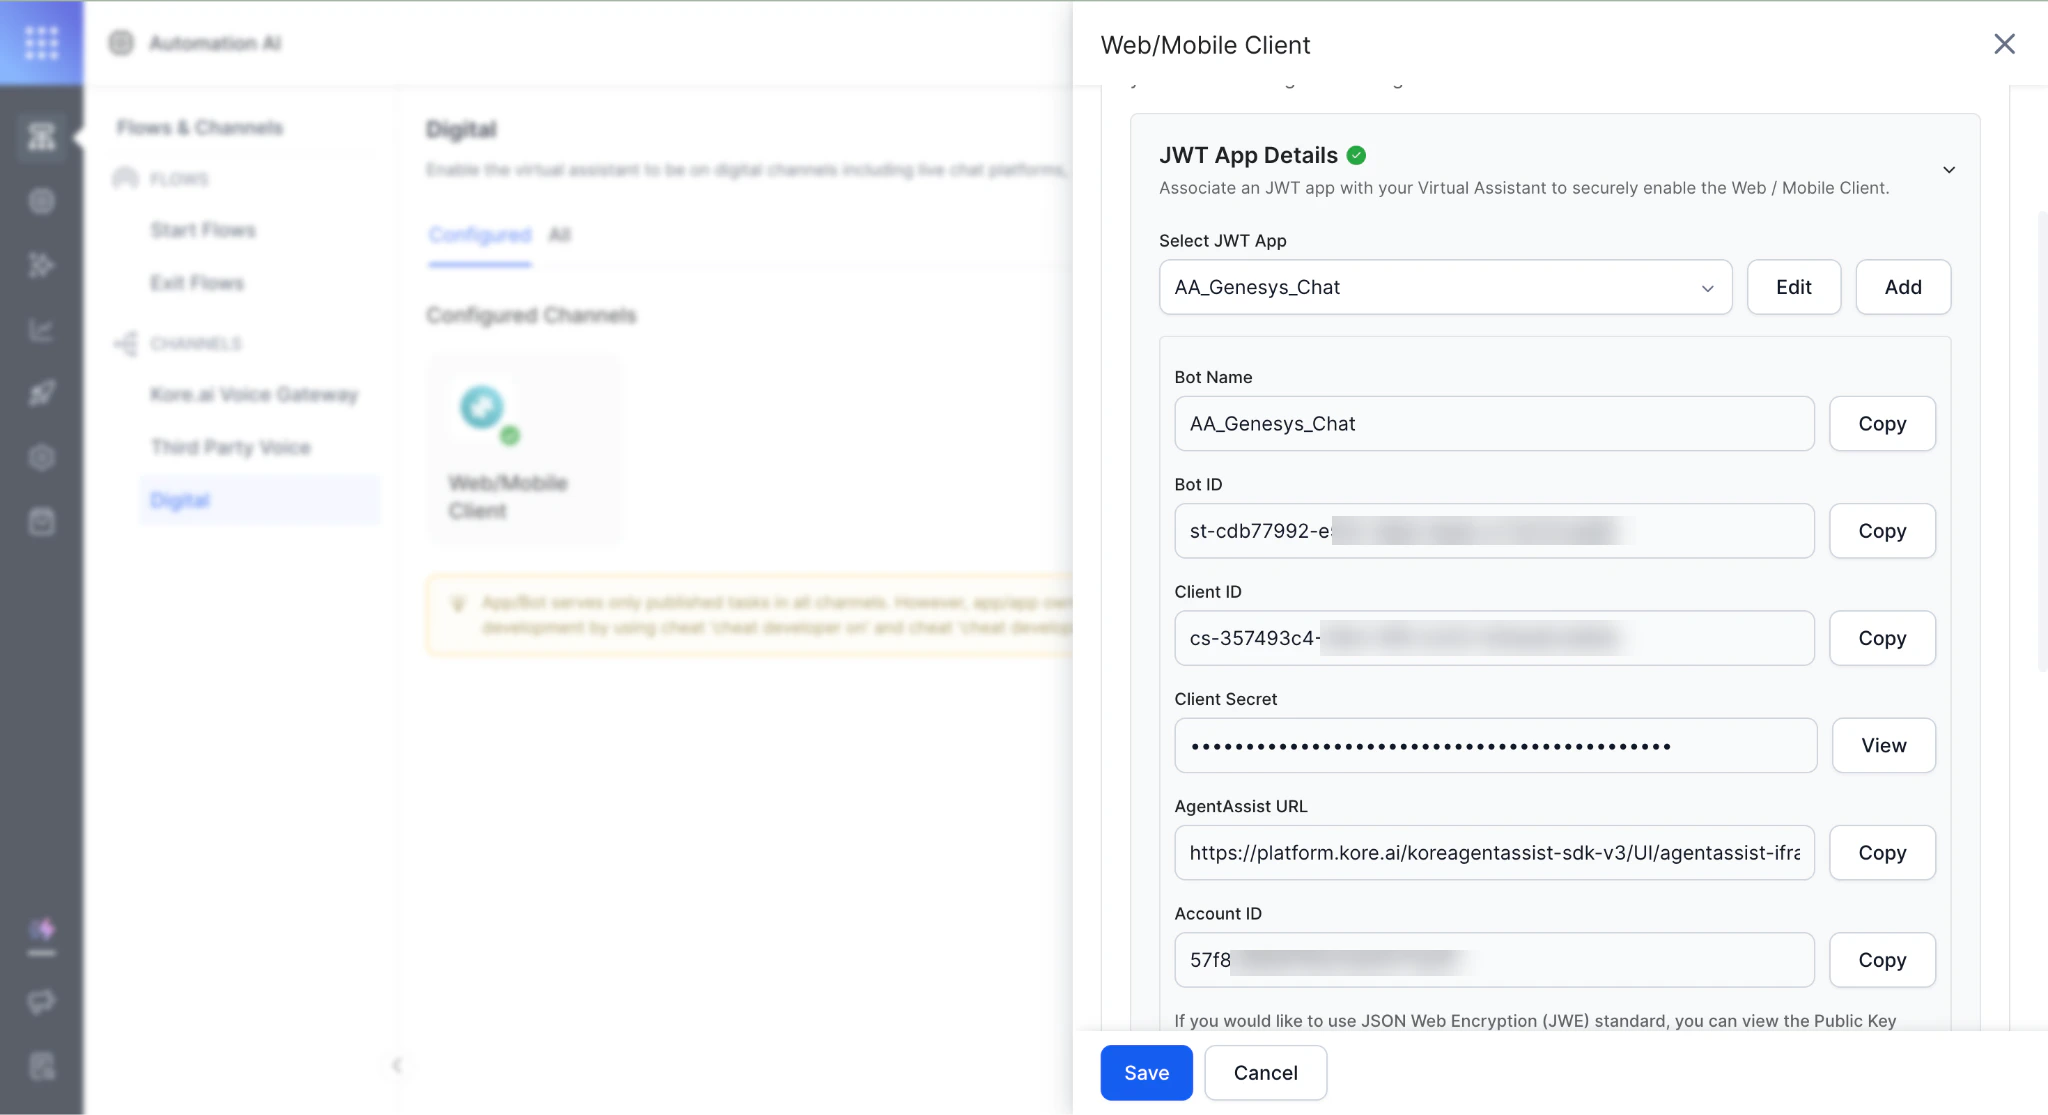 8. Paste the values into the **Authorization Parameters** section and click **Next**.
 9. Copy the **Domain Name** and **DID Number** from the connector page.
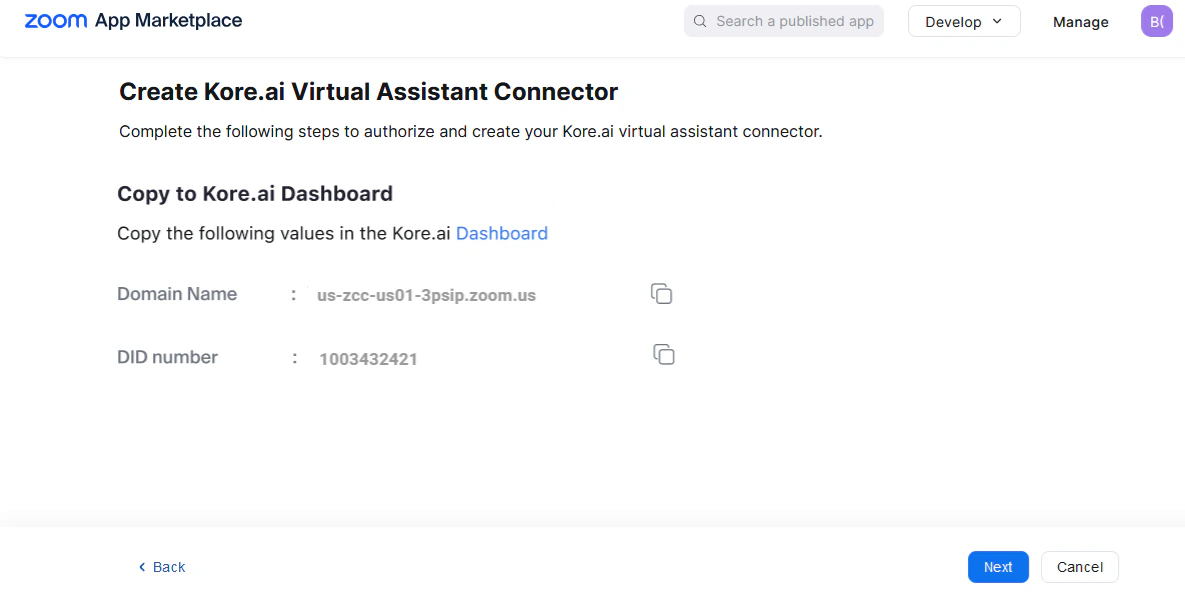 10. Paste them into the **Assistant Connector** configuration in ZCC.
11. Click **Next** to authorize the connector with the Platform.
After creating the Experience Flow, attach a DID Number to the flow. Since Zoom integration uses DID numbers, no number purchase from Kore is required.
***
## Step 5: Fetch Conversation Details and Summary
1. Sign in to AI for Service.
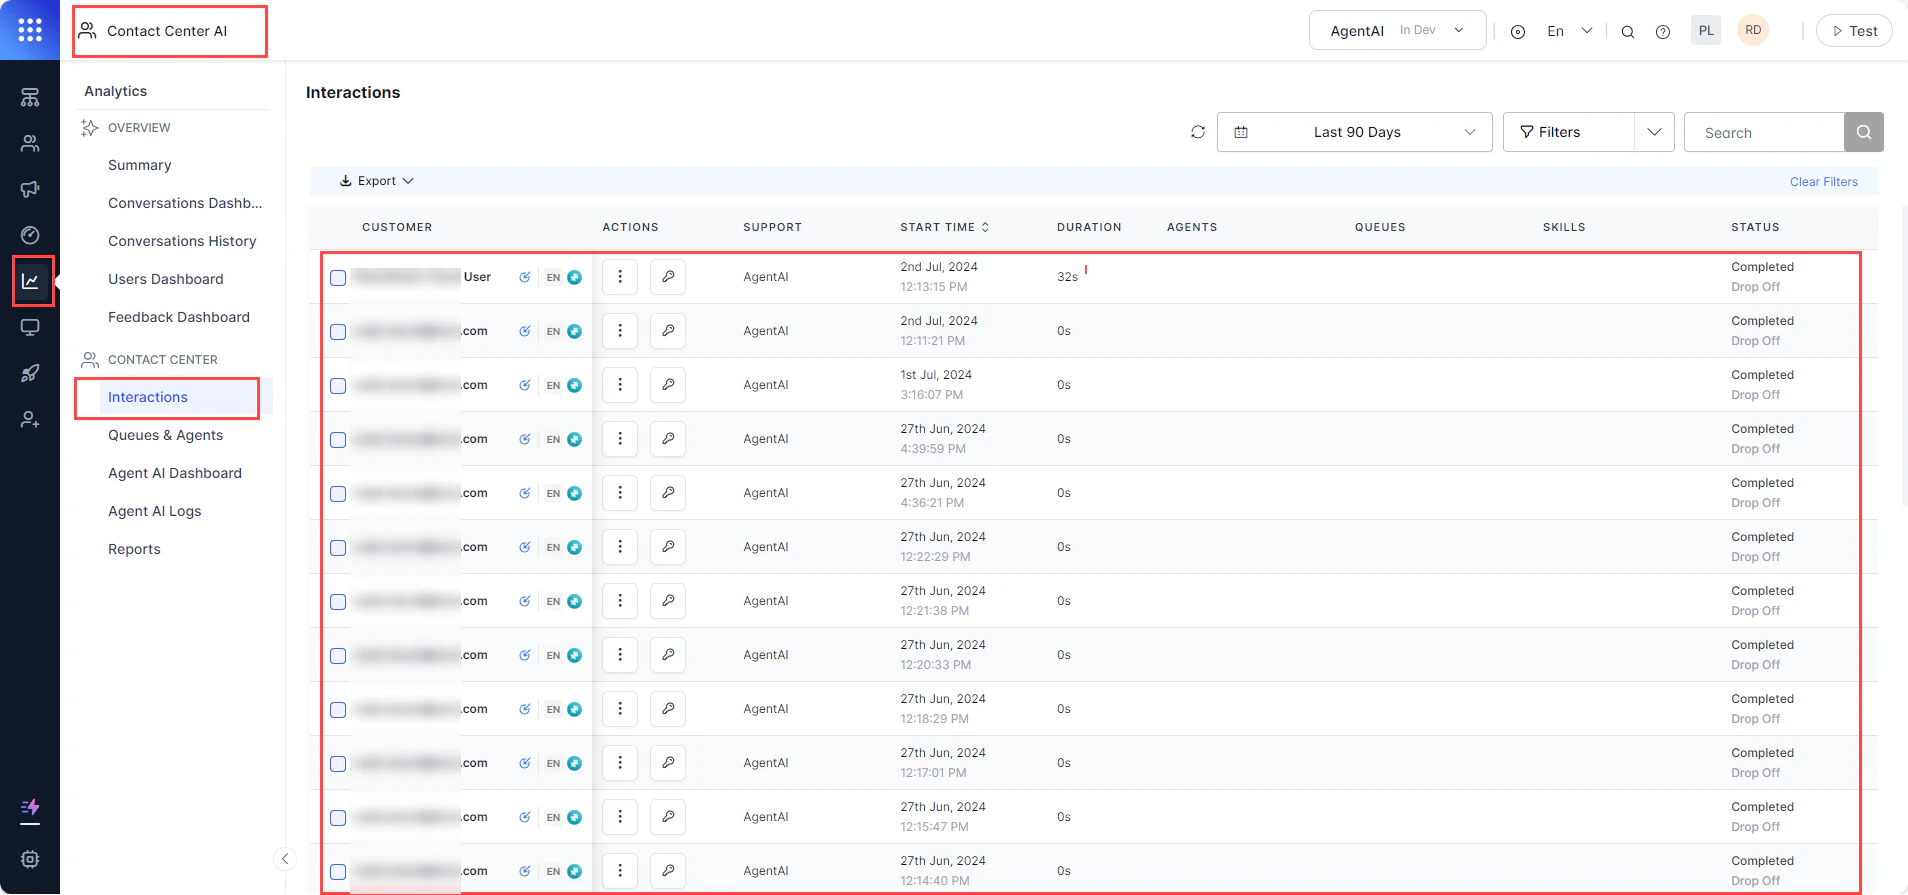
2. Go to **Contact Center AI > Analytics > Contact Center > Interactions** and verify call records exist.
10. Paste them into the **Assistant Connector** configuration in ZCC.
11. Click **Next** to authorize the connector with the Platform.
After creating the Experience Flow, attach a DID Number to the flow. Since Zoom integration uses DID numbers, no number purchase from Kore is required.
***
## Step 5: Fetch Conversation Details and Summary
1. Sign in to AI for Service.
2. Go to **Contact Center AI > Analytics > Contact Center > Interactions** and verify call records exist.
 3. Go to **Settings > App Settings > Dev Tools > API Scopes**.
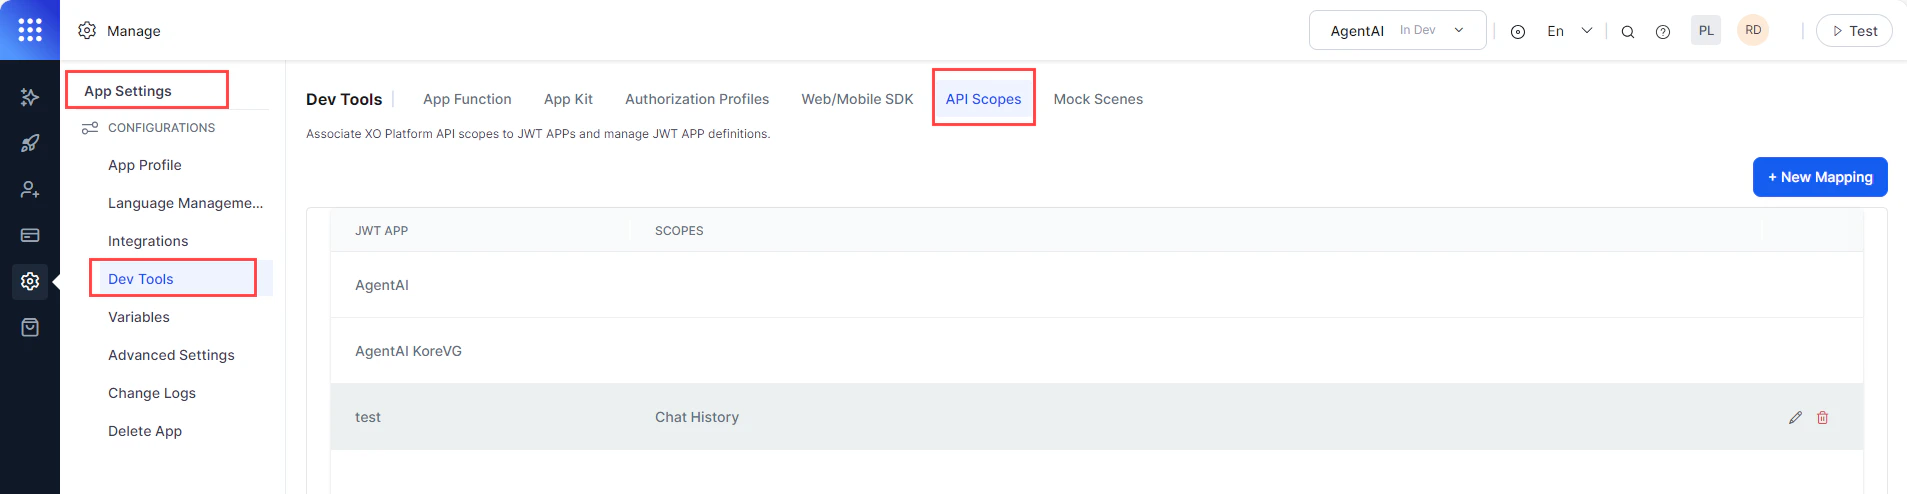 4. Click **+ New Mapping**, then select an app from the **JWT App** list.
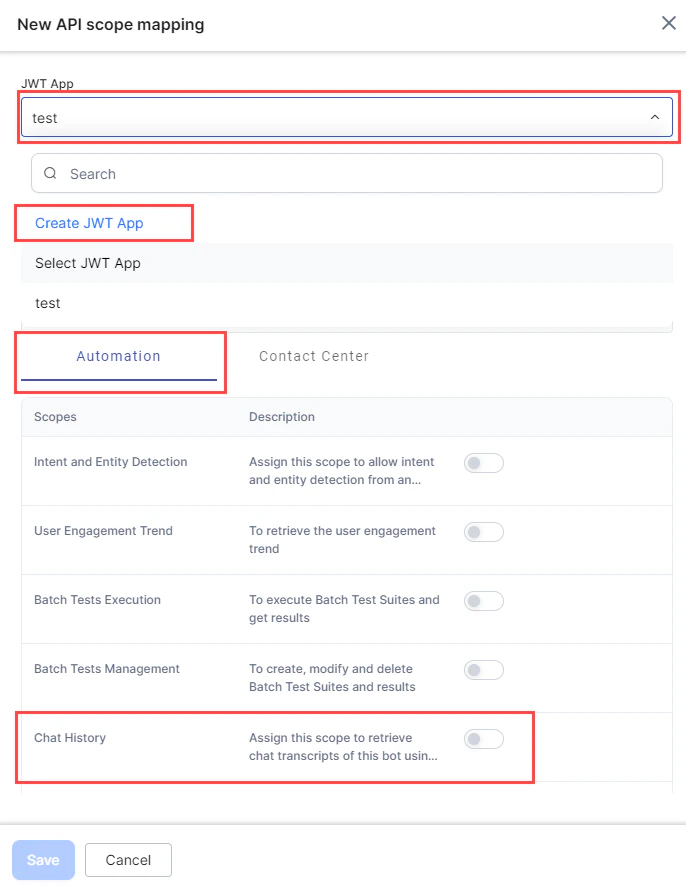 5. Enable **Chat History** under **Automation** and click **Save**.
6. Go to **Generative AI > Models Library**, find **Kore.ai XO GPT**, and click **Enable Now**.
5. Enable **Chat History** under **Automation** and click **Save**.
6. Go to **Generative AI > Models Library**, find **Kore.ai XO GPT**, and click **Enable Now**.
 7. On the Kore.ai XO GPT page:
* Select a model.
* Select a fine-tuned model for **Summarizing Conversation**.
* Read and accept the LLM & Generative Policy guidelines.
7. On the Kore.ai XO GPT page:
* Select a model.
* Select a fine-tuned model for **Summarizing Conversation**.
* Read and accept the LLM & Generative Policy guidelines.
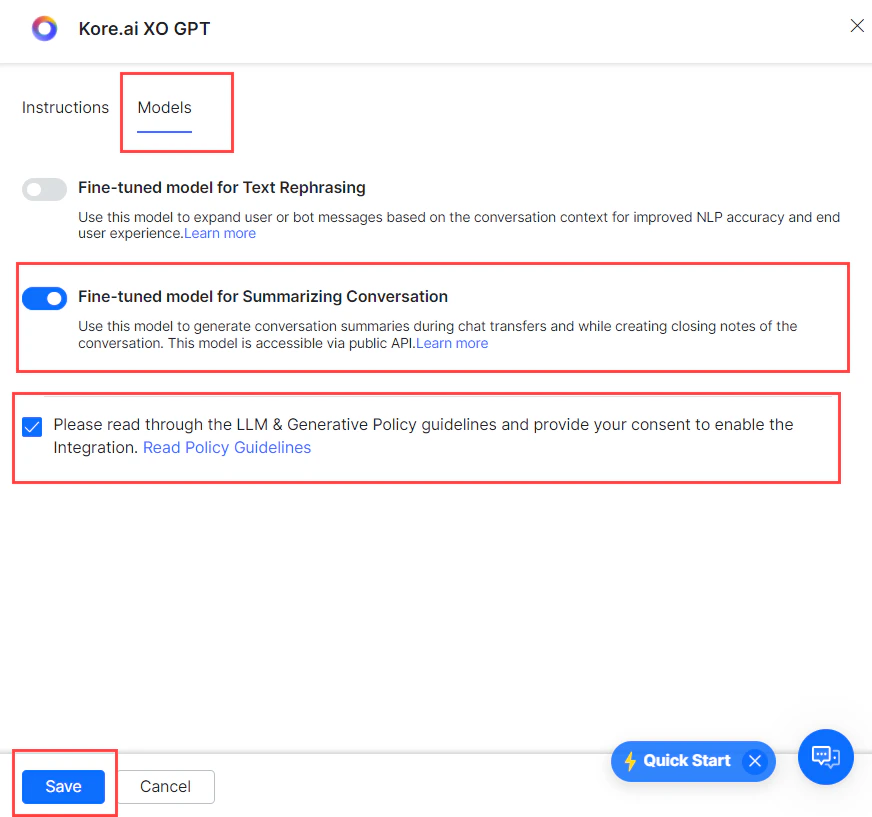 8. Click **Save**.
9. Go to **Generative AI > GenAI Features**. Enable **Conversation Summary** by selecting a model and toggling it on.
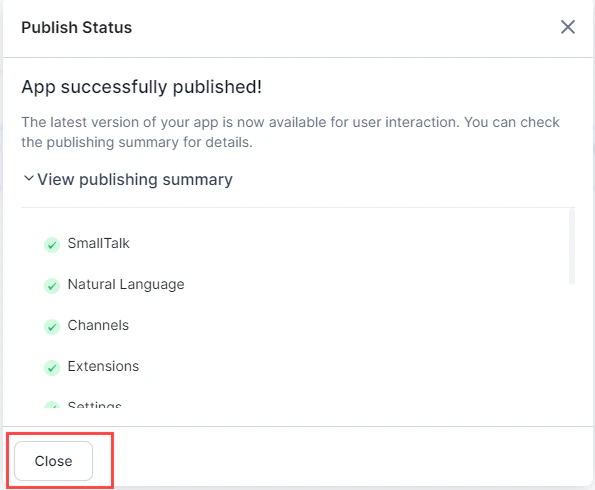
10. Go to **Deploy > Publish** and click **Proceed**.
8. Click **Save**.
9. Go to **Generative AI > GenAI Features**. Enable **Conversation Summary** by selecting a model and toggling it on.
10. Go to **Deploy > Publish** and click **Proceed**.
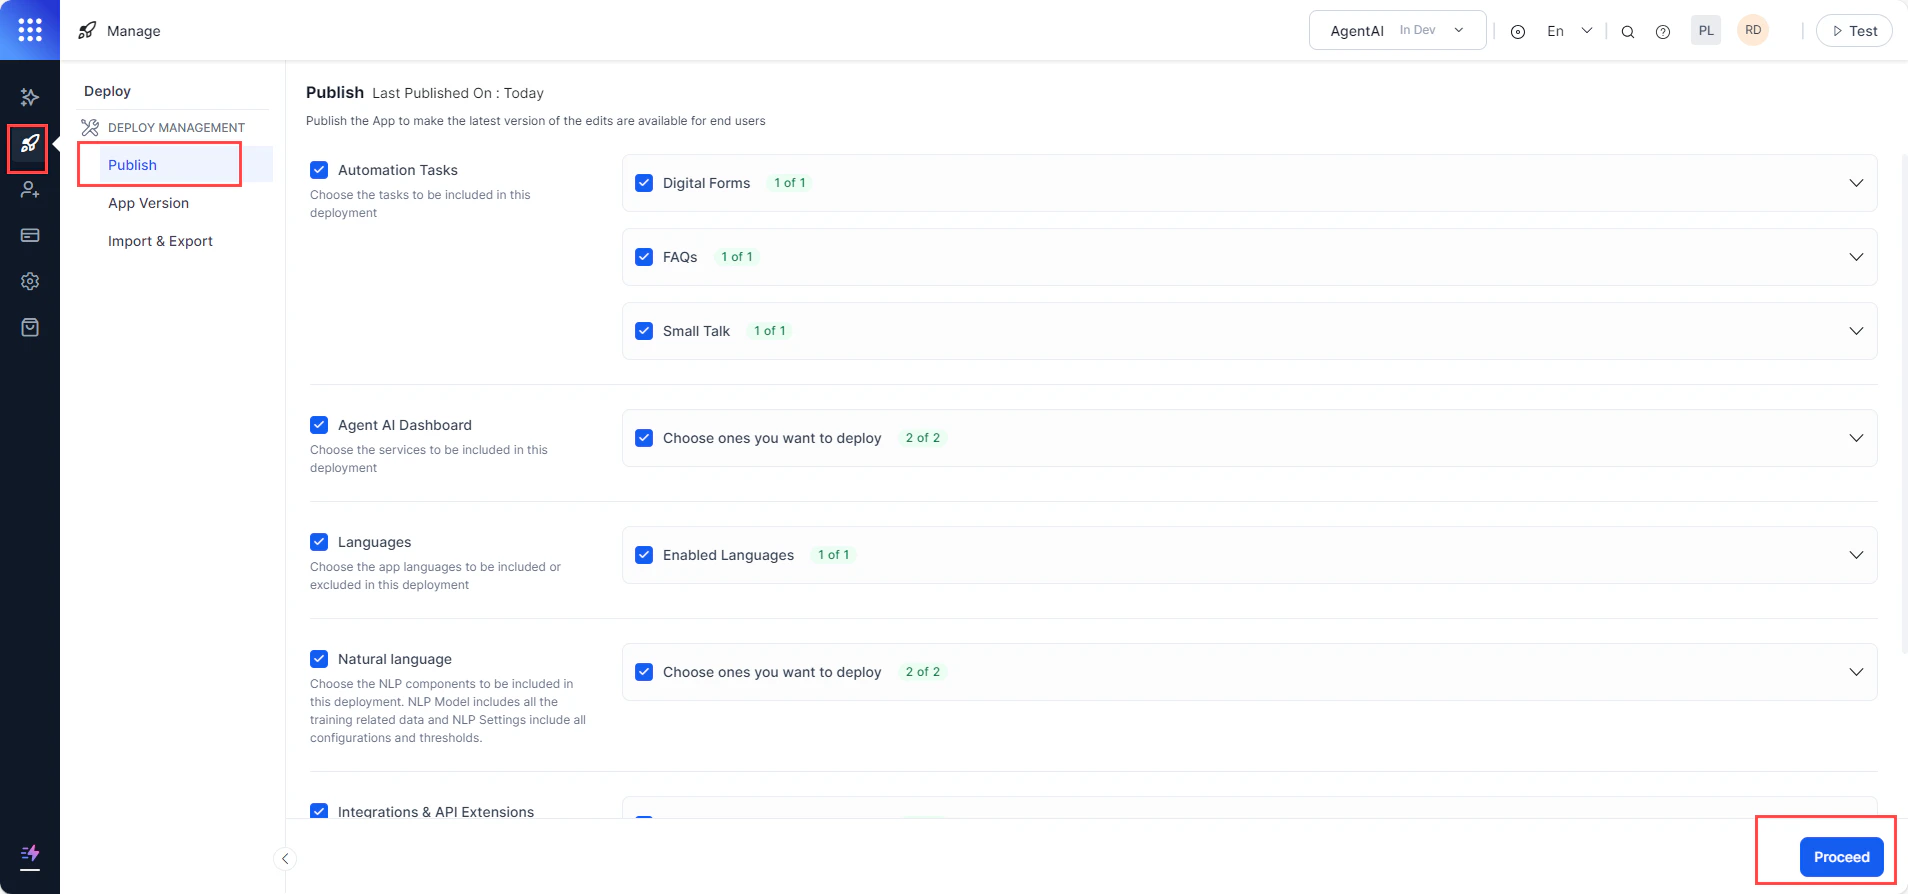 11. Enter a comment and click **Confirm**.
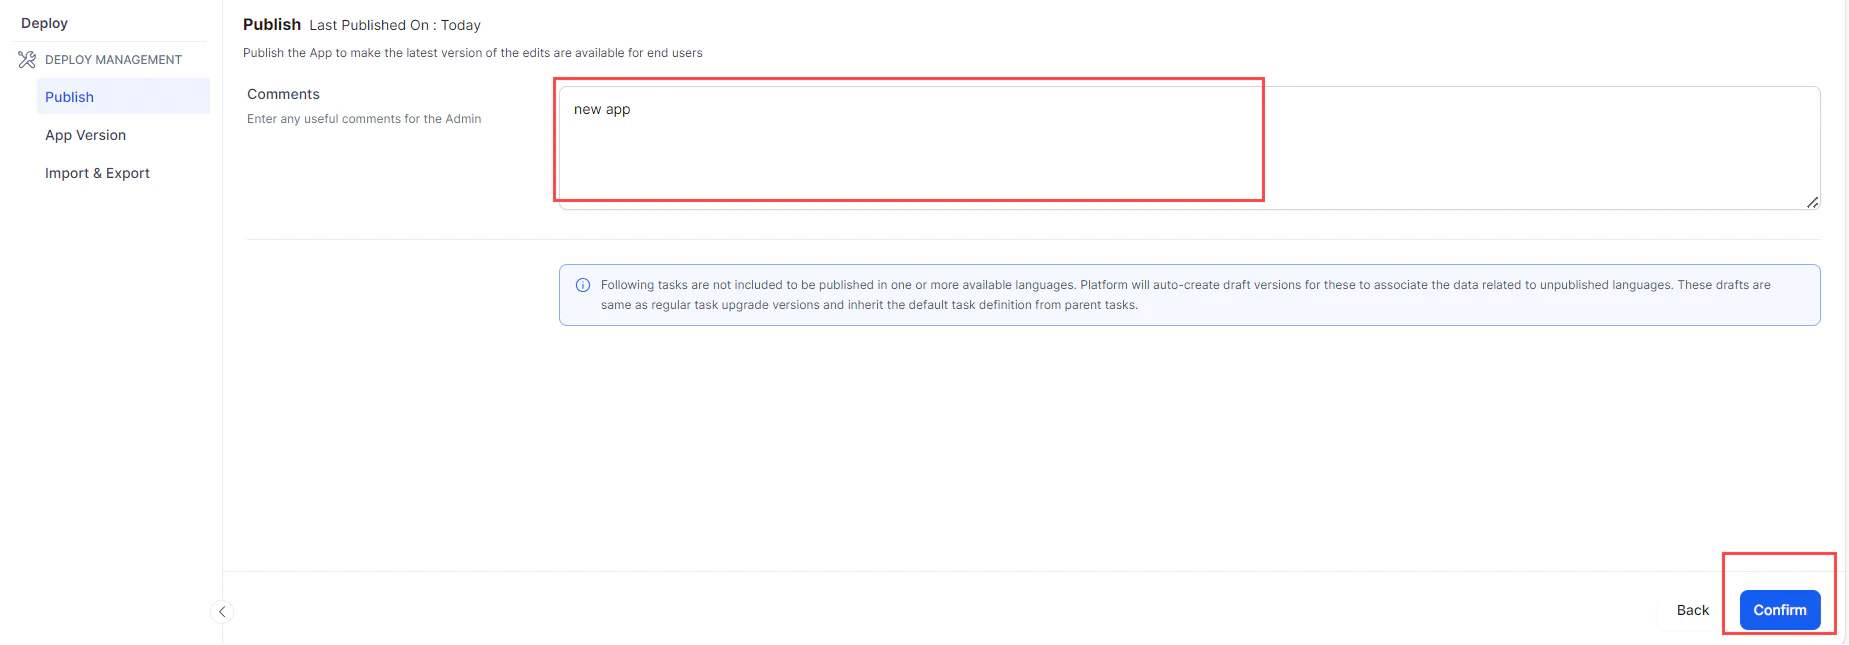 12. Close the confirmation message.
 13. Copy the `curl` from the [Conversation Details and Summary API](/ai-for-service/apis/automation/conversation-details-and-summary).
14. In Postman, paste the `curl` and replace the following values:
**Bot ID** — From AI for Service:
* Go to **Contact Center AI > Flows & Channels > Digital**.
13. Copy the `curl` from the [Conversation Details and Summary API](/ai-for-service/apis/automation/conversation-details-and-summary).
14. In Postman, paste the `curl` and replace the following values:
**Bot ID** — From AI for Service:
* Go to **Contact Center AI > Flows & Channels > Digital**.
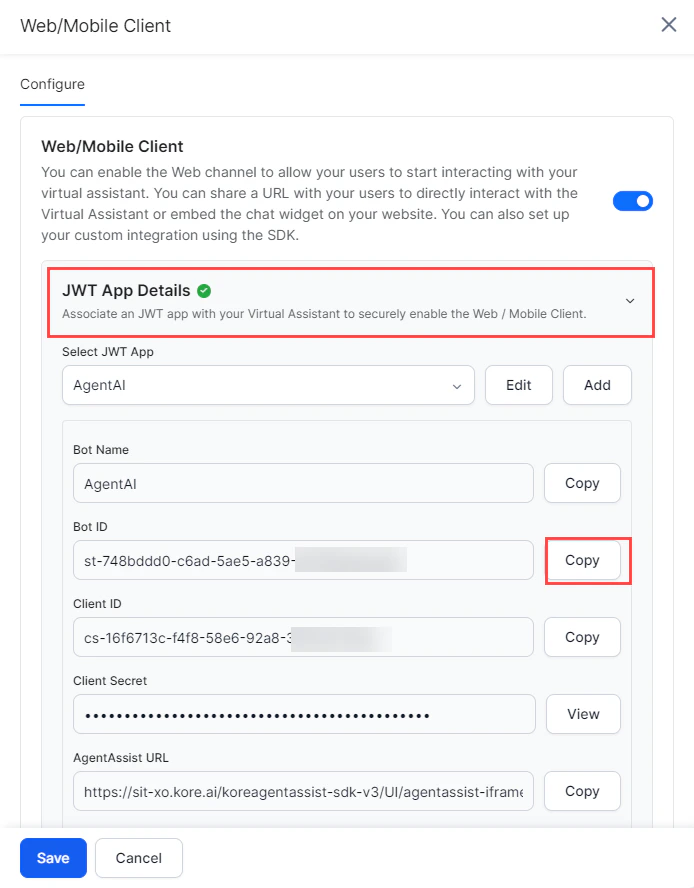
 * Click **Web/Mobile Client** under **Configured**, expand **JWT App Details**, and copy the **Bot ID**.
 **Session ID** — From AI for Service:
* Go to **Contact Center AI > Analytics > Contact Center > Interactions**.
* Click the interaction log.
**Session ID** — From AI for Service:
* Go to **Contact Center AI > Analytics > Contact Center > Interactions**.
* Click the interaction log.
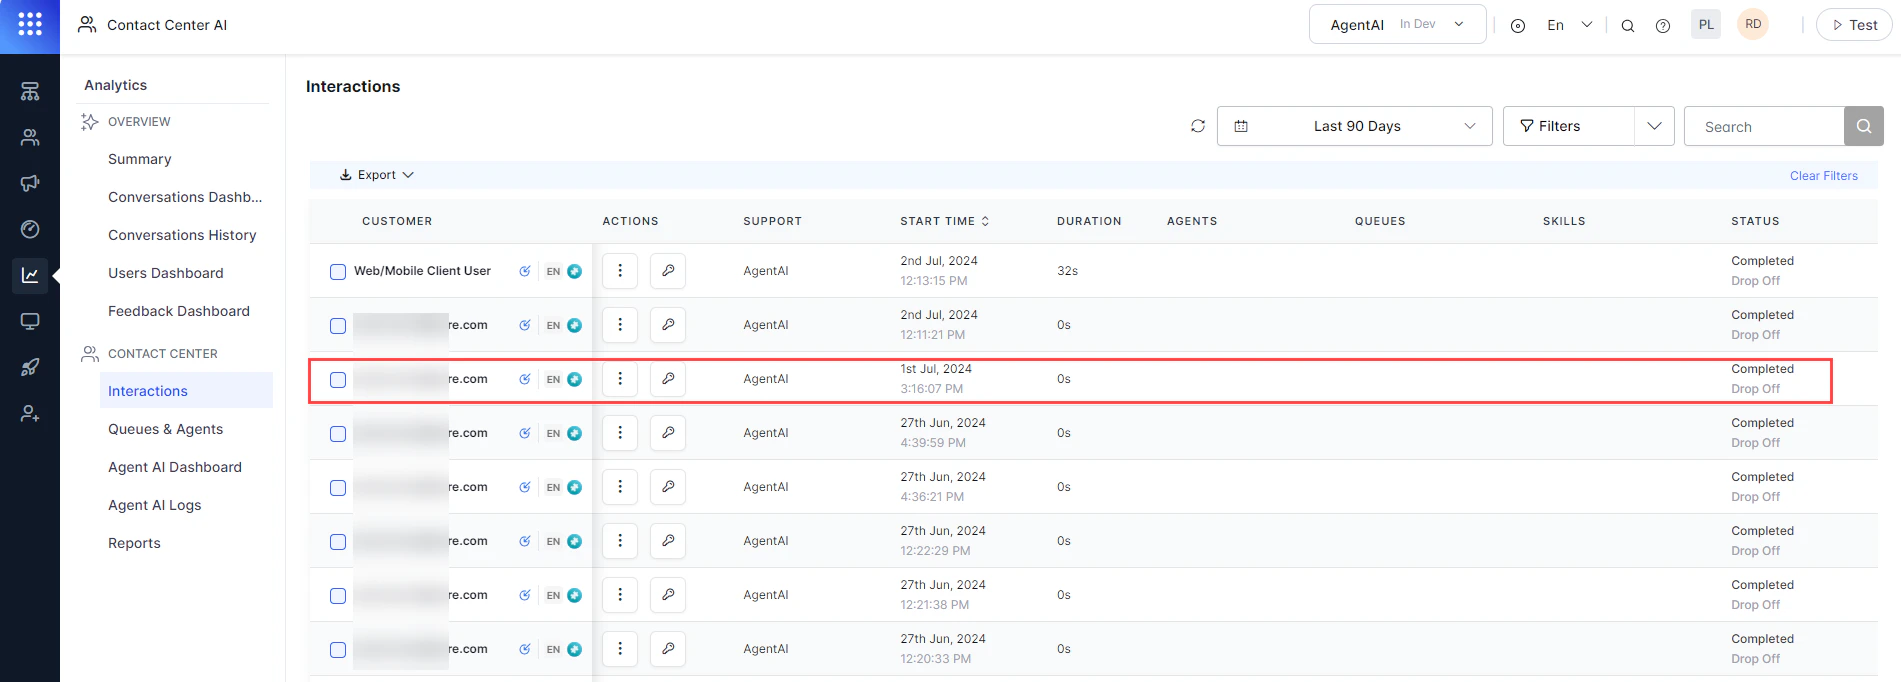 * On the **Insights to Logs** page, click **Identifiers** and copy the **Session ID**.
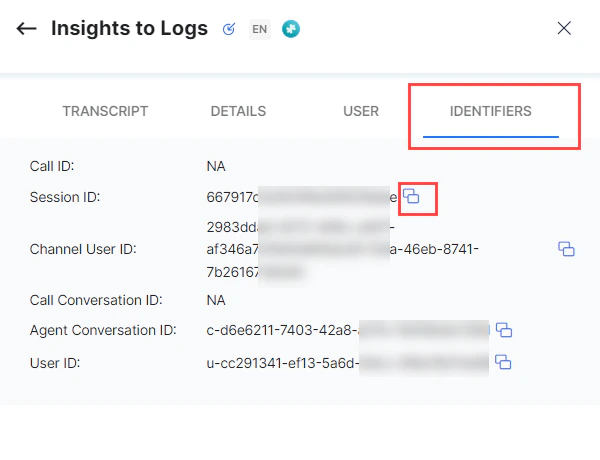 **JWT Token** — Follow the [JWT token generation guide](/ai-for-service/apis/automation/api-introduction#generating-the-jwt-token).
15. Run the modified `curl` to retrieve conversation details and summary.
**JWT Token** — Follow the [JWT token generation guide](/ai-for-service/apis/automation/api-introduction#generating-the-jwt-token).
15. Run the modified `curl` to retrieve conversation details and summary.