> ## Documentation Index
> Fetch the complete documentation index at: https://koreai-ai-for-work-dev.mintlify.site/llms.txt
> Use this file to discover all available pages before exploring further.
# Adding the Google Chat Channel
[Back to Available Channels](/ai-for-service/channels/adding-channels-to-your-bot#available-channels)
Adding Google Chat as a channel to your AI Agent allows end-users to chat with it using Google Chat. This article shows you how to set it up.
## Step 1: Enable the Google Chat API
1. Log into [Google Cloud.](https://console.developers.google.com/projectselector2/apis/dashboard?pli=1)
2. Click **Library**, in the left side menu.
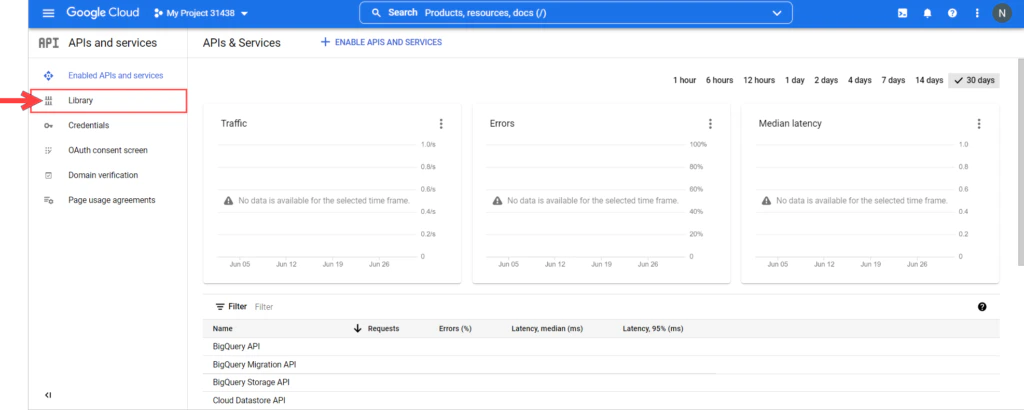 3. Search and select the **Google Chat API**.
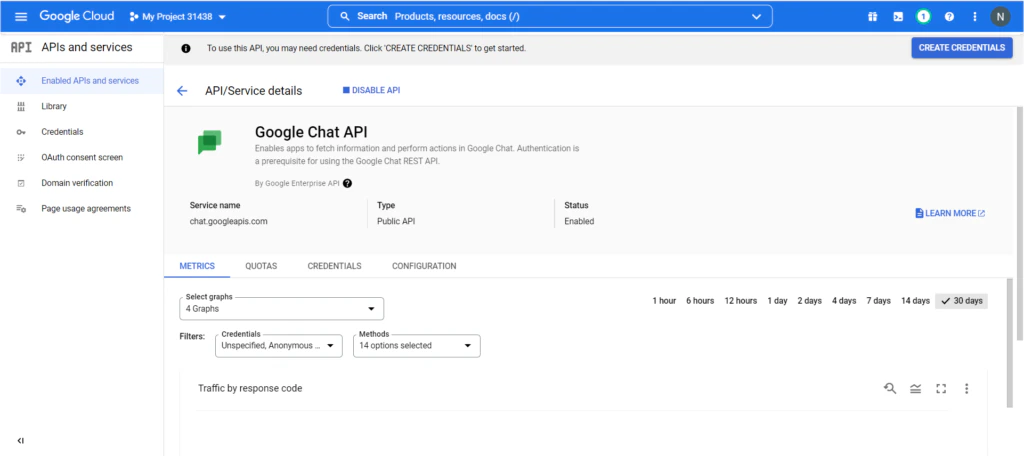
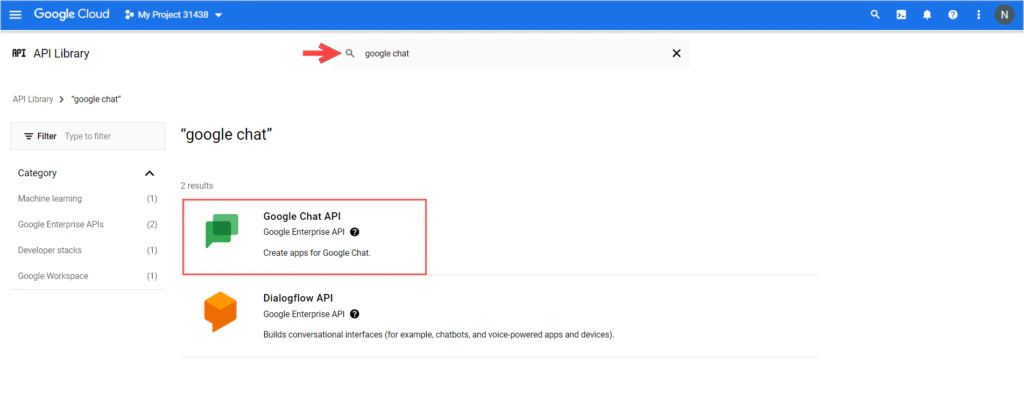 4. Click **Enable**.
5. On enabling the API, you are redirected to the **Overview** page of the **Google Chat API**.
4. Click **Enable**.
5. On enabling the API, you are redirected to the **Overview** page of the **Google Chat API**.
 ## Step 2: Set Up the API in Google Cloud
To set up the Google Chat API, you need to create credentials first, then configure its details and functionality, as follows:
1. From the Credentials page, click **Create credentials** and select **Service account**.
## Step 2: Set Up the API in Google Cloud
To set up the Google Chat API, you need to create credentials first, then configure its details and functionality, as follows:
1. From the Credentials page, click **Create credentials** and select **Service account**.
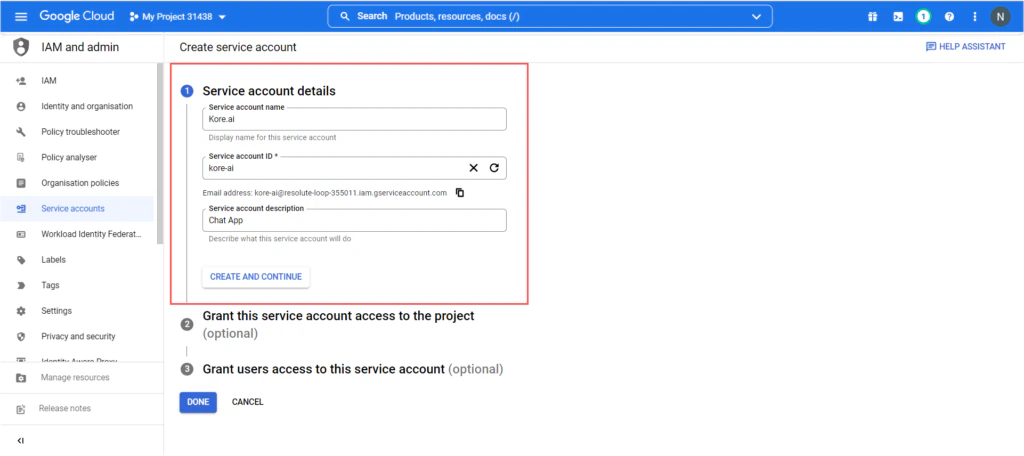
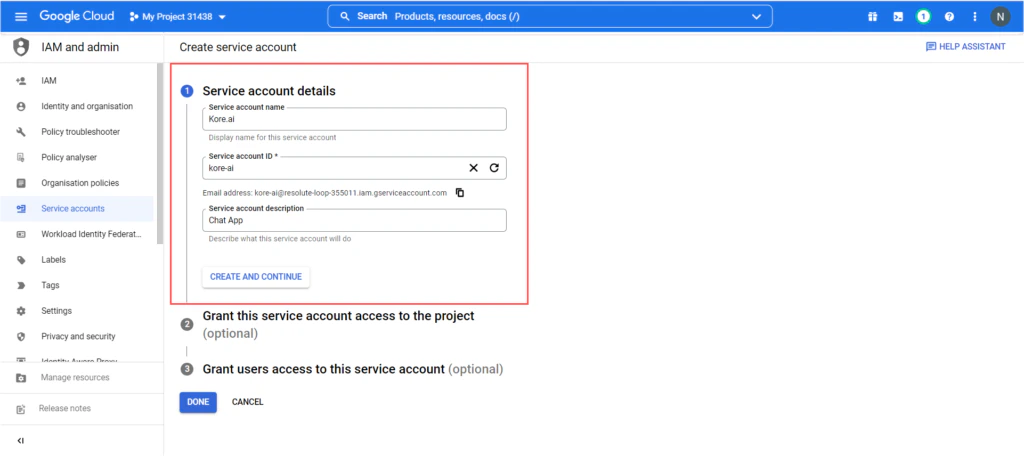 2. Provide a name for your service account, service account description, and click **Create and Continue**.
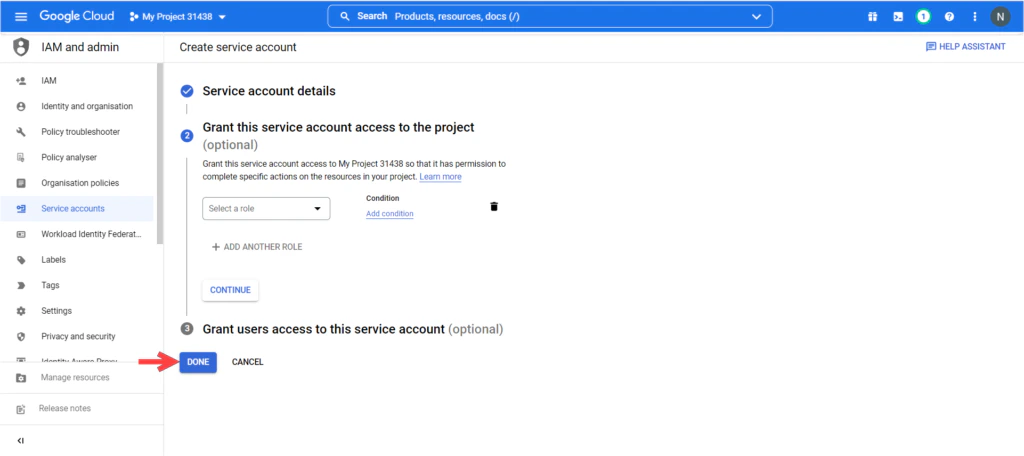
 3. Once the service account is created there are 2 optional steps:
* Grant this service account access to project
* Grant users access to this service account
4. Click on the **Done** button.
3. Once the service account is created there are 2 optional steps:
* Grant this service account access to project
* Grant users access to this service account
4. Click on the **Done** button.
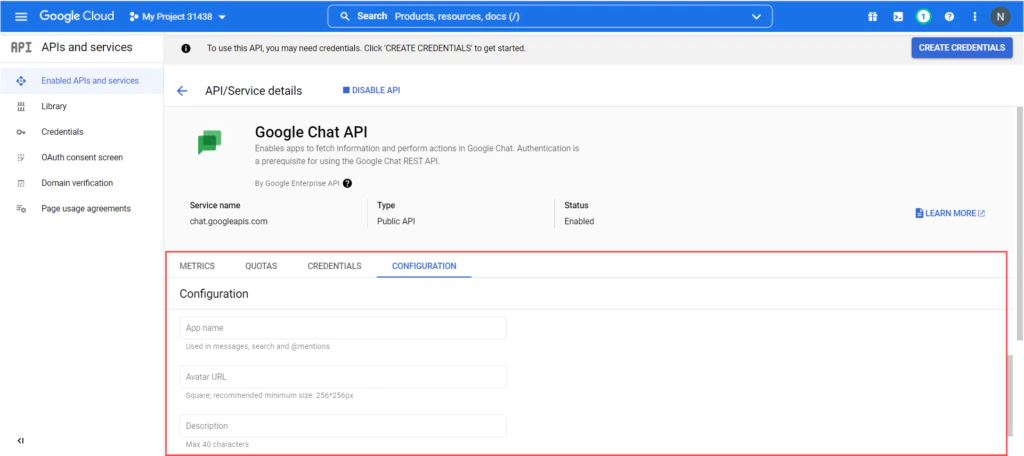
 5. Go to the **Configurations** section and provide all the required details like:
* App name
* Avatar URL
* Description
5. Go to the **Configurations** section and provide all the required details like:
* App name
* Avatar URL
* Description
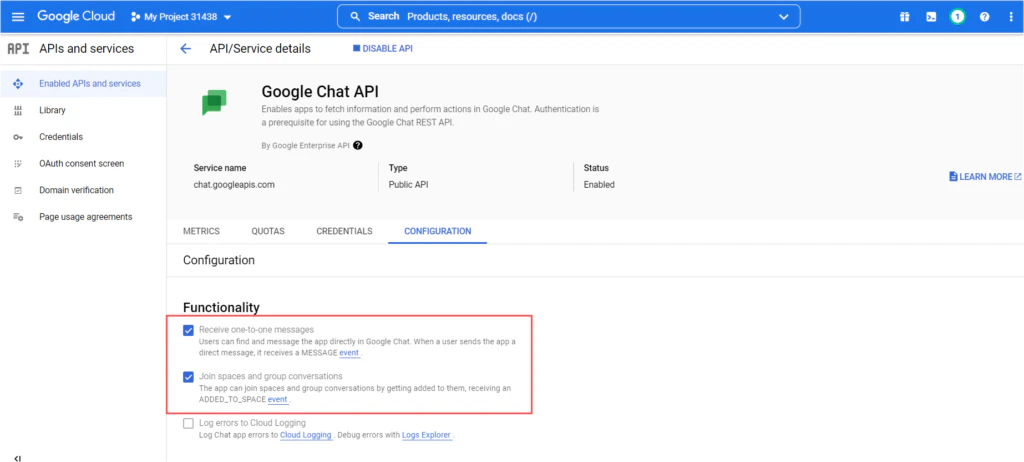
 6. Under **Functionality** choose both **Receive one-to-one messages** and **Join spaces and group conversations** options.
 7. Under **Connection Settings**:
* Select the **App URL** option.
* Go to the Kore.ai **Channels & Flows** > **Channels** > **Digital** > **All** > **Google Chat** > **Configurations** and copy the **Webhook URL**.
* Go back to **Connections Settings in Google Cloud** and paste the Webhook URL
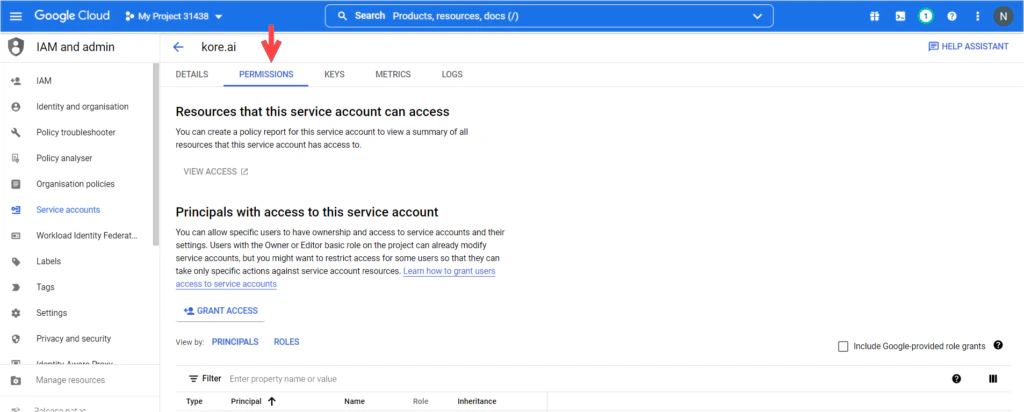
8. Select the appropriate option under **Permissions**.
7. Under **Connection Settings**:
* Select the **App URL** option.
* Go to the Kore.ai **Channels & Flows** > **Channels** > **Digital** > **All** > **Google Chat** > **Configurations** and copy the **Webhook URL**.
* Go back to **Connections Settings in Google Cloud** and paste the Webhook URL
8. Select the appropriate option under **Permissions**.
 Next, we will be configuring the API keys that the Platform will use to connect to Google Chat.
## Step 3: Create API Keys
Once your service account has been created, you need to manage the keys corresponding to your API, as follows:
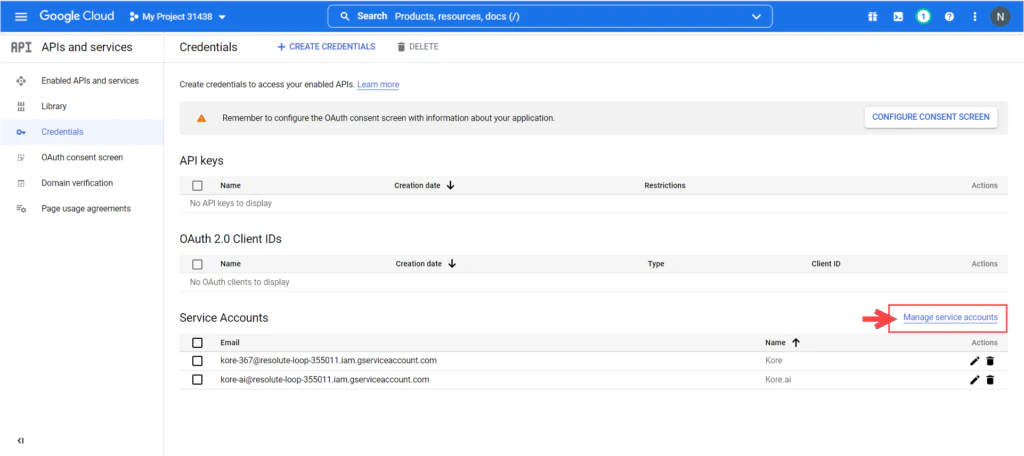
1. Navigate to the **Credentials** page and click on **Manage service accounts**.
Next, we will be configuring the API keys that the Platform will use to connect to Google Chat.
## Step 3: Create API Keys
Once your service account has been created, you need to manage the keys corresponding to your API, as follows:
1. Navigate to the **Credentials** page and click on **Manage service accounts**.
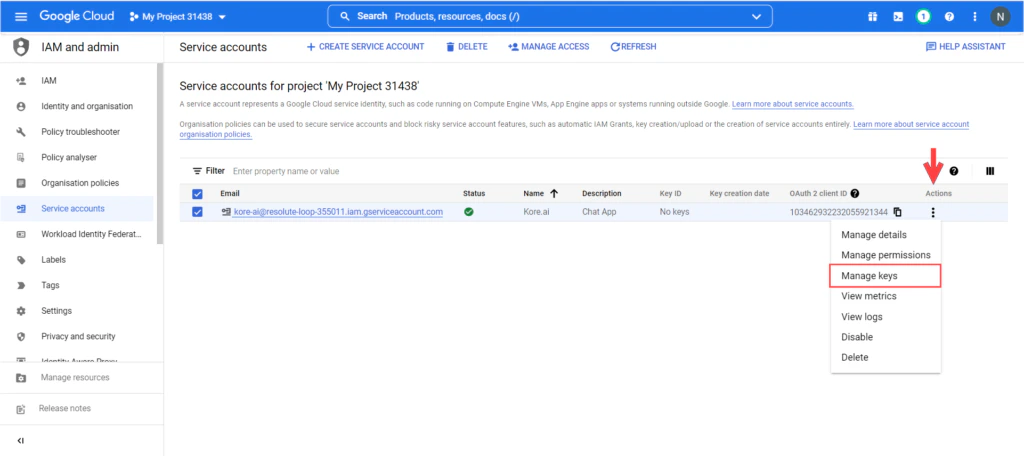
 2. From the Manage service accounts page click the **Actions** button corresponding to your newly created account, then on **Manage keys**.
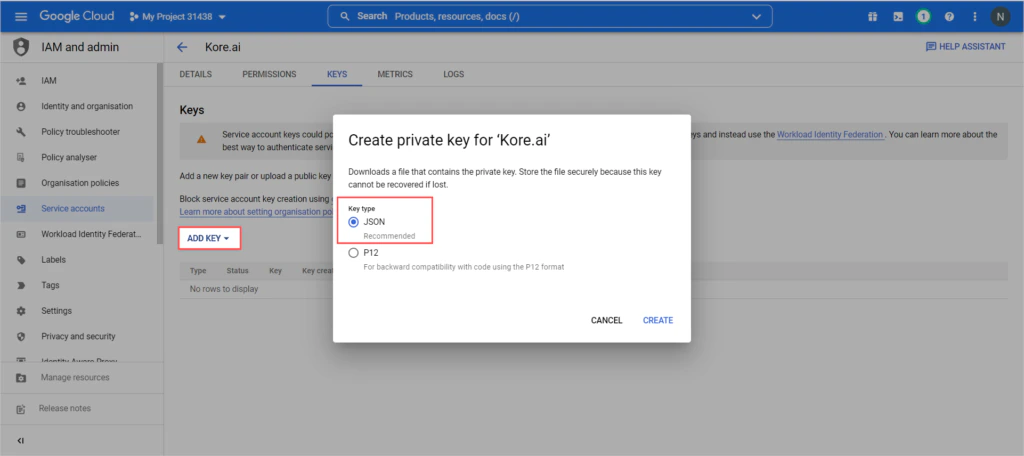
 3. From the **Manage Keys** page click on **Add Key** button, select **Create new key** from the drop down, select the JSON option, and click on **Create** button.
 A JSON file will be generated and you need to copy the **client\_email**, and **private\_key** that needs to be input into the Platform. .
## Step 4: Configure the Google Chat Channel
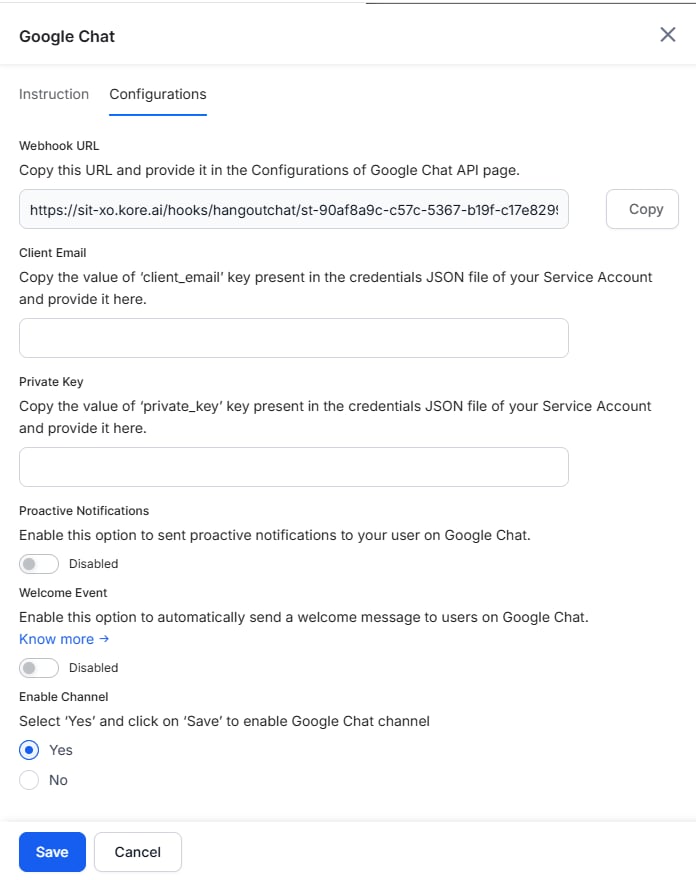
In the Platform, select the AI Agent you’re working with, then go to **Channels & Flows** > **Channels** > **Digital** > **All** > **Google Chat** > **Configurations**.
1. Enter the following configuration details:
1. **Client Email** - Copy the value of the **client\_email** field present in the credentials JSON file of your Service Account and enter it here.
2. **Private Key** - Copy the value of the **private\_key** field present in the credentials JSON file of your Service Account and enter it here.
2. Enable **Proactive Notifications** to send relevant updates to the users without requiring them to initiate interaction with the app first.
3. Enable the **Welcome Event** toggle to automatically send a welcome message and initiate start (experience) flows when users install an app(bot) integrated with Google Chat via Google Workspace.
4. Select **Yes** and select **Save** to enable Google Chat channel.
A JSON file will be generated and you need to copy the **client\_email**, and **private\_key** that needs to be input into the Platform. .
## Step 4: Configure the Google Chat Channel
In the Platform, select the AI Agent you’re working with, then go to **Channels & Flows** > **Channels** > **Digital** > **All** > **Google Chat** > **Configurations**.
1. Enter the following configuration details:
1. **Client Email** - Copy the value of the **client\_email** field present in the credentials JSON file of your Service Account and enter it here.
2. **Private Key** - Copy the value of the **private\_key** field present in the credentials JSON file of your Service Account and enter it here.
2. Enable **Proactive Notifications** to send relevant updates to the users without requiring them to initiate interaction with the app first.
3. Enable the **Welcome Event** toggle to automatically send a welcome message and initiate start (experience) flows when users install an app(bot) integrated with Google Chat via Google Workspace.
4. Select **Yes** and select **Save** to enable Google Chat channel.
 After enabling the channel and verifying all the configurations, you can optionally publish the app for the new channel. Learn more about [Publishing your App](/ai-for-service/deployment/publishing-app).