

- Entity collection: LLM gathers entities conversationally, reducing the need for multiple entity nodes.
- Tool calling: LLM identifies when to call external functions, invokes them with correct parameters, and incorporates results into its response.
- Streaming support: Tool calling with streaming lets the model generate responses progressively (V2 prompts with OpenAI/Azure OpenAI format).
- Rich UI: Pass structured JSON from the LLM to channels for cards, lists, tables, and suggestion chips (requires “Parse Rich Templates”).
- Pre/Post-processor scripts: Run custom JavaScript before and after each LLM interaction.
- Multilingual: Supports English and non-English languages.
- IVR/Voice: Configurable for voice channels (streaming prompts supported).
Quick Start Tutorials
Prerequisites
The Agent Node is disabled by default. Enable it at Generative AI Tools > GenAI Features. See Enable GenAI Feature.Setup
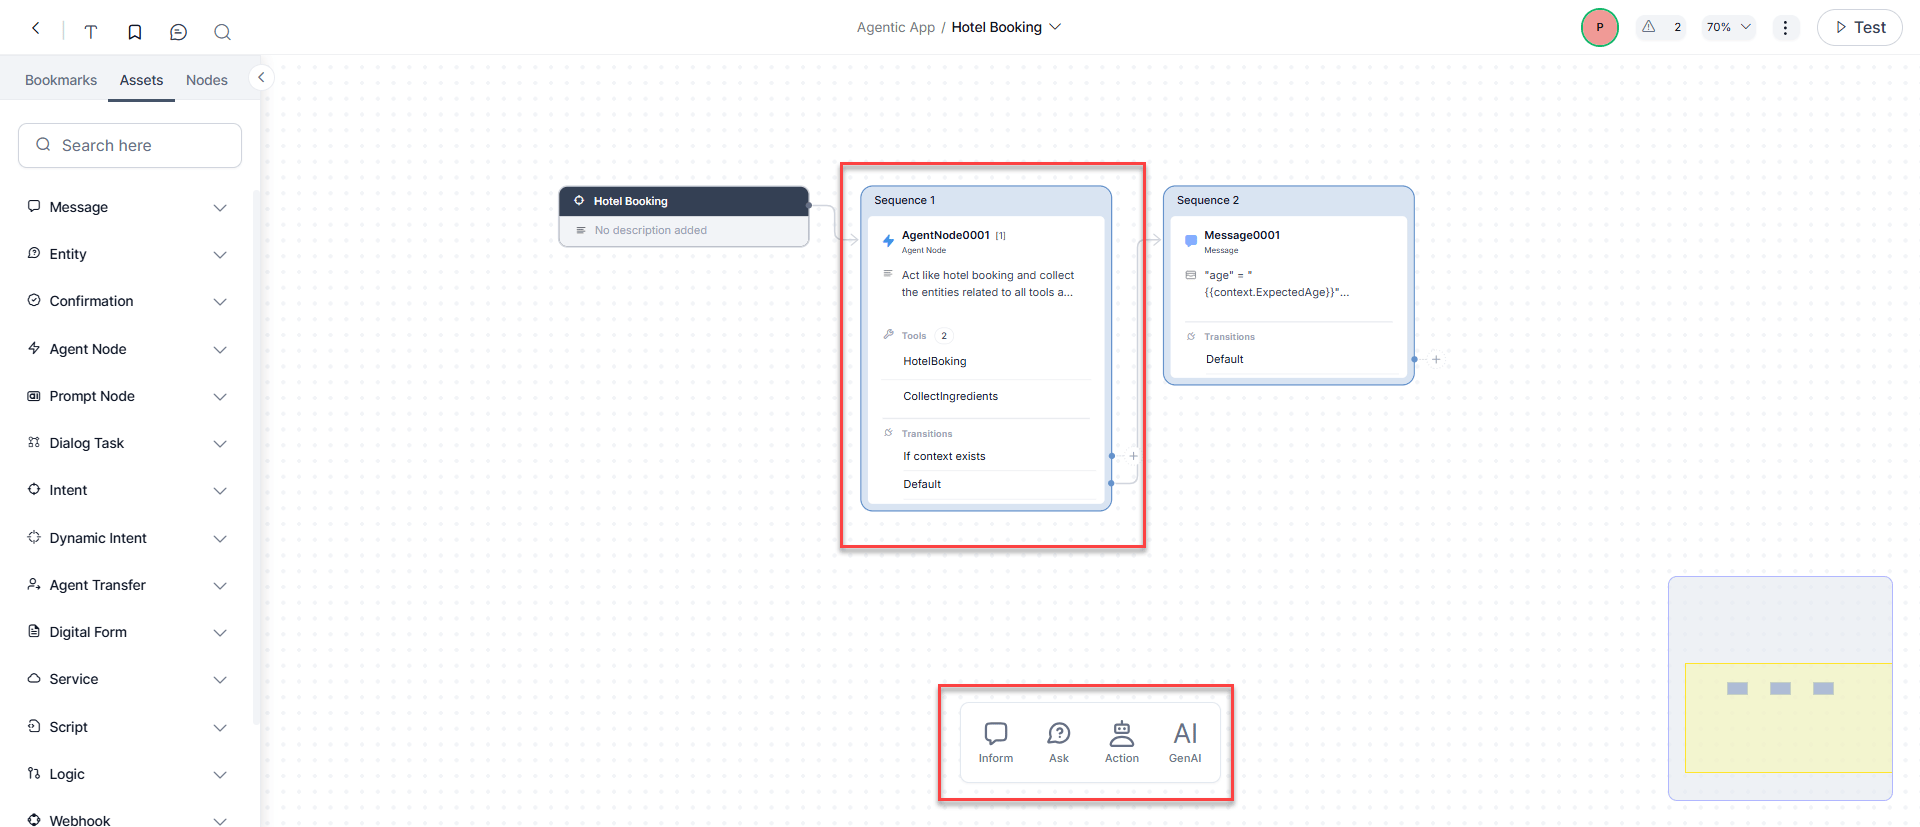
Add Agent Node to a Dialog Task
- Go to Automation > Dialogs and open the target task.
- Add the Agent Node from the node list like any other node.
Component Properties
Changes here apply to this node across all dialog tasks.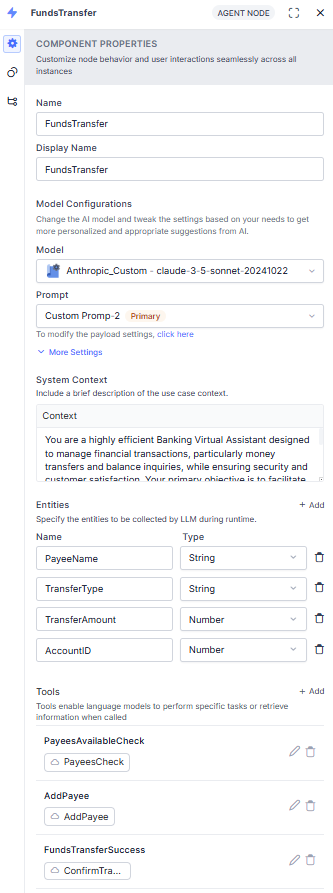
Model Configuration
Pre-Processor Script
Executes once when the Agent Node is reached, before LLM orchestration starts. Use it to format input or extract data. Same properties as the Script Node—click Define Script to configure.Entities
Entity collection via this section is applicable to V1 Prompts only.
System Context
A brief description of the use case to guide the model.Tools
Tools let the LLM interact with external services via Script, Service, or Search AI nodes. Maximum 5 tools per node. Click + Add to open the New Tool window. See Tool Configuration for full details.Rules
Business rules that govern entity collection. Click + Add and enter a concise rule, for example:- Policy number must be exactly 10 digits.
- Claim type must be one of: auto, home, health, life.
Agent Interruption Detection
Agent Interruption Detection enables the Agent Node to detect and handle interruptions using its own reasoning based on the defined Interruption Qualifier. When enabled, the platform skips intent detection for user inputs while the Agent Node is active. This reduces latency and avoids additional LLM cost when DialogGPT is enabled. The Agent Node evaluates each user input against the Interruption Qualifier during execution as part of its normal reasoning, without adding extra processing steps. However, platform continues intent detection before the Agent Node execution. If the input doesn’t match the qualifier, the Agent Node continues execution. If the input matches the qualifier, the Agent Node invokes theinterruption_identified tool to signal an interruption and applies the configured Interruption Behavior. This approach performs interruption detection within the Agent Node’s LLM without requiring a separate detection step.
Example: How to define Interruption Qualifier
During a payment flow, if the user asks unrelated questions such as how’s the weather, check flight status, or any other non-payment request, treat the input as an interruption.
This setting applies only to custom V2 streaming and non-streaming prompts.
Exit Scenarios
Conditions that stop LLM interaction and return control to the dialog flow. Click Add Scenario and enter a short, specific phrase, for example:- User wants to book more than 5 tickets—return “max limit reached”.
- User requests a human agent.
Post-Processor Script
Executes after every user input processed by the Agent Node, before the node exits. Use it to transform the LLM response stored in context variables. Same properties as the Script Node—click Define Script to configure.If the Agent Node requires multiple user inputs, the post-processor runs for each one.
Redaction of PII Data
It controls how PII-flagged entity values are displayed to end users. The global setting takes precedence over any Agent Node configuration. Refer to Redacting Personally Identifiable Information.- Yes: End users see the original, unmasked value.
- No (default): End users see only a masked/redacted version; the original value is hidden.
These settings apply to runtime display only. PII is always redacted in chat history and internal logs, regardless of this setting.
Instance Properties
These settings apply only to this node instance in this task.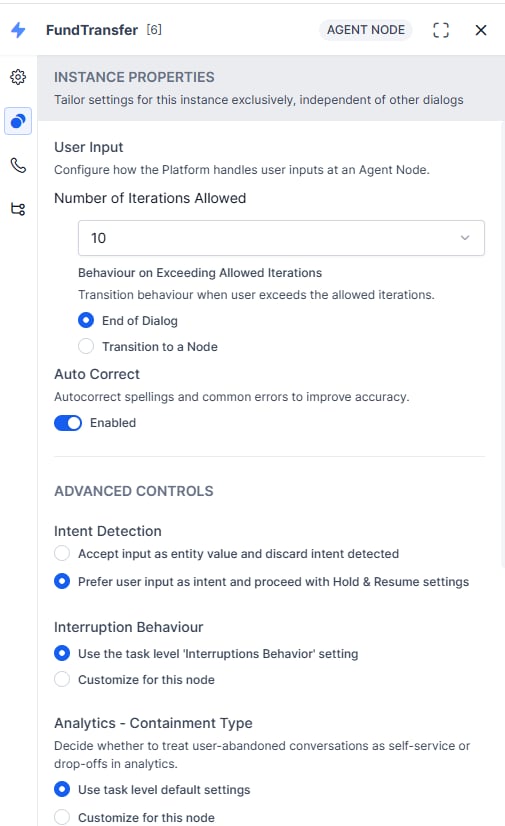
User Input
Auto Correct
Toggle to enable/disable auto-correction for spelling and common errors.Advanced Controls
Intent Detection (String and Description entities only):- Accept input as entity value and discard the detected intent: captures the user entry as a string/description, ignores intent.
- Prefer user input as intent and proceed with Hold & Resume settings (default): considers input for intent detection.
- Use task-level setting: inherits the dialog task’s Interruptions Behavior.
- Customize for this node: override with node-specific behavior. See Interruption Handling.
- Use task-level default: inherits dialog-level Containment Type.
- Customize for this node: set Self Service or Drop-off for abandoned conversations.
IVR Properties
Configure voice channel behavior: prompts, grammar, and call parameters. Agent Nodes with streaming LLM prompts support IVR Properties for voice only. See Voice Call Settings Field Reference.Connection Properties
Define transition conditions from this node (instance-specific). See Adding IF-Else Conditions to Node Connections. Default connection variants:- Not Connected: no next node defined.
- End of Dialog: explicitly ends the dialog.
- Return to Flow: ends the Dialog Task and returns to Flow Builder at the next node.
- Deflect to Chat: transitions from voice to chat. Types: Automation or Agent Transfer. Requires Voice Gateway (Phone number or SIP Transfer).
Prompt Setup
V1 vs V2: Quick Comparison
Choose V1 when:
- You need JSON mode (text generation only).
- You need full control over response parsing via response keys.
- You are maintaining an existing flow with explicit entity handling.
- You need tool calling and streaming together.
- You want simplified configuration (no manual exit scenario/entity keys).
- Entity collection should be fully integrated into tool invocations.
Prompt Design Principles
Apply prompt engineering to define: Context:- The agent’s role (AI Agent, voice assistant) and communication channel.
- Expected response length, verbosity, and formality.
- The primary function (customer support, appointment scheduling, troubleshooting).
- The company or service represented.
- Whether the agent should proactively clarify ambiguous inputs.
- Interaction goals, level of personification, power dynamics.
- Core character traits (professional, friendly, humorous).
- Tone and key behavioral traits.
V1 Prompt: JSON Mode
Supports text generation only.- Define dynamic input keys (platform populates at runtime).
- Provide test values to validate the prompt structure.
- Configure output keys:
- Text Response Path: location of the AI response in the JSON payload.
- AI Agent Response: the key to display to the user.
- Exit Scenarios: when to end the interaction.
- Collected Entities: key-value pairs of captured entities.
- Add a post-processor script if additional transformation is needed. The returned output must include the exact keys defined in the configuration.
V1 Prompt — JavaScript Mode
Use when you need:- Tool calling.
- Access to full conversation history as an array.
- Advanced prompt logic.
V2 Prompt — JavaScript Mode
V2 is built entirely around tool calling. The platform handlesend_orchestration (exits the node) and custom tools automatically.
Sample V2 JavaScript Prompt:
V2 Tool Types
V2 Response Format
Select the response payload format in the prompt configuration:Add a Custom Prompt
Custom prompts are required for tool-calling functionality. You write JavaScript that builds a JSON object sent to the LLM. See Prompts Library for full reference. Execution order when both node-level and prompt-level processors are configured: Node Pre-processor → Prompt Pre-processor → Prompt Execution → Prompt Post-processor → Node Post-processorNode-level scripts support App Functions in addition to context, content, and environment variables.
Add a V1 Custom Prompt
- Go to Generative AI Tools > Prompts Library and click + New Prompt.
- Enter the prompt name. Set Feature to Agent Node and select the model.
- In Request > Advanced Configuration, select Prompt Version 1.
- Disable Stream Response (V1 doesn’t support tool calling and streaming simultaneously).
- Click JavaScript, then Continue on the Switch Mode dialog.
- Write your JavaScript. Sample context values appear for reference. See Dynamic Variables.
- Enter test values and click Test to preview the JSON sent to the LLM.
- In the Actual Response panel, double-click the key for the text response path, then click Save.
- (Optional) Toggle Parse Rich Templates, then configure the post-processor script per channel.
- Set the Exit Scenario Key-Value, Virtual Assistant Response Key, Collected Entities, and Tool Call Request key.
- Click Test → verify key mapping → click Save.
- In the Agent Node dialog, select the model and this custom prompt.
If the default prompt is selected with tools configured, the platform shows a warning that tool calling requires a custom prompt with streaming disabled.
Add a V2 Custom Prompt
- Go to Generative AI Tools > Prompts Library and click + New Prompt.
- Enter the prompt name. Set Feature to Agent Node and select the model.
- In Request > Advanced Configuration, select Prompt Version 2 → click Proceed on the Switch Version dialog.
- Toggle streaming on or off as needed.
- Enabling streaming disables: Exit Scenario, AI Agent Response, Collected Entities, Tool Call Request, and the post-processor script.
- Click Import from Prompts and Requests Library to use a pre-built V2 template (includes auto-imported post-processor).
- Select Feature, Model, and Template - V2. Preview if needed, then click Confirm.
- Modify the imported prompt as required.
- (Optional) Click Configure under Pre-Processor Script to add a pre-processor.
- Enter sample context values and click Test. See Dynamic Variables.
- In the Actual Response panel, select the Response Format:
- Streaming enabled: select OpenAI or Azure OpenAI → Save.
- Streaming disabled: select OpenAI/Azure OpenAI → Save; or select Custom → enter Text Response Path and Tool Call Request key → Save.
- (Optional) Toggle Parse Rich Templates for rich UI support.
- (Optional) Map Request Tokens key (
usage.input_tokens) and Response Tokens key (usage.output_tokens) if using Token Usage Limits on a Custom Model. - Click Test → verify key mapping → click Save.
- In the Agent Node dialog, select the model and this custom prompt.
Parse Rich Templates
Enables the node to pass structured JSON responses to client channels for rich UI rendering (cards, lists, tables, suggestion chips). Toggle Parse Rich Templates in the custom prompt settings. In the post-processor, select the channel type and enter the rendering script. Sample V1 post-processor with rich templates:Reference: Dynamic Variables
Available in pre-processor scripts, post-processor scripts, and custom prompts. See Using Bot Variables.Reference: Output Keys
Reference: Context Object
Reference: Expected Output Structure
V1 Prompt Output Formats
V2 Prompt Output Formats
Sample V2 conversation history (with tools):
Tool Configuration
Tools allow the LLM to call external services (Script, Service, or Search AI nodes). Max 5 tools per Agent Node. Navigate to Agent Node > Component Properties > Tools and click + Add.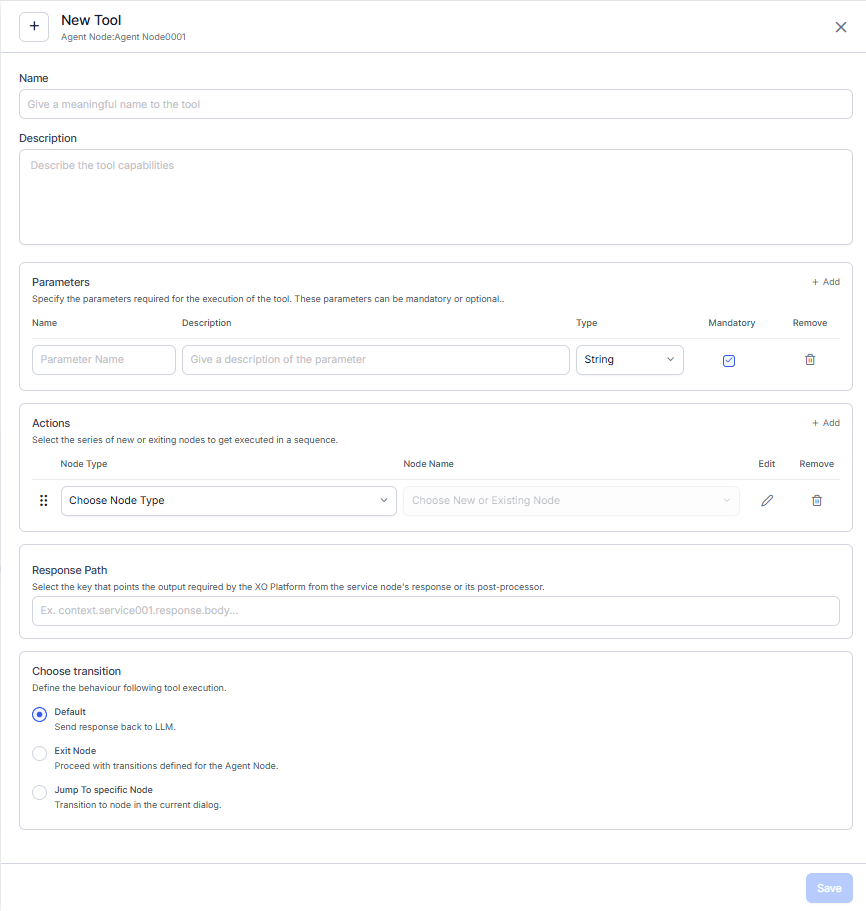
Tool Fields
Parameters
Define up to 10 parameters per tool.Actions
Actions are nodes executed when the LLM calls the tool. Up to 5 actions per tool, chained sequentially—the output of one becomes the input of the next.Transitions
Define what happens after tool execution:
Jump to Node is useful for complex workflows where tool results need to route to specific dialog branches.
Execution Flow
At runtime, the Agent Node orchestrates a loop between the platform, LLM, and external tools:- Input Processing: User input passes through the Pre-Processor script (runs once per orchestration start).
- Entity Collection: The platform invokes the LLM to identify and collect required entities using the configured business rules. Conversation continues until all entities are captured.
- Contextual Intents: Dialog or FAQ intents recognized in user input are handled per Interruption Settings. Flow returns to the Agent Node after completion.
- LLM Decision: The LLM decides whether to:
- Respond with text: sends the response to the platform, which renders it to the user.
- Call a tool: sends a tool request; the platform executes the linked action nodes (Script/Service/Search AI), retrieves output.
- Output Handling: Based on the selected transition, the platform either exits the node or appends the tool output to the prompt and sends it back to the LLM.
- Post-Processing: The Post-Processor script runs on every LLM response before it’s shown to the user.
- Exit Conditions: The node exits when:
- A defined exit condition is met.
- The user exceeds maximum retry volleys.
- Repeat: Steps 1-7 repeat for each conversation turn.
Debugging
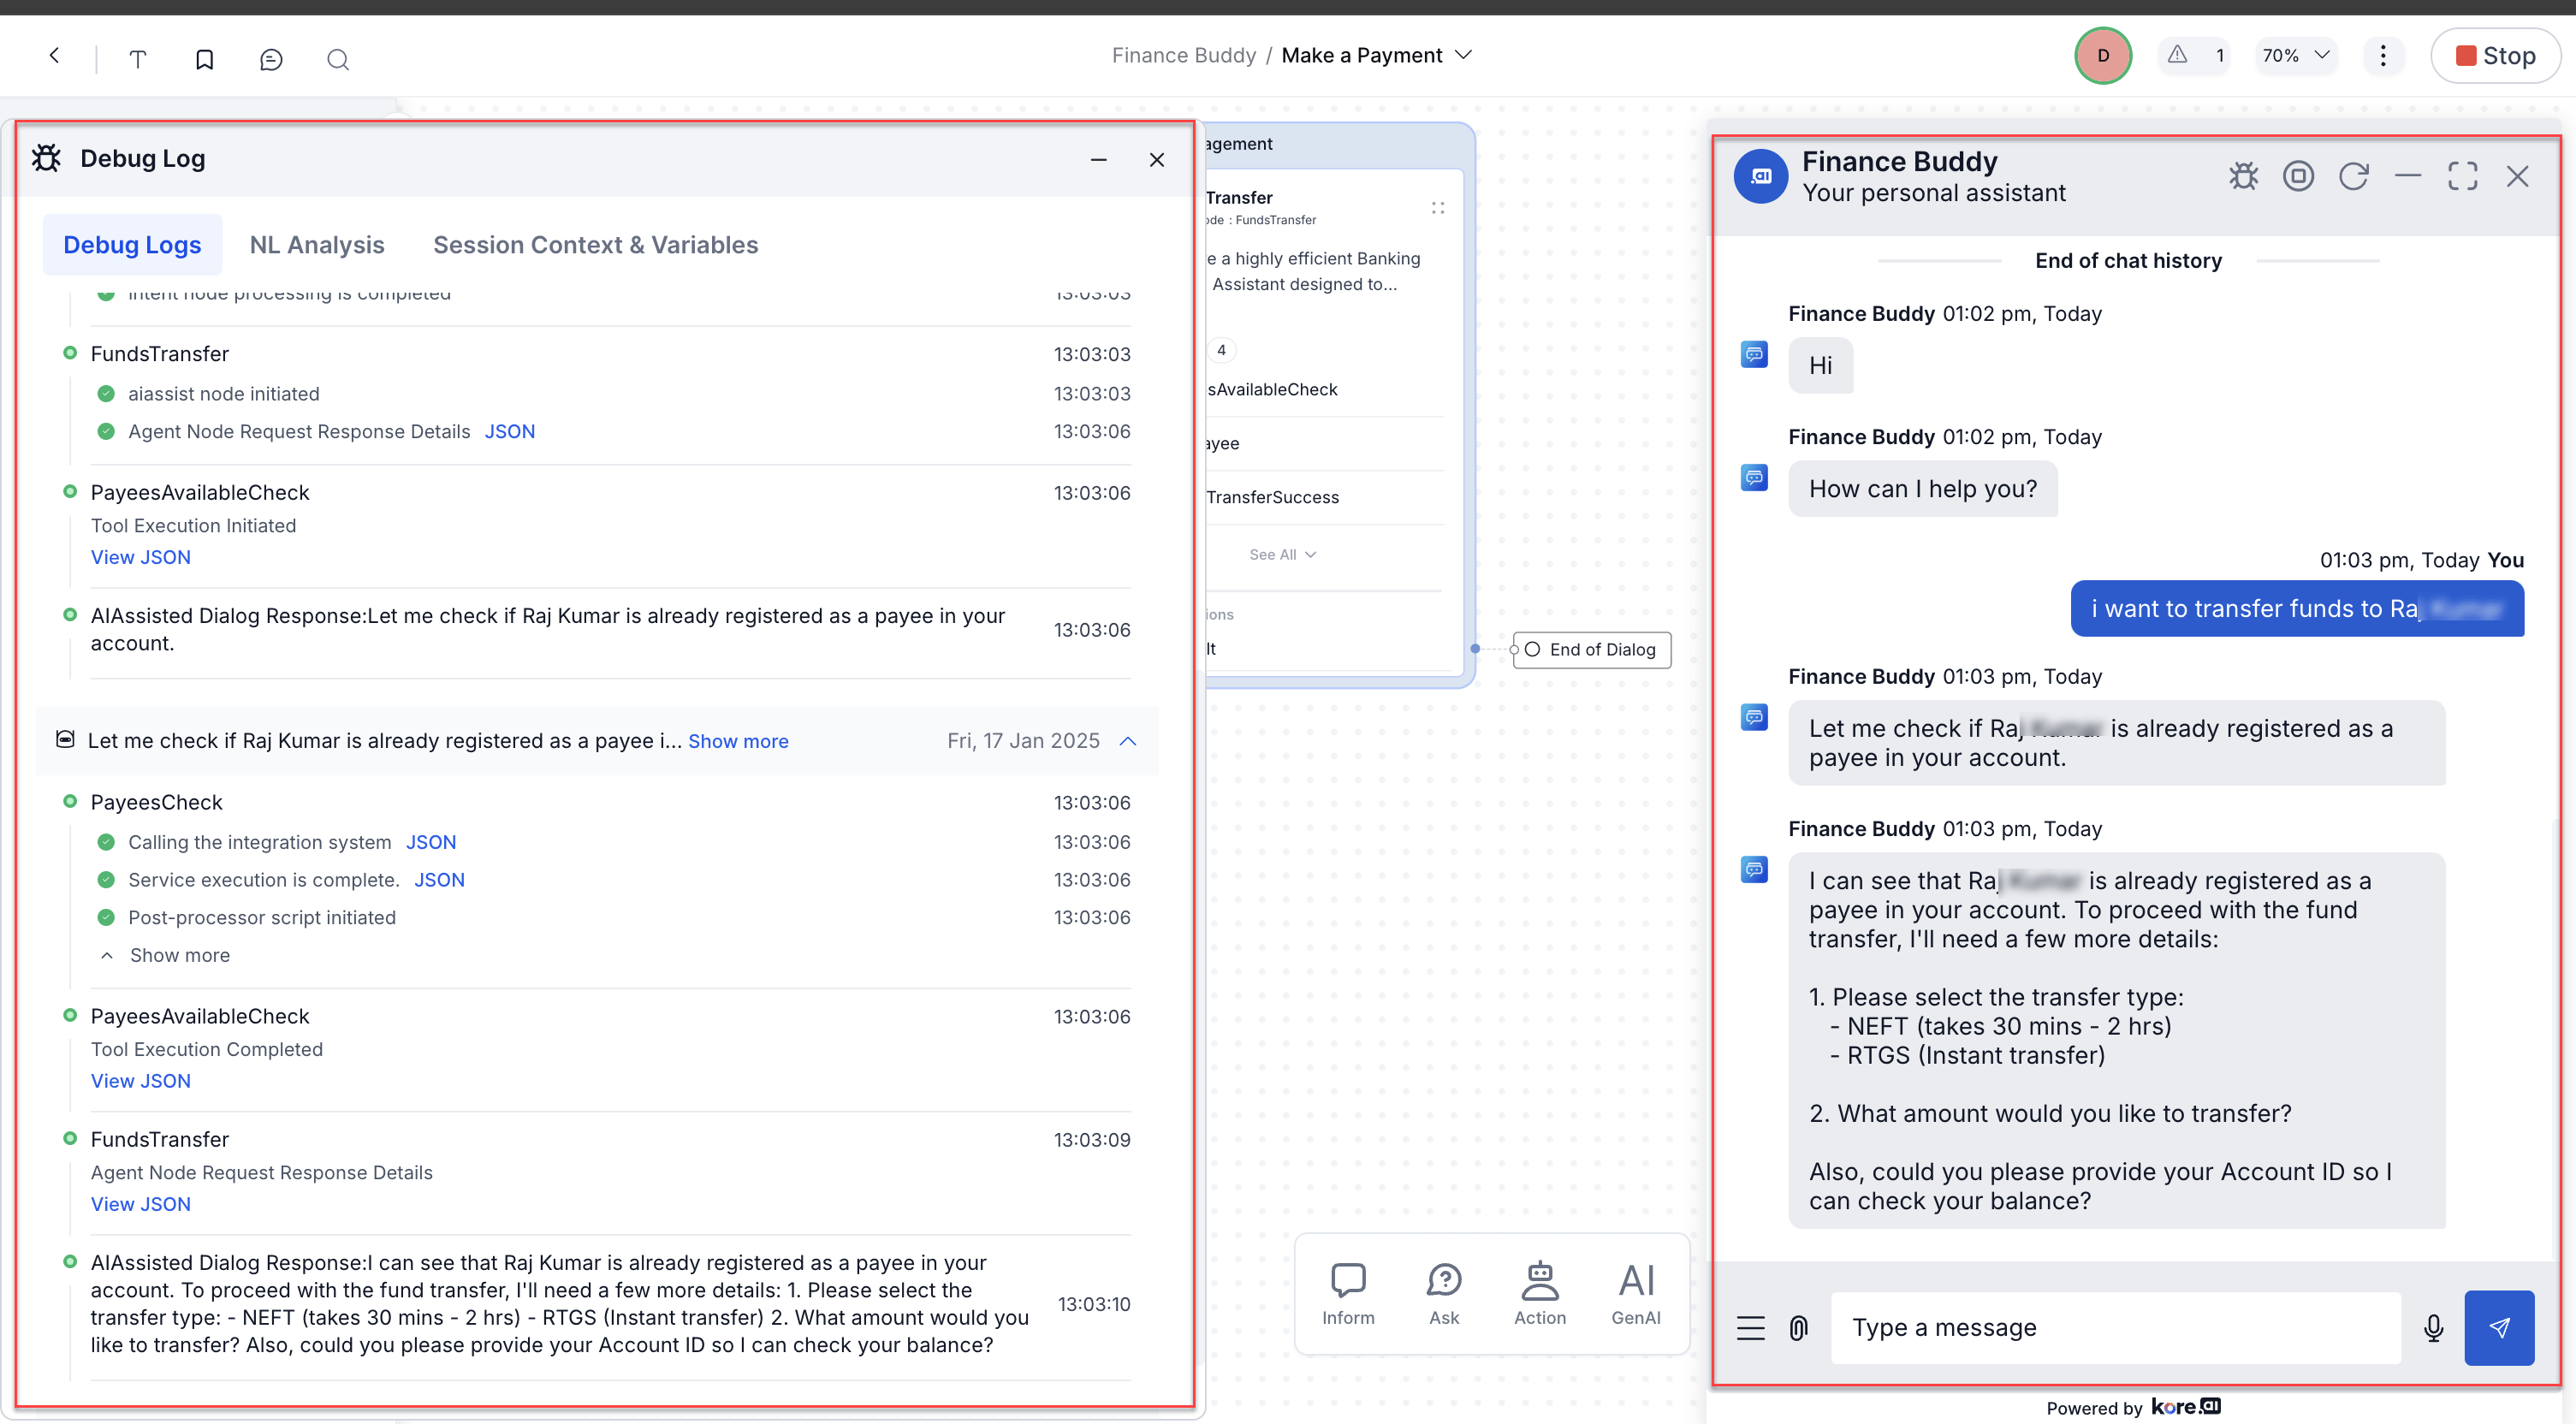
Use the Talk to Bot panel with debug logs enabled to trace execution. Debug logs capture:- Full conversation history array.
- Tool calls made and their results.
- Request/response JSON for each LLM call.
- User: “Transfer funds to John.”
- Agent Node initiates.
- LLM request/response JSON logged.
PayeesAvailableChecktool called → result logged (John is a registered payee).- LLM asks for transfer type, amount, and account ID.
- User provides details.
FundsTransfertool called → result logged.- Conversation history updated → Agent Node exits.
Best Practices
Model Selection
Prompt Engineering
- Be specific: vague instructions produce inconsistent responses.
- Include examples: show the LLM example inputs and expected outputs.
- Layer instructions: general guidance first, then specific constraints.
- Choose V2 for new projects: it offers better tool integration and simplified configuration.
- Use JavaScript mode for complex scenarios: more flexible than JSON mode for tool-based workflows.
- Start from templates: especially for V2; they include pre-configured post-processors.
- Test with diverse inputs: cover edge cases, not just the happy path.
- A/B test critical prompts: compare versions for high-volume interactions.
Tool Design
- Name tools clearly: the LLM reads the name to decide when to call it.
- Write comprehensive descriptions: the description is the primary signal for tool selection; be detailed.
- Keep tools focused: one tool, one function. Avoid combining multiple capabilities.
- Limit parameters: only include parameters that are truly necessary.
- Match data types: use
string,integer,booleanappropriately. - Test action nodes independently: verify each node works before integrating it into a tool.
- Choose transitions intentionally:
- Default: conversation continues naturally.
- Exit Node: tool marks end of LLM’s work.
- Jump to Node: complex routing based on tool results.
Agent Node Design
System Context:- Define the agent’s role precisely.
- Set tone, style, and behavioral boundaries.
- Include domain-specific background knowledge.
- Keep it complete but concise—avoid overwhelming the model.
- Define scope: what the agent should and shouldn’t do.
- Include data validation requirements (formats, ranges, constraints).
- Enforce compliance requirements explicitly.
- In V2, use tool parameters for entity collection—no separate entity section needed.
- Frame entity collection within the interaction’s purpose for better accuracy.
- Group related entities to create a natural conversation flow.
- Validate immediately where possible.
- Define precise exit conditions.
- Always include a frustration-detection scenario (prevent negative UX loops).
- Set retry limits that balance task completion with user patience.
- Define clear post-exit routes (human handoff, alternate process).
Conversation Flow
- Minimize volleys: collect information efficiently; avoid unnecessary back-and-forth.
- Handle context switching: allow the agent to recognize topic changes gracefully.
- Support multi-intent utterances: configure to handle multiple requests in one message.
- Design for ambiguity: prepare natural fallback responses for unclear inputs.
- Use confirmation strategically: confirm critical information without making the conversation tedious.